Building a banjo, part 4: making it banjo shaped
Finishing up the rim
Now that we’re glued up, we can come back and finish these pieces!
Roughing out the laminations
Most rims are around a half inch thick and round, not octagons. It’s time to get a rough cut of each lamination so that they are easier to glue together and sand evenly.
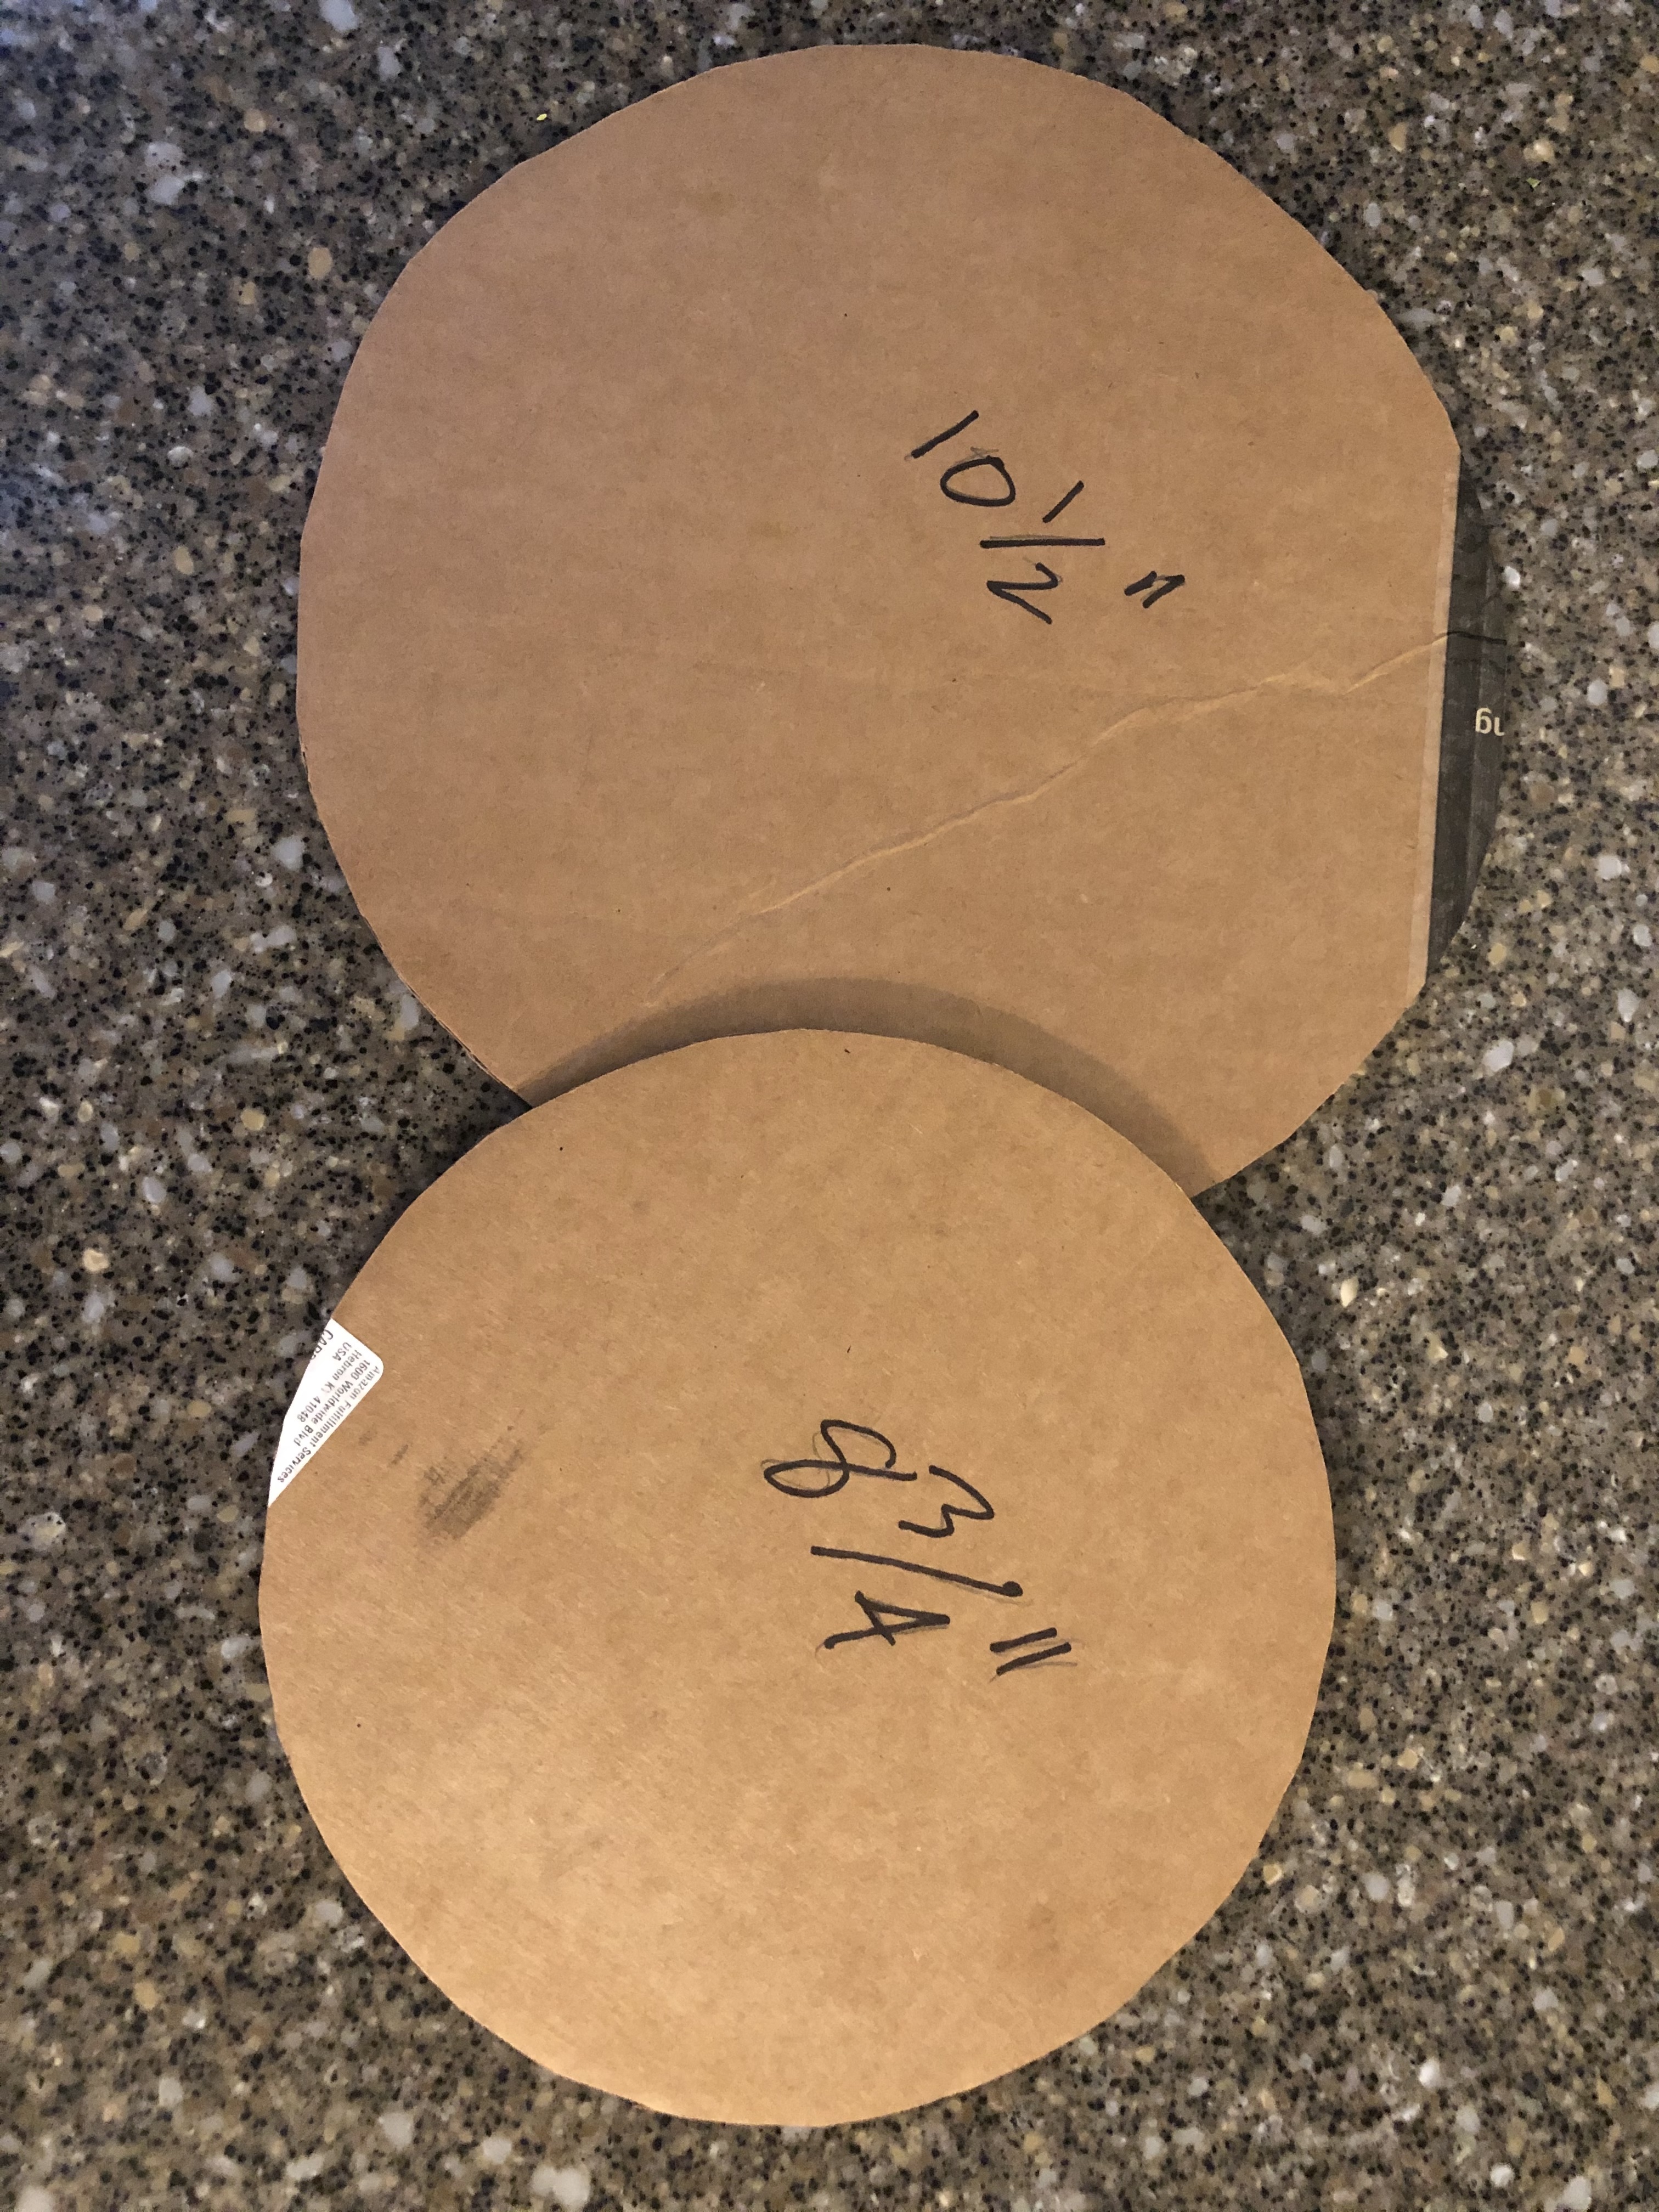
Before you can cut, you have to mark. There are plenty of ways to do this, but I found it easiest to simply make a guide out of cardboard (Amazon boxes). Use a compass to cut a circle with your outer diameter and another with the inner diameter. Leave some give, so plan on a 3/4” rim for now. You’ll slowly work it down to size after they’re glued together. The last thing you want is a dip in one lamination.
The two here are 10 1/2” and 8 3/4”, leaving 1 3/4”. Remember that this divides in half (there are two widths of rim within the diameter), so they make a 7/8” rim. It’s pretty easy to get this down using power sanders, but not so much by hand, so you’ll have to balance the reward of starting closer to the target thickness against the risk of ending up things not lining up quite right. Remember, too, that you’ll be gluing a skin on, so it doesn’t need to align with a standard size measurement.
The easiest way to do this (by far) is to use a spindle sander for the inside and band saw for the outside, but those are expensive. (Lots of videos use a lathe with a giant chuck or big old piece of wood glued to paper to hold it on, though.)
You just run the outside through the bandsaw to get a rough circle, then pop each octagon over the spindle and hog out wood until you have a circle. No worries about cleaning things up yet. That will come after gluing.
I can think of a few ways to do it without those specific power tools. Sawing the angles off until you get close to the outer ring size isn’t a big deal. A coping saw should do the trick for the inside. You could also use a hand saw to “kerf” the inside with little cuts right up to the line, then use a chisel to knock out the waste wood.
Gluing up the rim
Once you have the rough shapes cut, it’s time to glue the laminations together. This is pretty straightforward. First, do lots and lots of sanding to make sure that the glue surfaces are clean and even. Then do more. And again. And some more.
Stack the laminations up and think about how you want to align them. If you’re doing a fancy checkerboard, this is the time to get it set. You want the segments to overlap in each layer so that they provide extra strength for each other. Go ahead and mark a few lines so that you know where the layers intersect once you put glue on.
Then, spread some glue on each side of the glue surface and set them up. Put the clamps on loosely, to hold, then tighten them little by little, moving around the rim as you do it. Glue slides, so getting one cranked down may mean that you’re off a bit and can’t move it. Take your time and get them tight. Wipe off the excess as it bleeds out and leave it overnight. (If I knew that I were writing this, I would have taken more pictures of each of these steps!)
Sanding
Pull out the belt sander, if you have one, and start shaping the rim. You want a nice clean circle. The inside is a pain without a spindle sander, but way-too-much hand sanding will get you there. Start with the coarsest sandpaper and don’t step it up until you’re pretty much where you want to be. (I go from 80 to 220.) It’s definitely worth using a sanding block here: either wrap a piece of sand paper around a scrap piece of wood or glue it right onto a scrap. This keeps your sanding straight and efficient.
Once the walls are even, smooth, and feel really nice, you can think about the top and bottom. The bottom is flat. A few runs on the edges with sandpaper will pull off the sharp edge, but if you’re hand sanding, you probably knocked that corner off already.
The top is different. You want a banjo rim to come in contact with the skin evenly and only in one spot. For this reason, you need to be absolutely sure that the top is flat. The easiest way to do this is to put it on a flat surface (a piece of glass is good, but a trustworthy table works, too). If it rocks, you need to sand off the high spots that make it rock.
Then, you only want the rim to hold the skin at it’s outermost part. Most banjos use tone rings to do this: a brass hoop or something similar that sits on the rim and holds the skin. We’ll do a “wooden tone ring” by angling the top down as you move from the outer to the inner edge.
I’ve found it to be pretty quick work on my mounted belt sander. You can hold the rim at an angle and just wind it through to “cut” (sand) the bevel. Hand sanding (by finger or with a block) would do the job too. The bevel doesn’t matter so much; you’re just trying to get the wood out of the way of the skin so that it can ring nicely. Once you’re done, run the sand paper over the top a few more times to wear away any sharp points that could tear the skin and flip it upside down again to ensure that it’s perfectly flat.
The rim is good for now. We’ll come back to it when it’s time to cut some holes for the dowel stick, but that’s not until after the neck is done.
Back to the neck
Cutting the peghead profile
The first major cut you’ll make is for the face of the peghead. You want a straight line from the middle of the tip up through where the nut will go. This next series of cuts is easiest with a bandsaw, but again, it’s very much doable with a handsaw. The goal here is to make sure that when you exit the cut on the face of the neck (where the nut will go), your line goes straight across the neck, perpendicular to the sides. Once you do the face, you can do the back and decide whether you want a hand stop or (as in this drawing), you just curve into the back of the neck.
Peghead face and fingerboard
I like the look of a peghead top and fingerboard that’s about 1/4” thick. This may mean some sanding or hand planing. More importantly, it has to be really really flat. It’s a fingerboard, after all. You could put a radius on it (like a guitar), but I don’t think that’s particularly necessary for a fretless. If the wood is really hard (which it should be), then this could take a while. Clamp it down, dig in, and see you in a few days. For these builds, I used the same piece of wood for both. I like the look of this, because the grain patterns connect across the neck and down the peghead.
The face cut should be perfectly flat. That will mean a bunch of sanding or planing. Again, you want this to glue completely and solidly to the wood for the face. You can worry about the back later. In fact, you may want to wait on cleaning the back up so that you can fix any tear out that happens when you cut out the peghead shape.
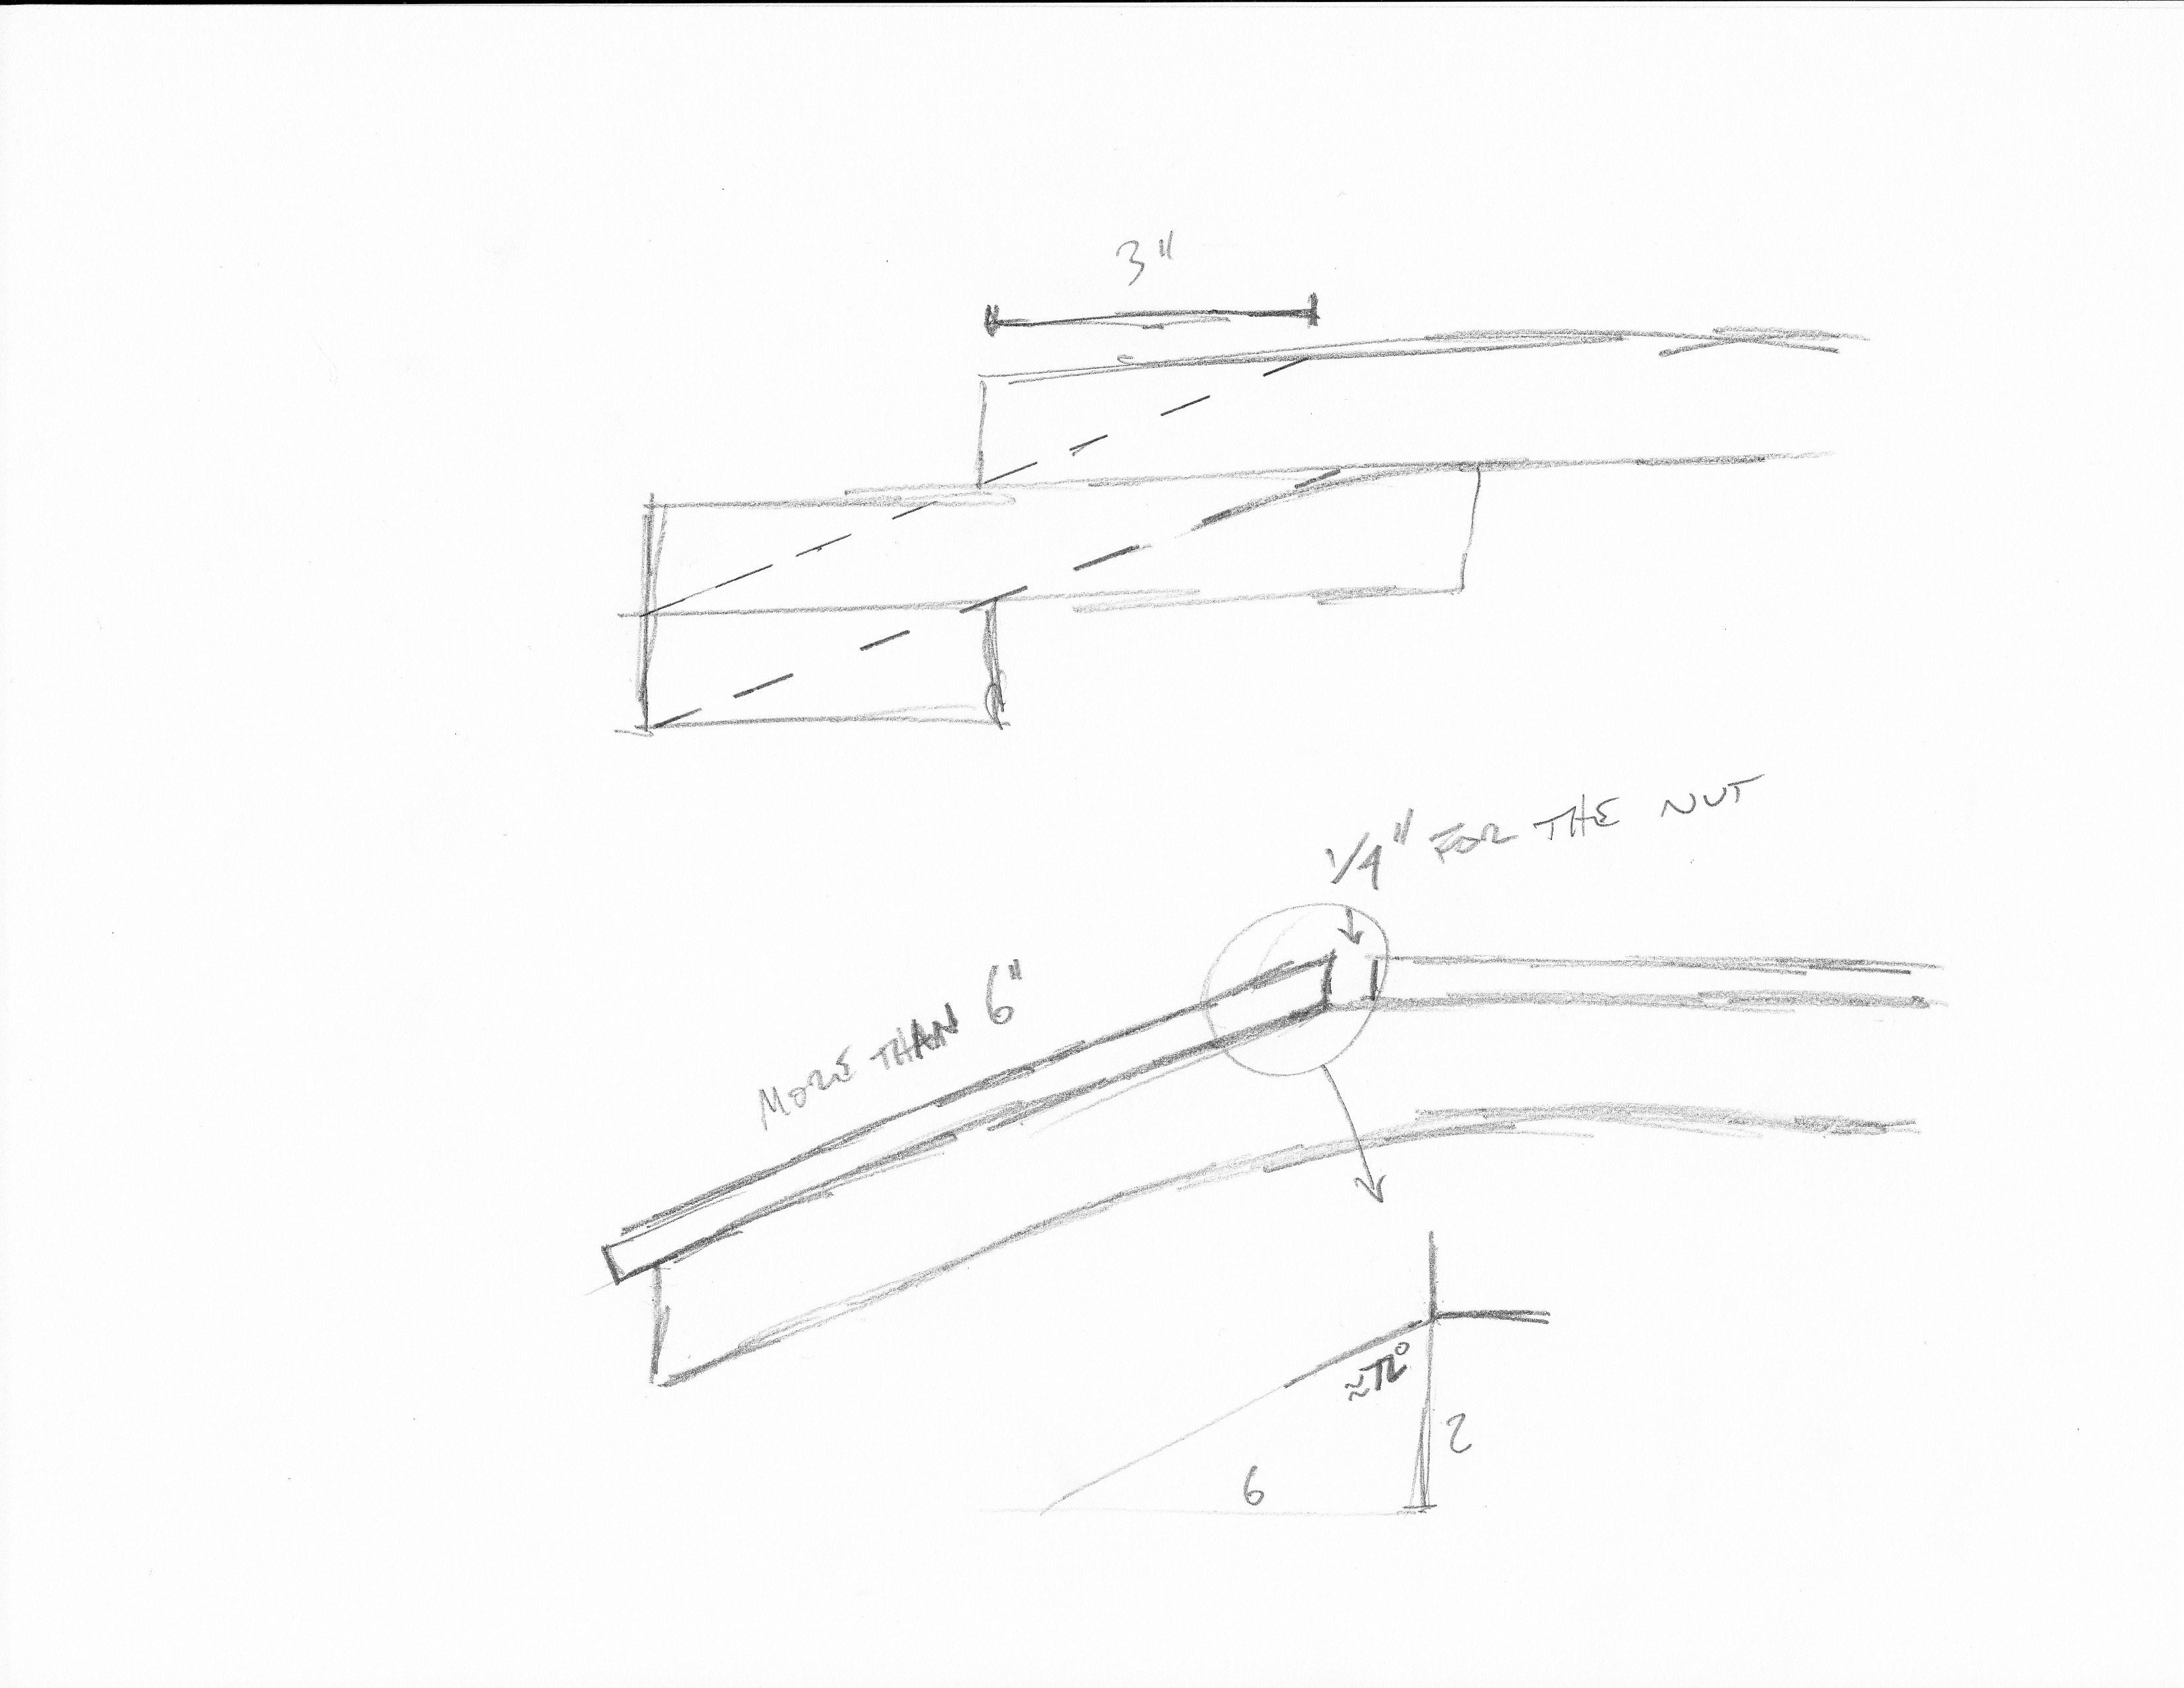
Now it’s time to cut a piece of your fingerboard material for the peghead face. In this plan, the face is just under 6 1/2”. (It’s actually 2 * the square root of 10, but who’s counting?) When you cut this piece, the end that will face the rest of the fingerboard needs to be angled. I drew the triangle (representing the peghead). The saw needs to be about 18 or 19° off from 90°. This is a mitre saw cut.
Since the rest of the fingerboard is squared off, adjust the saw back to 90°, move about a 1/4” down (to keep the grain in line), and trim off that angle. Then you can cut your fingerboard piece to length. You can go the entire length of the neck or make it a little shorter, if you plan on making a deep scoop. (Shallow scoops that don’t go all the way through the fingerboard material are even more common.)
Get the glue and clamps back out, line up the peghead face and glue. Then, use all those clamps again to get the fingerboard. This one is the longest glue job you have, so be careful to space out as many clamps as you can across it. Any gaps will show up when you start cutting the neck into shape.
Roughing the heel and scoop
With the neck on its side, you can draw the shape that you would like for the heel. The main two options are rounding it over or coming to a sharper point (like a boat). Do an image search online for custom banjos and you’ll see a whole host of options. While you’re there, take a look at peghead shapes. We’ll come back to that. Do the same for the scoop.
For all of these cuts, and many others as we get to the sides, there’s a good hand tool technique that uses the kerf of the saw to make life easier. Basically, you cut a whole bunch of lines up to your actual cut line so that you can more easily cut or chisel out the waste. The site I referenced above has a page with some great pictures of this. It’s far easier to see than explain. I like a shallower move down the neck with a steeper dip into the heel than in these photos, but I don’t have any from this step. I’ll have to take some next time.
Repeat this process to cut out the slope of the back of the neck and the scoop.
Planning the neck
It’s time for some of the most interesting design choices: choosing a neck shape and a peghead shape. First, keep poking around internet image searches. Just look at lots of stuff and see what you think.
I already linked to the Romero site, but here’s another one that’s full of some wild building: Jeff Menzies Instruments. His main page seems to be down right now.
While looking, keep an eye out for how the fifth string peg works. Since we’re using violin pegs, the side gears are not really an option. I’ve seen pegs going into the sides, but I think you’d need to cut off the end of your reamer to do that and, well, I’m not willing to.
The Banjo Database is another great place to look. These are mostly older minstrel-style banjos. Some of them have tons of pictures and Greg Adams and his team (who started the page) went and visited many of these to take measurements. I used this site extensively when getting started because of how helpful the measurements are.
Pete Ross’s gourd banjos are also a good place to look for some ideas.
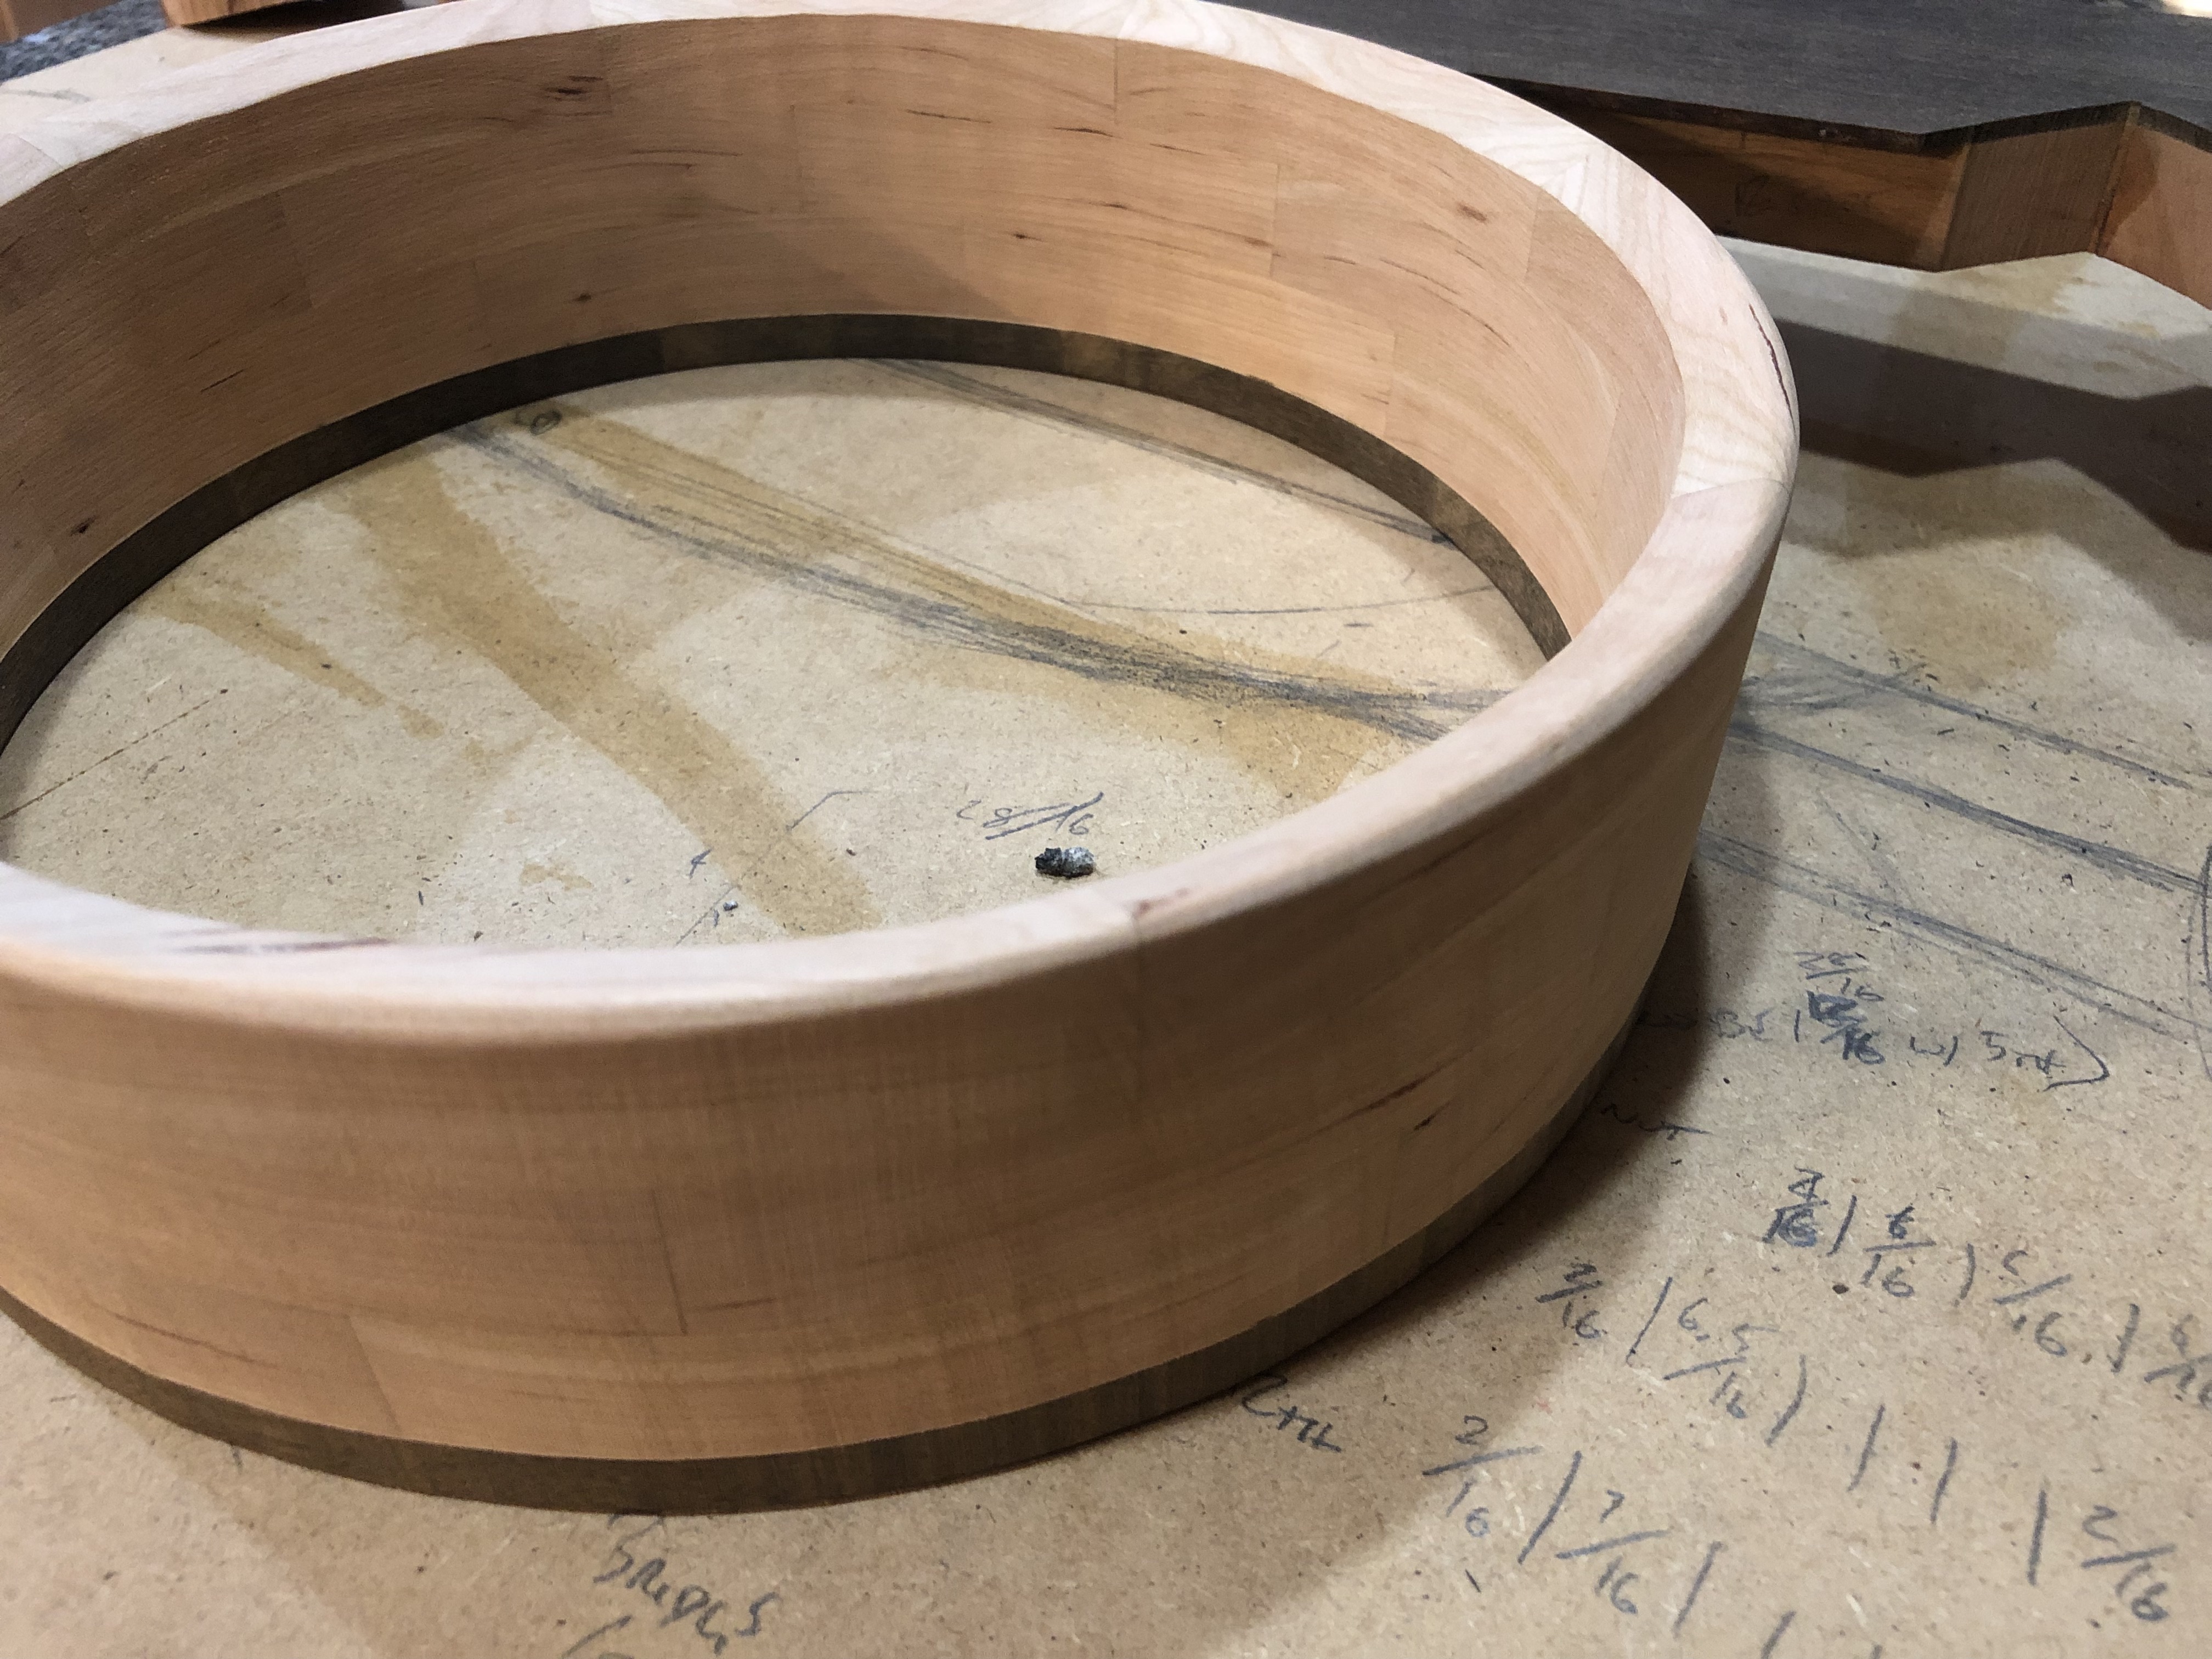
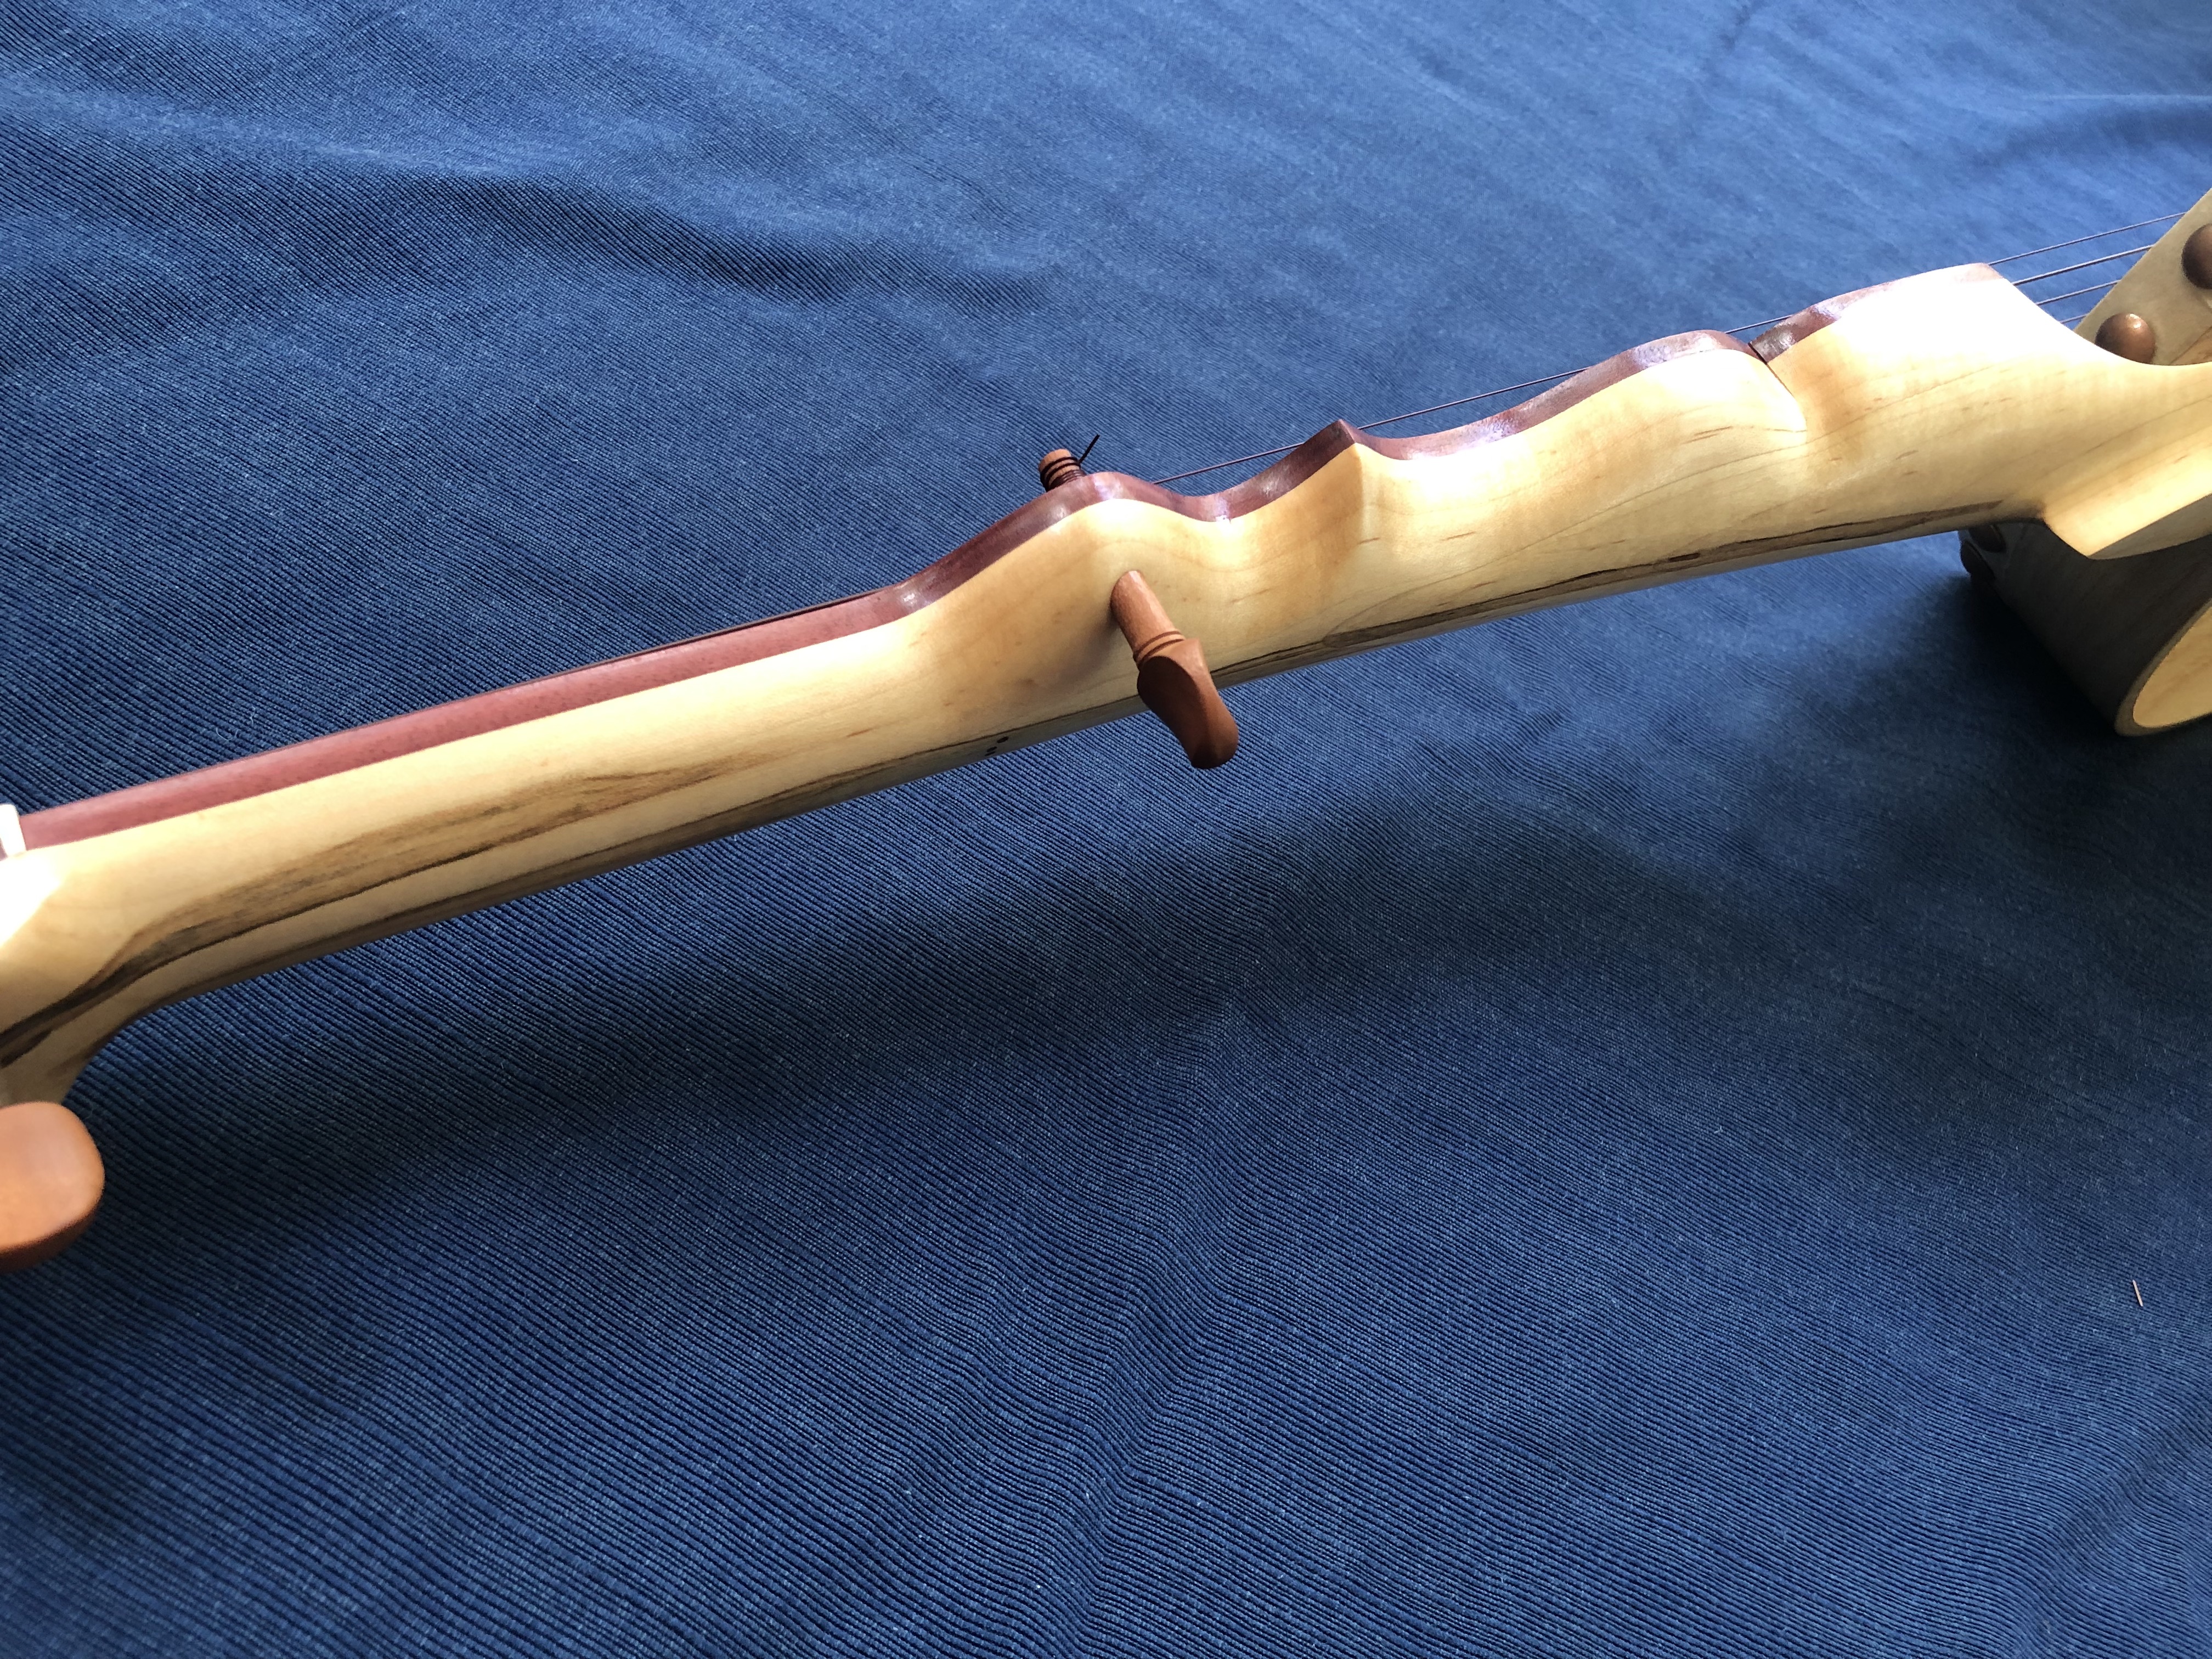
The main choice you have is between a straight necked banjo with a lip popping out for the fifth string and a minstrel-style double ogee. This is the set of curves that you see on some of these older ones. (You can also tell that my rim, which was steam bent, is not quite a circle. And it still works.) You can also get creative: I made a last minute decision to turn my last neck into a wide curve that sweeps across the neck where the scoop would go.

The peghead offers a host of other options. Go an image search for “banjo peghead templates” and you’ll find some useful charts. After checking out your options by looking at real photos, reverting to these charts will be important for drawing your own on your neck. (The template chart from Romero is really nice, it shows the shapes alongside real examples and labels each with proper names. If the page moves and breaks this link, the internet image search should still pull similar things up.)
A note on the double ogee
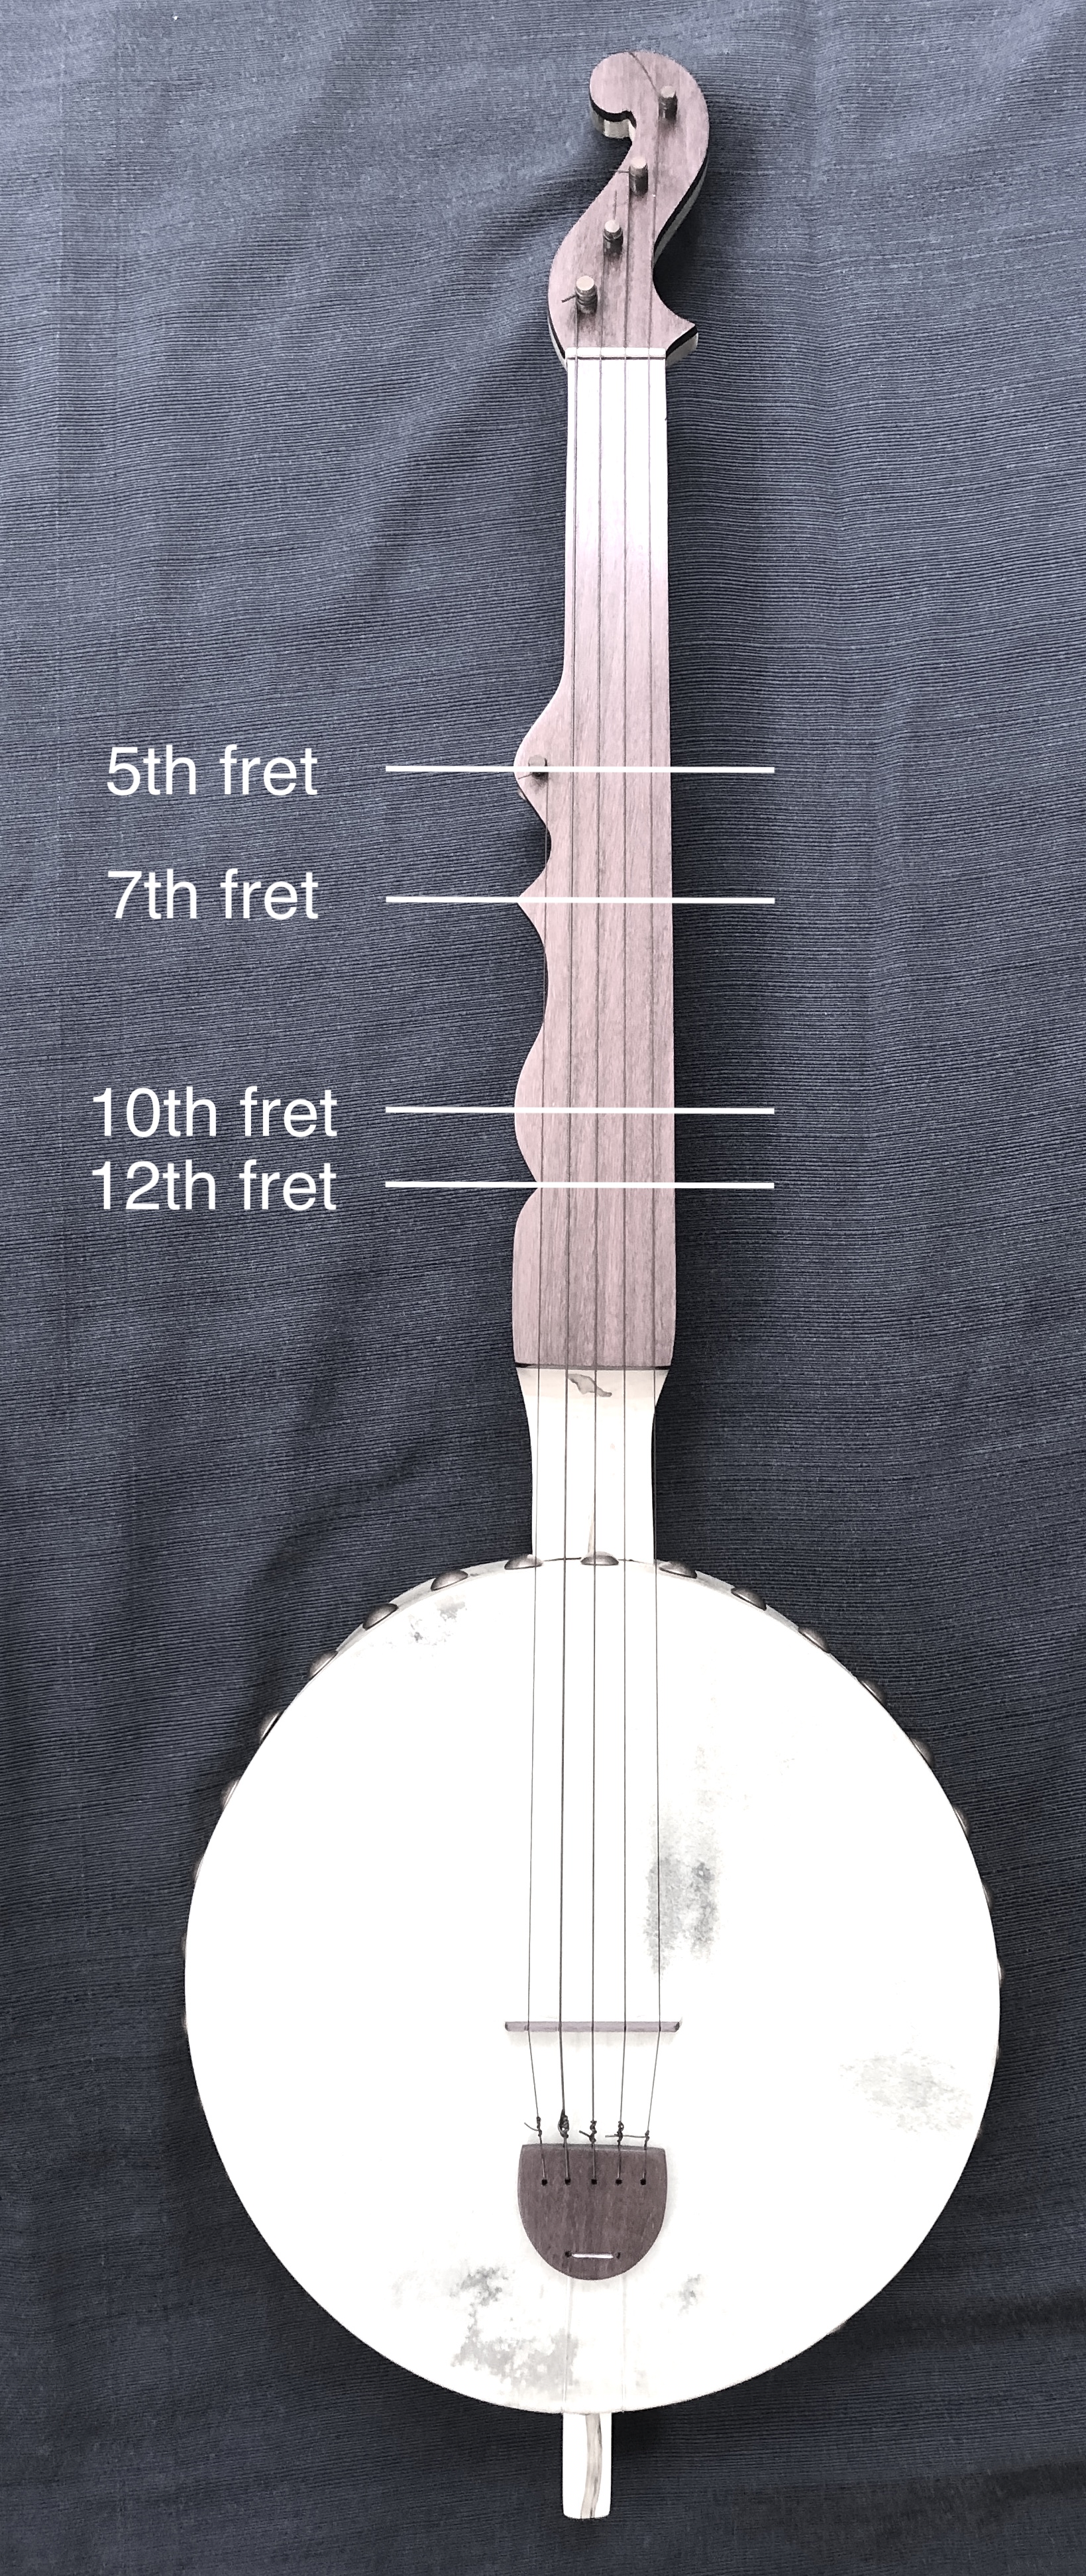
The winding double ogee edge is worth an extra moment of consideration. This can be purely decorative, but, if you set it up right, the points and bumps serve as markers up the neck.
Here is that same image from above, but with the markers put in. If you wanted to do this, a set of French curves is worth the few dollars that they cost from an art supply or arts and crafts shop.
Drawing the shape of the neck
There’s some math coming up again. The easiest way to check your work on drawing (or shaping) the neck will be returning to a banjo that you like. Measure and copy it.
The center line starts us off. Measure the middle of your neck blank by the nut and the rim end. Draw a line. That’s your third string. Easy.
Now you get to think about string spacing. I like a wide spacing and, since these are nylon, they’re likely to be for clawhammer or older styles of finger playing. These are not bluegrass banjos. String spacing gets measured at two points: the nut and the bridge. It’s common for them to widen very slightly so that left hand fingering is easier and the right hand has more space to maneuver.
Here’s the catch: there’s no bridge on your neck. It’ll be over the rim. Instead of drawing it over the dowel stick and hoping that you are lining things up, you can split the difference and measure at the 12th fret.
So where’s the 12th fret? It’s halfway down your scale: if you are doing a 26” scale, mark the 12th fret 13” away from the nut. Draw it right on there. You could use the painters tape if it’s too dark to see.
While you’re at it, mark off the fifth fret, where the fifth string will end. This is a ratio and not just 5/12ths or whatever. Easiest way: find a fret position calculator. The one from StewMac is good. Use 24 frets (doesn’t matter) and put in your scale length. The instrument doesn’t matter, either. Then, find the 5th fret measurement and mark it down. For a 26” scale, it comes out to 6.522”. That’s close enough to 6 1/2” for us.
The fifth string peg has to go somewhere, too. Measure the shank of your pegs to get a rough guess as to where it’s going to pop through the face of the fingerboard and align the hole so that the string will come off of the inside of the peg in line with the other strings. If you put the center of the peg on the string line, the string will end up angled steeply into the other strings. It’ll be a tight and awkward fit.
I like a 3/8th inch string spacing at the nut and a 7/16ths of space at the bridge, which means that the spacing at the 12th fret is halfway between: 15/32nds. It’s basically a pencil mark over the line and mostly relevant for the sides of the neck. The strings will go where we want when we make the bridge.
Mark two strings worth of spacing in each direction at the nut and 12th string, then connect those lines with a straight edge. The fifth string doesn’t go all the way up to the nut, so you can stop the line at the 5th fret marker that you put in earlier.
Warning! Make sure you put the fifth string on the right side! It should be on the top when you hold it in your hand. I did this backward once and made a left handed banjo by mistake. I caught it quickly, was able to reglue the pieces, and you could barely tell, but that was boneheaded.
The neck should be about 1/8” wider than the strings, so make some measurements and draw another line just outside of the outer strings.
Lastly, you can draw in whatever you’re looking to do for the fifth string and, if you are doing it, the double ogee curves. (You’ll need to return to that fret calculator to get the measurements for the double ogee.)
This image shows the stages that I describe above. It’s not to scale.

Sit back say, hey! Then hold it and make sure that everything makes sense. It’s a big block, but the drawing helps to make it seem a bit more real.
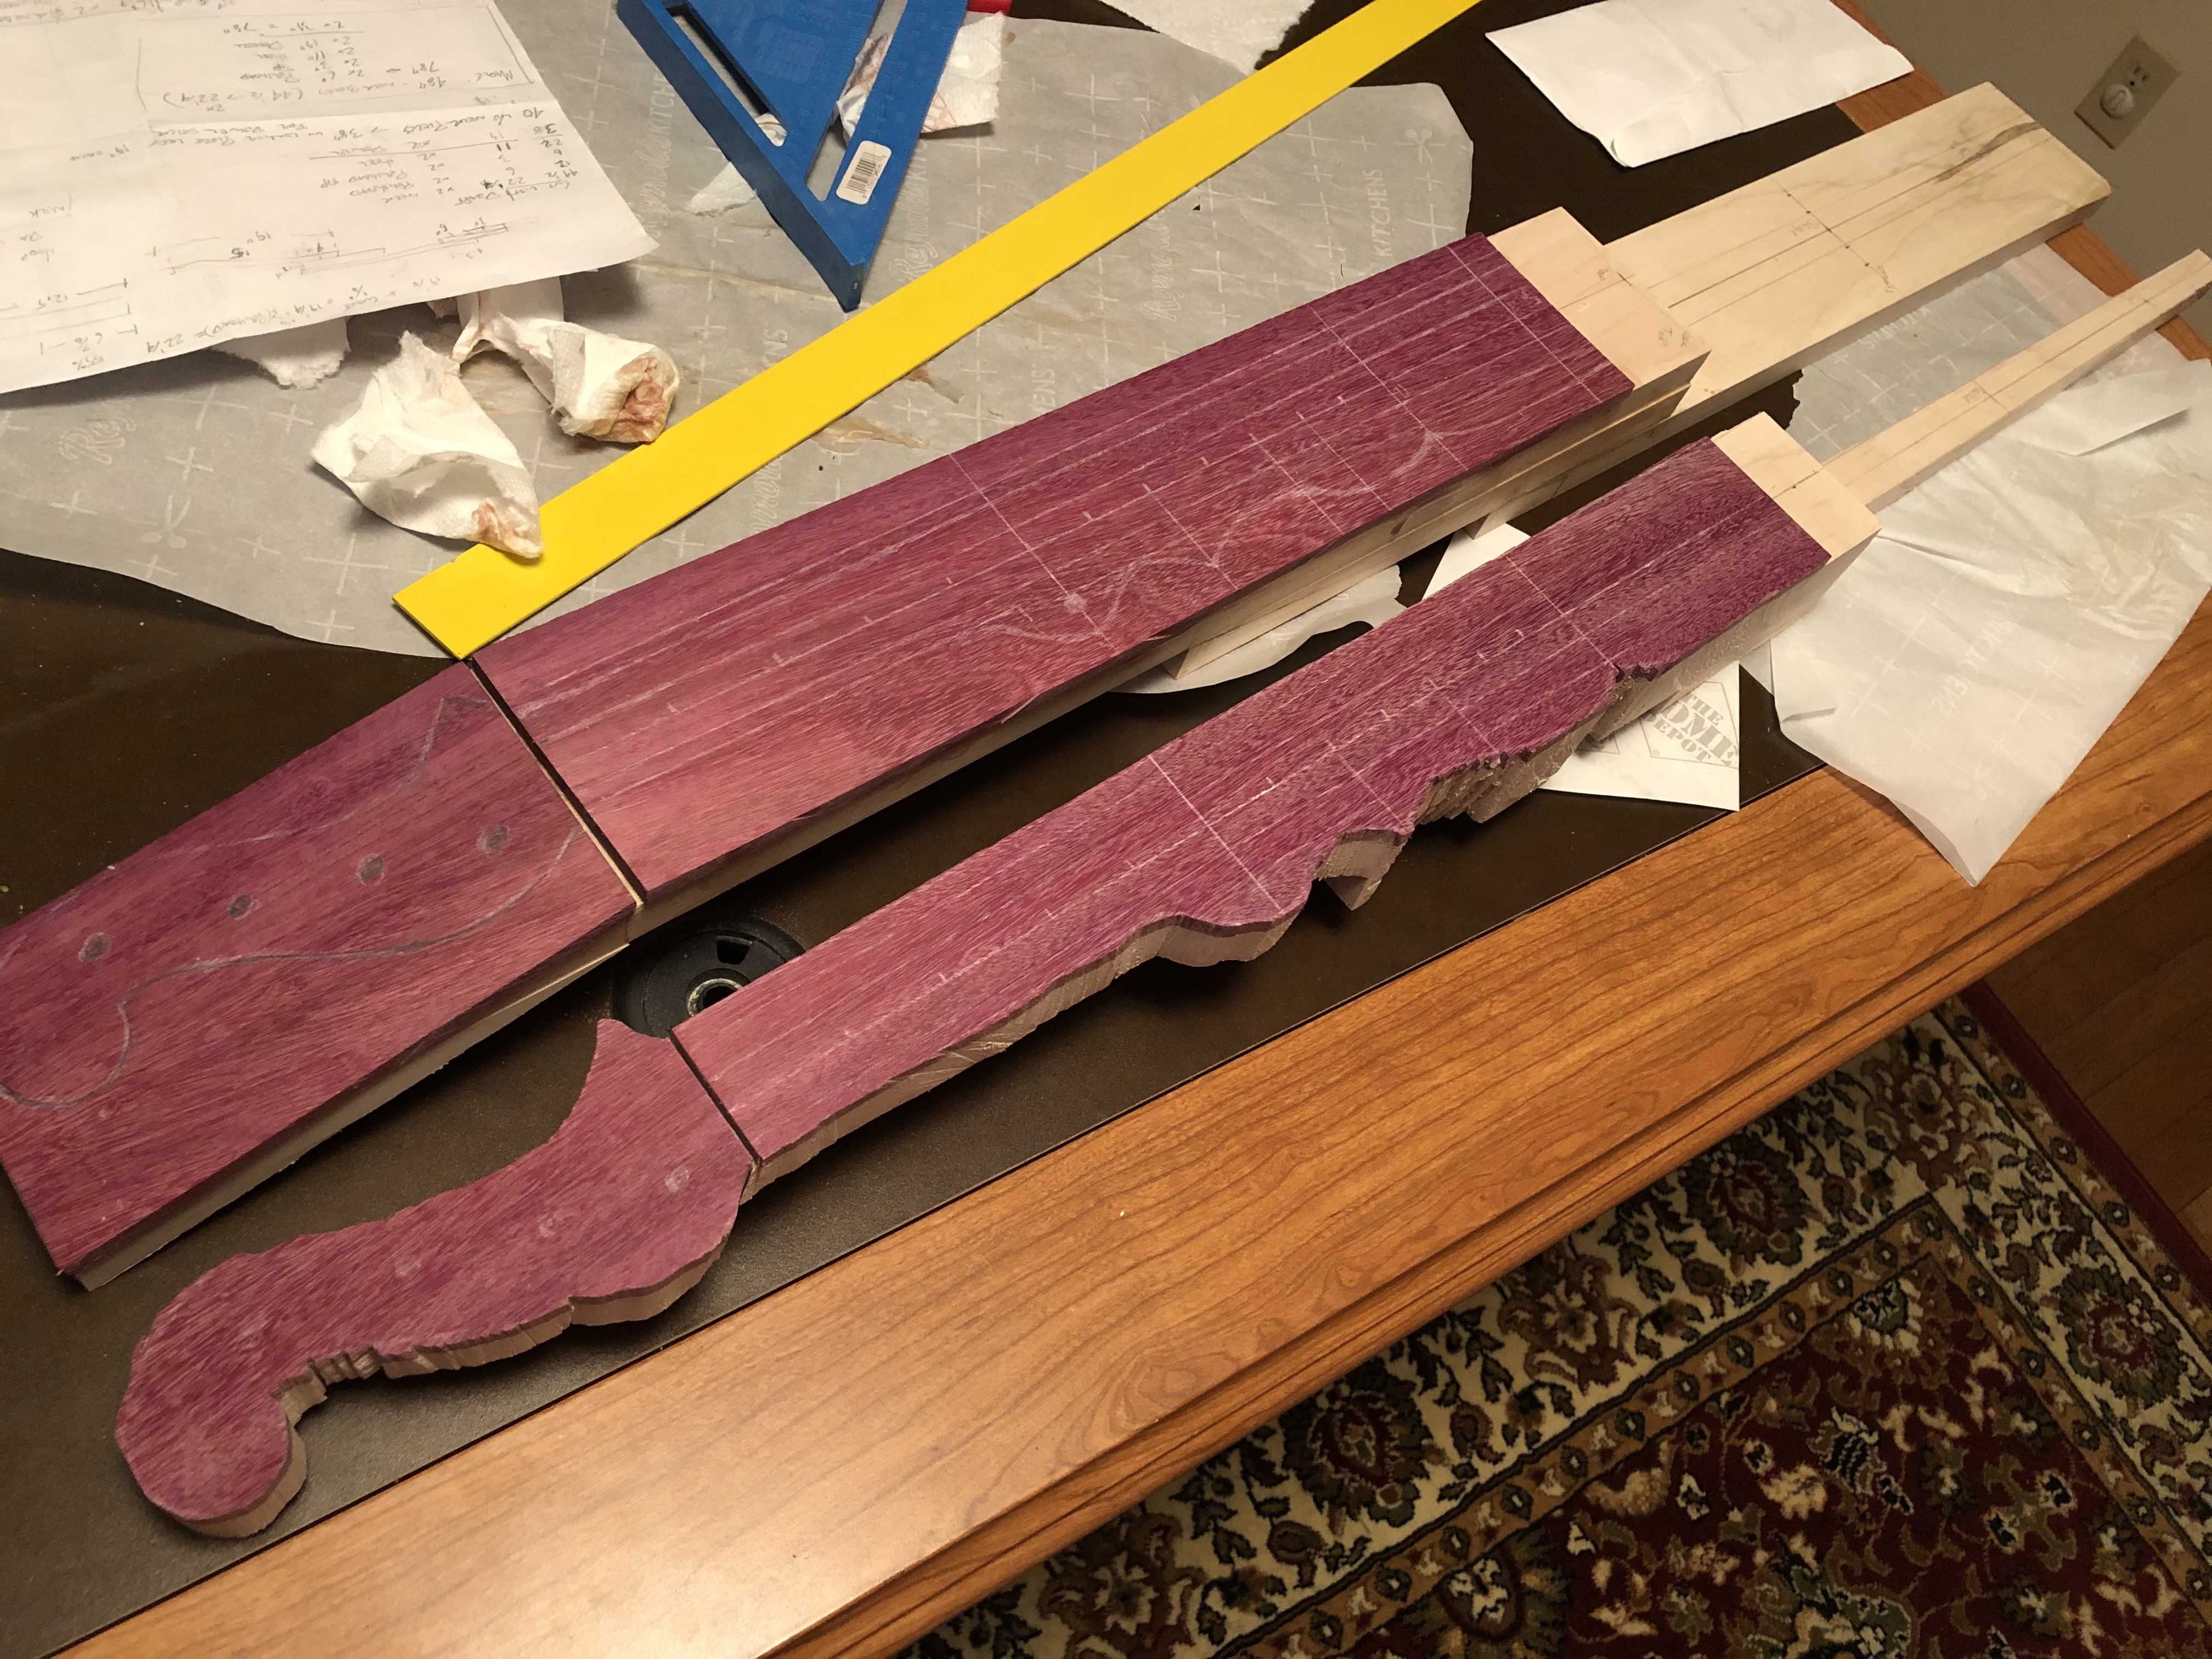
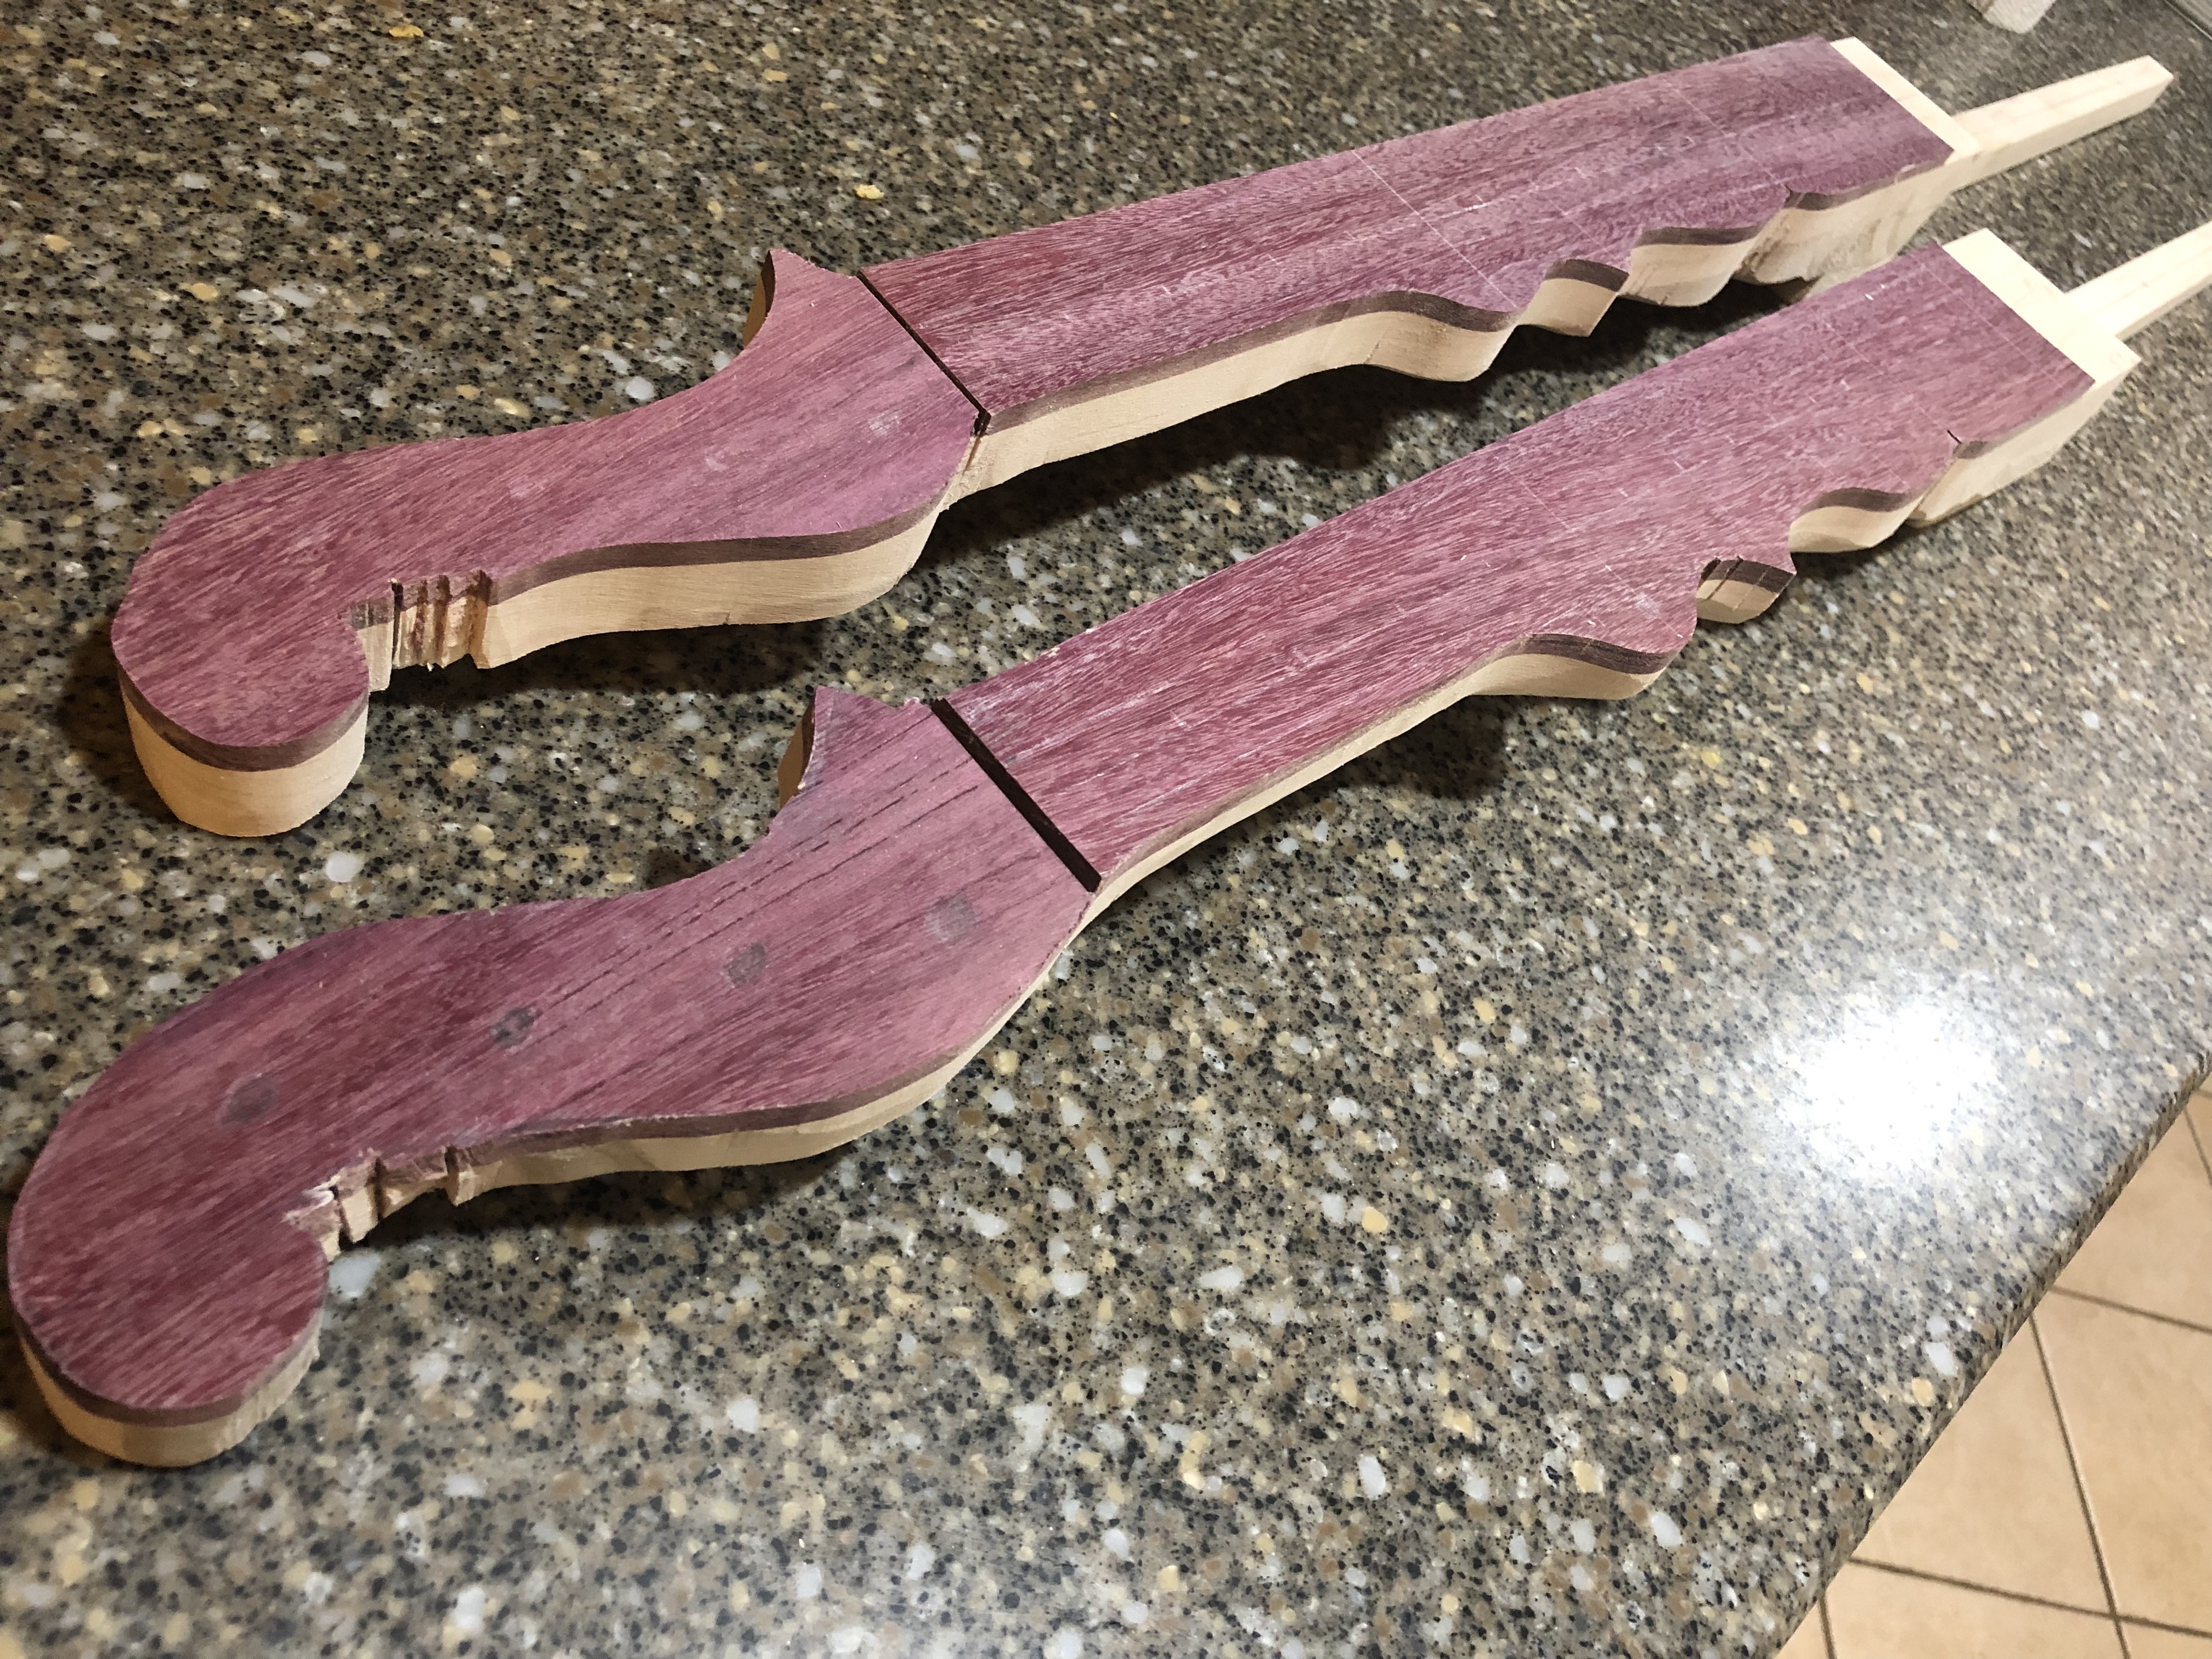
This image shows two necks, one is drawn and I already cut the other. You can see that the edges are really ragged from the first round of cutting. That’s fine, they’ll get cleaned up later. You’re not cutting yet anyhow.
Drawing and cutting the peghead
The peghead is simpler. Go back to that template you found and pull it up on your computer. Use some image editing software to make it bigger. If you crop it right to the edge of the image, you can use real life measurements in something like Preview on macOS (under “Adjust Size”). You’ll want it about 6” tall, but make sure you’re measuring the piece of wood so that it’s not too big…
Then, print it out and tape it where it goes so that you can trace it. Some people glue it to a piece of cardboard to make it easier to trace.
Make sure that you poke holes in the center of where the pegs go. You need to mark these spots so you can drill the holes. After you take it off, check the spacing of the holes against the size of the heads of your pegs: you don’t want the pegs so close together that you can’t turn them.
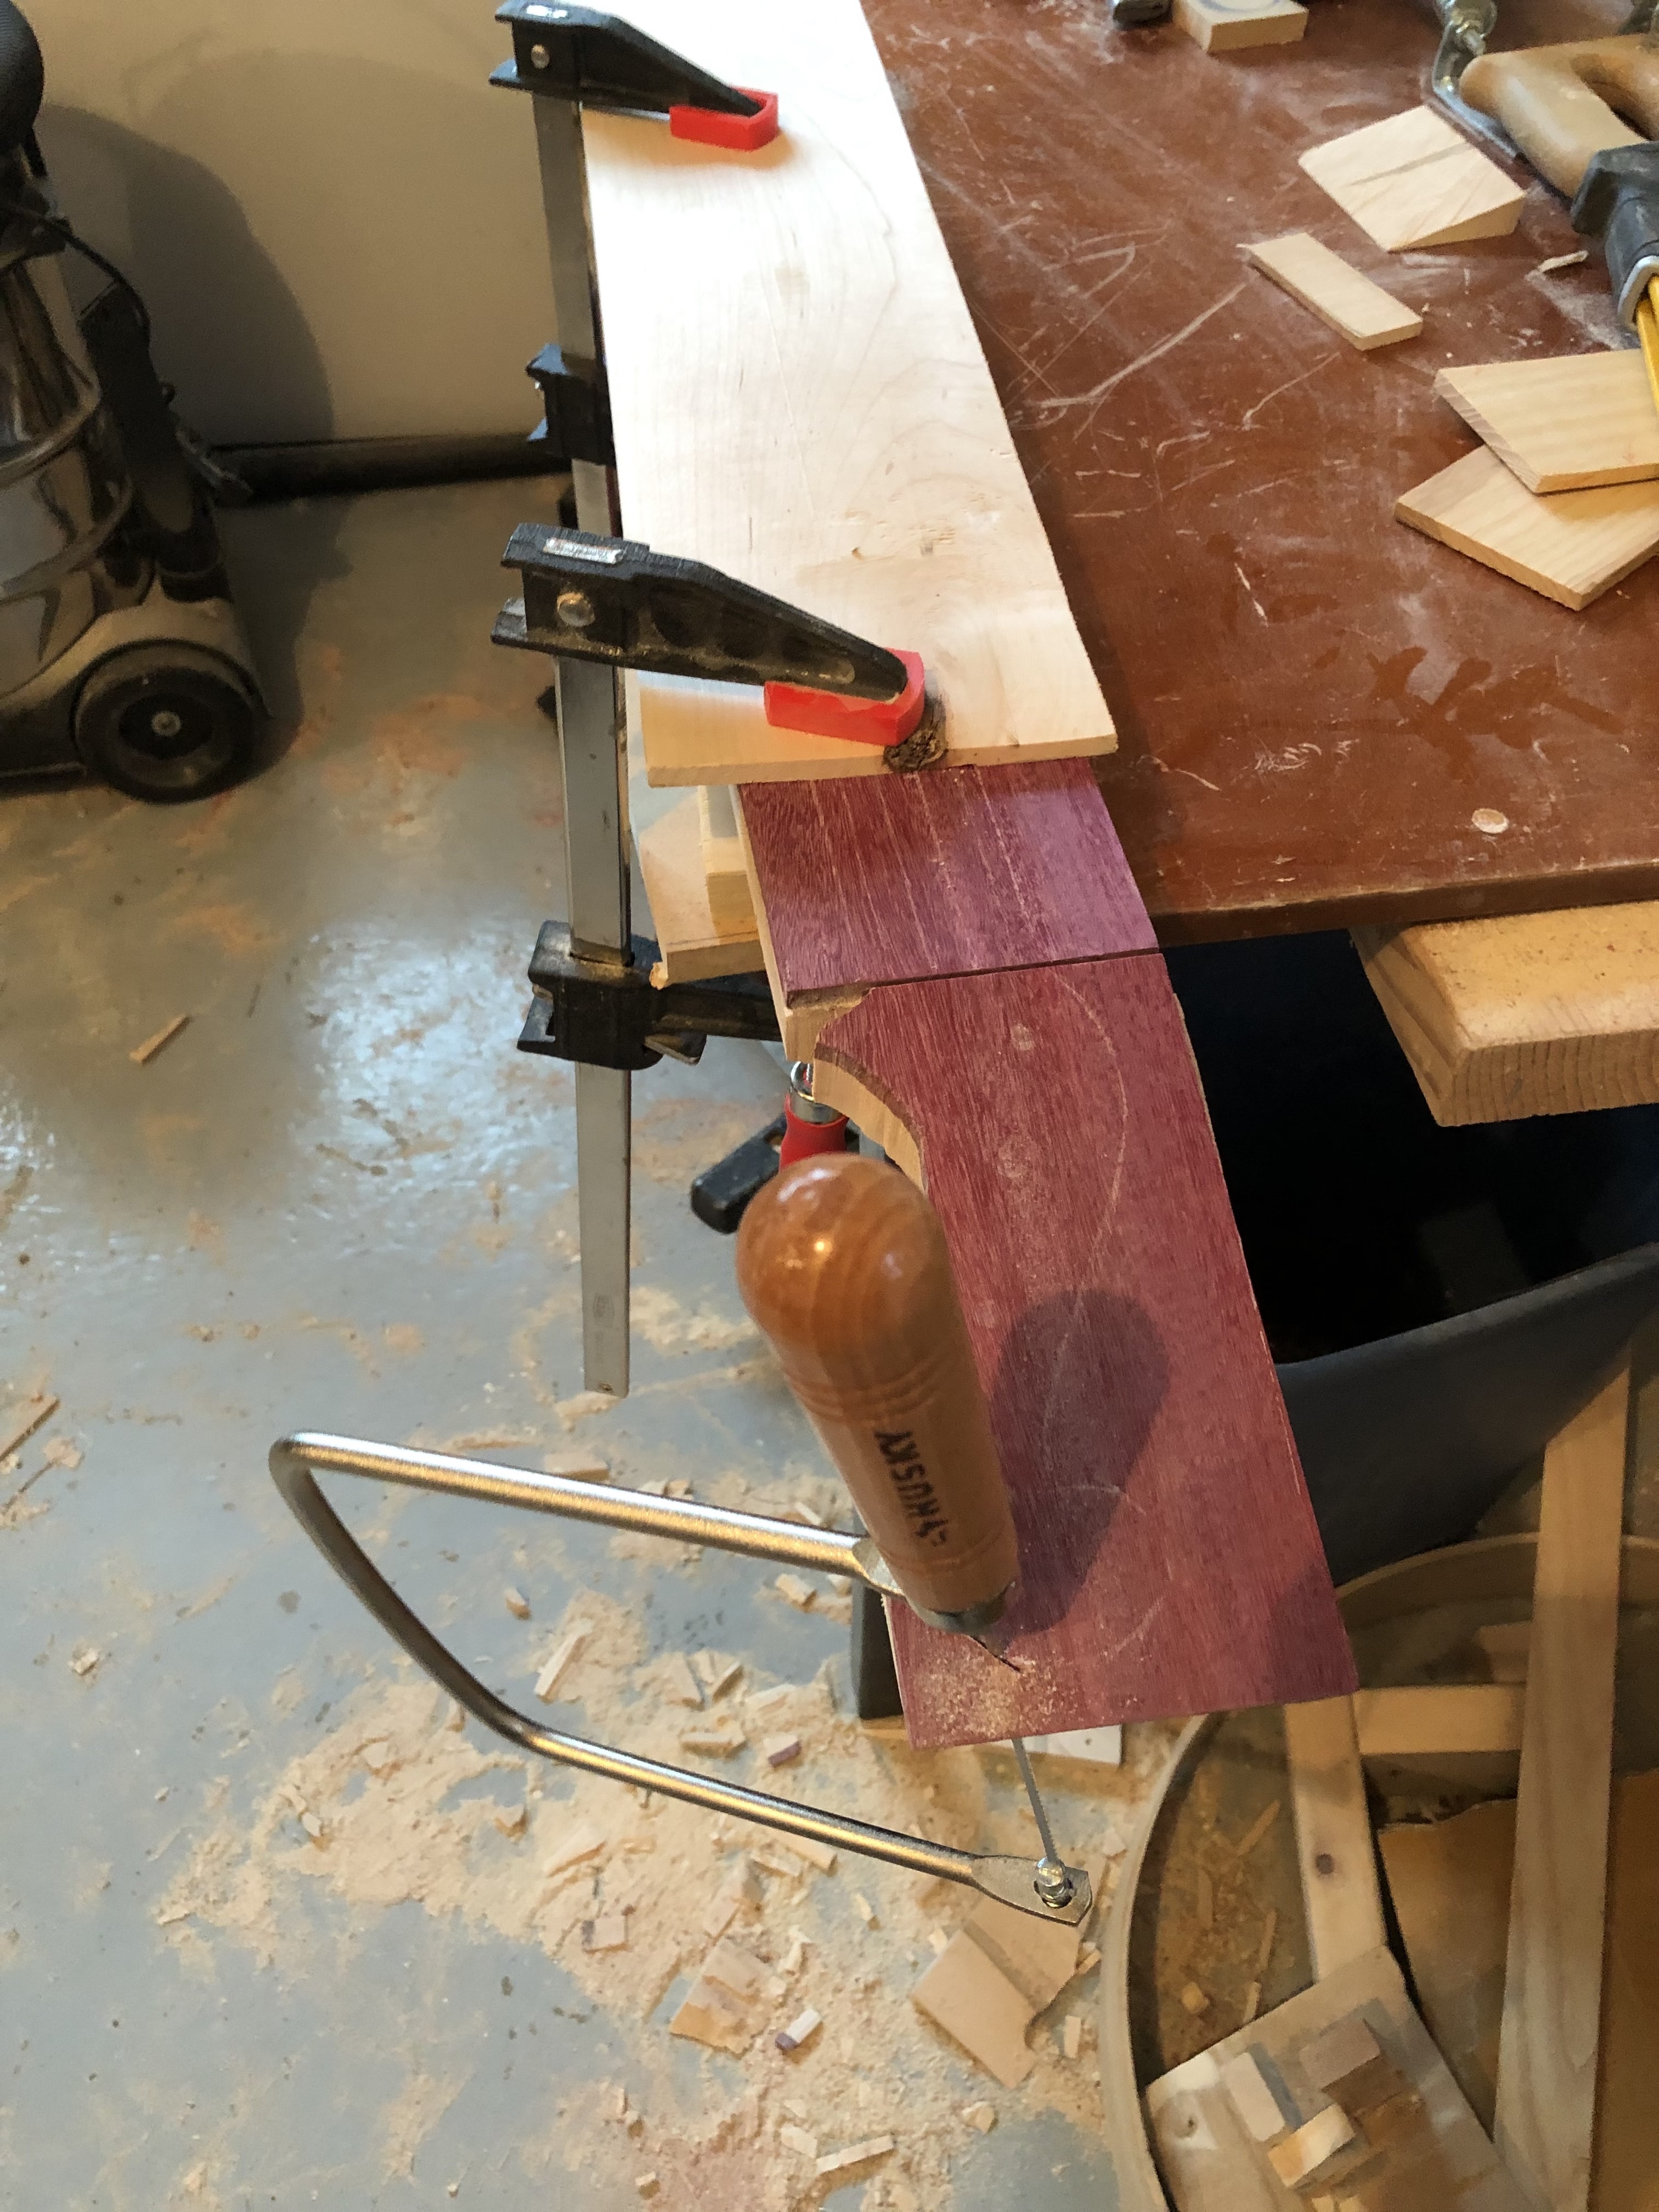
Time to cut. A hand saw will get lots of waste off quickly and a coping saw will cut those corners off. I like to do the peghead first so that the waste is out of the way when it’s time to get to the long, straight lines of the neck. At least a little bit out of the way.
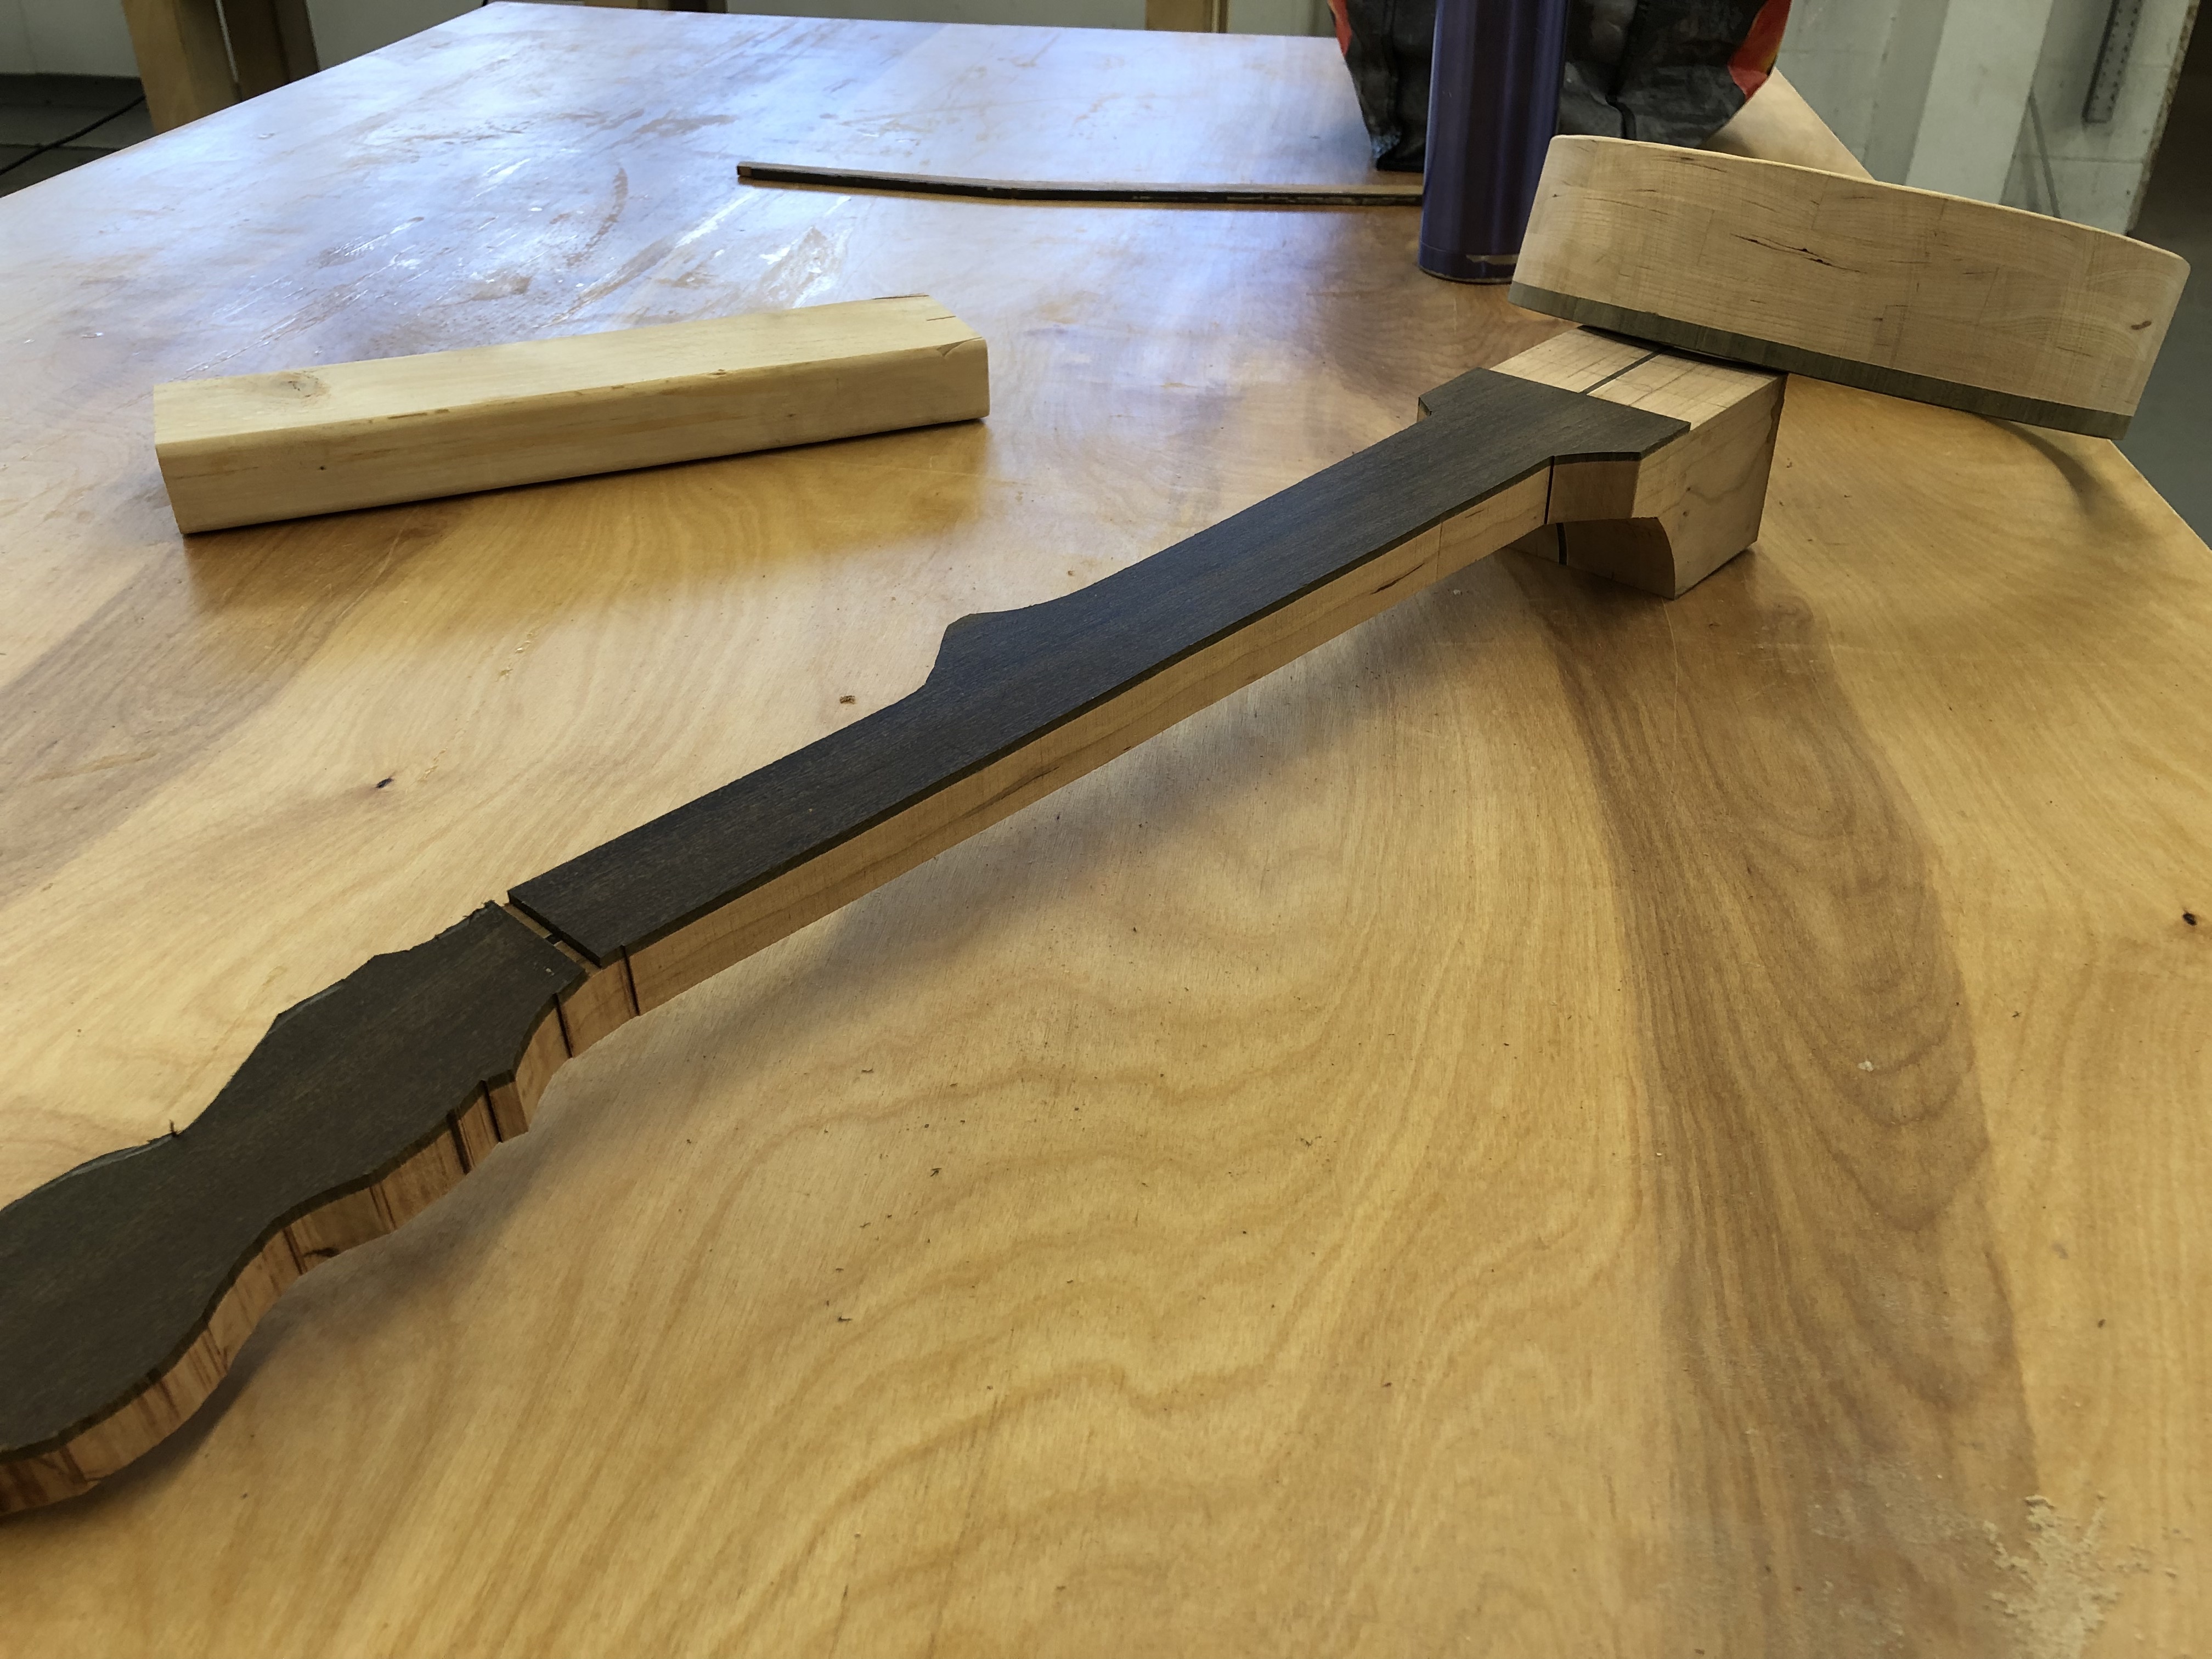
Notice how it’s clamped up in the photo. You’re at a point where you don’t want to clamp on to the fingerboard if you don’t have to: it could dent it in a way that’s a pain to get out later. Same for underneath: there are blocks holding it up so it’s steady and the pressure is not on the neck itself. That gets harder to set up as we put a curve in the back.
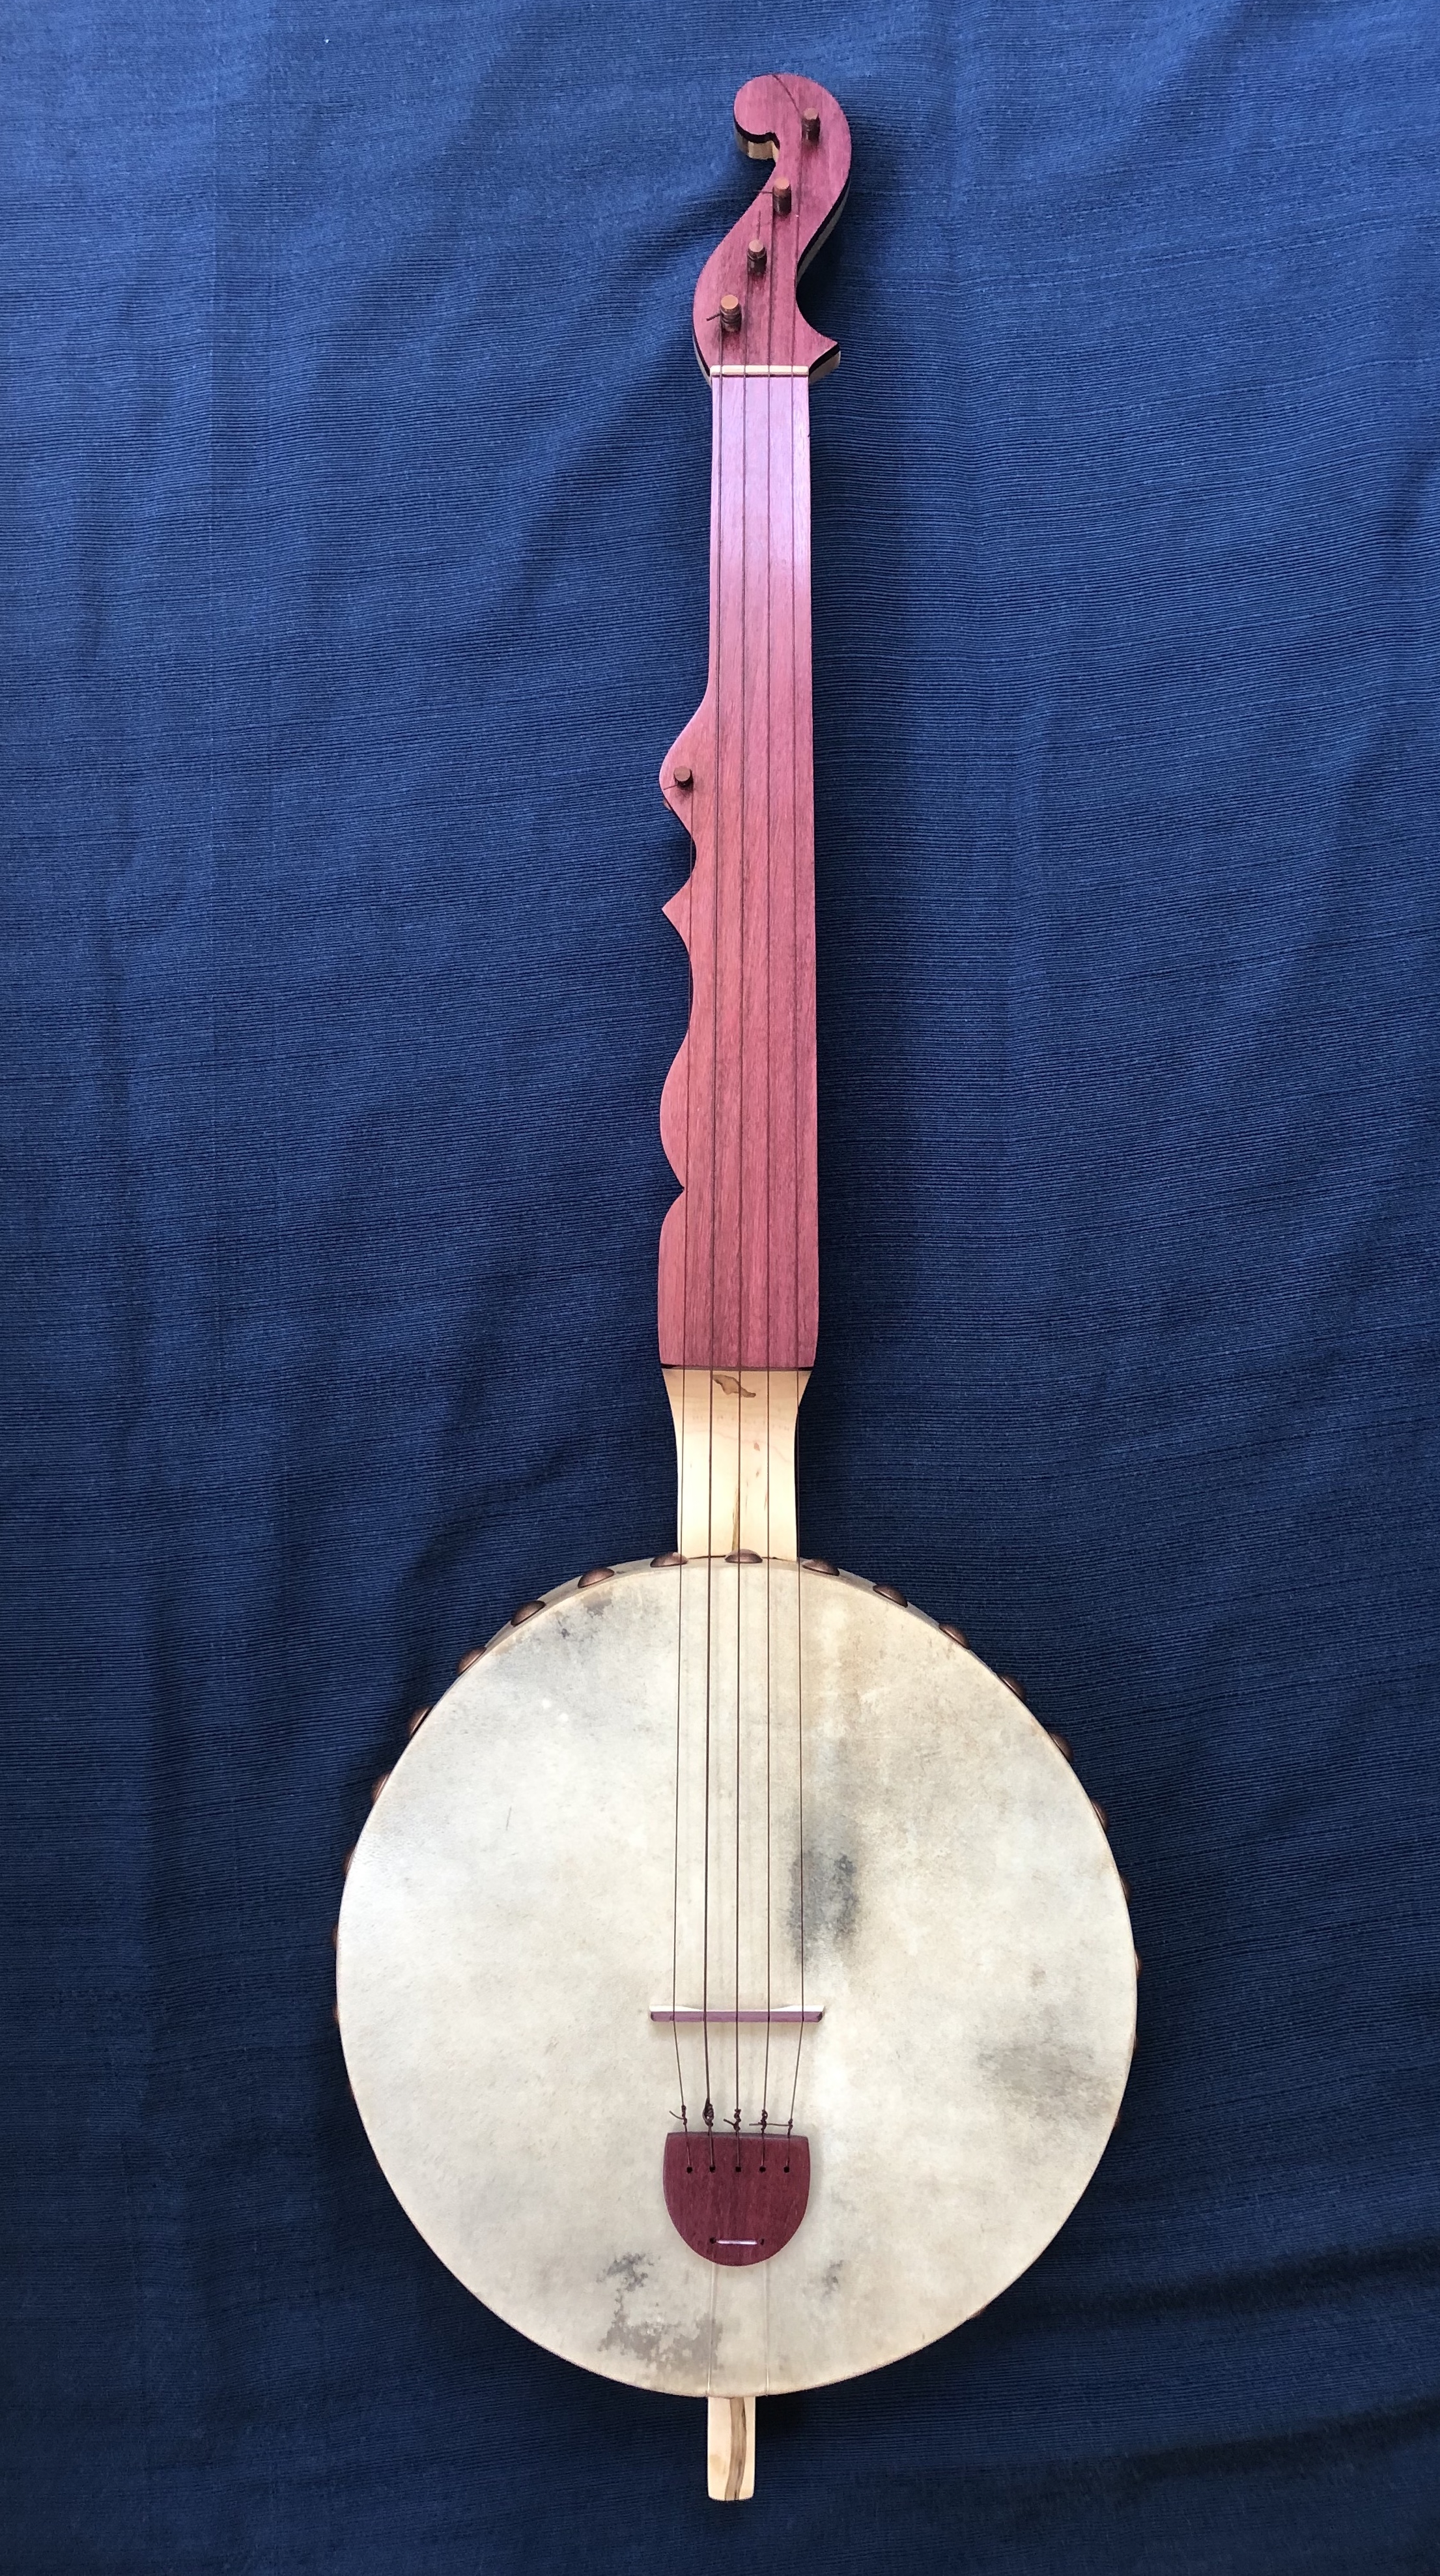
One other note: you have a choice here about how you cut the peghead. I like the look of lines that are perpendicular to the fingerboard and pegs that are perpendicular to the peghead (see the photos at the top of the page). You can also make the cut for the peghead sides perpendicular to the peghead face. Don’t worry if you’re off: as long as it holds pegs, it’ll do the job.
Drilling peg holes
The goal here is a straight hole. If it’s tilted, then the pegs will be tilted. Not a big deal—they just have to hold the strings—but your eye will see them out of alignment and it might drive you bonkers.
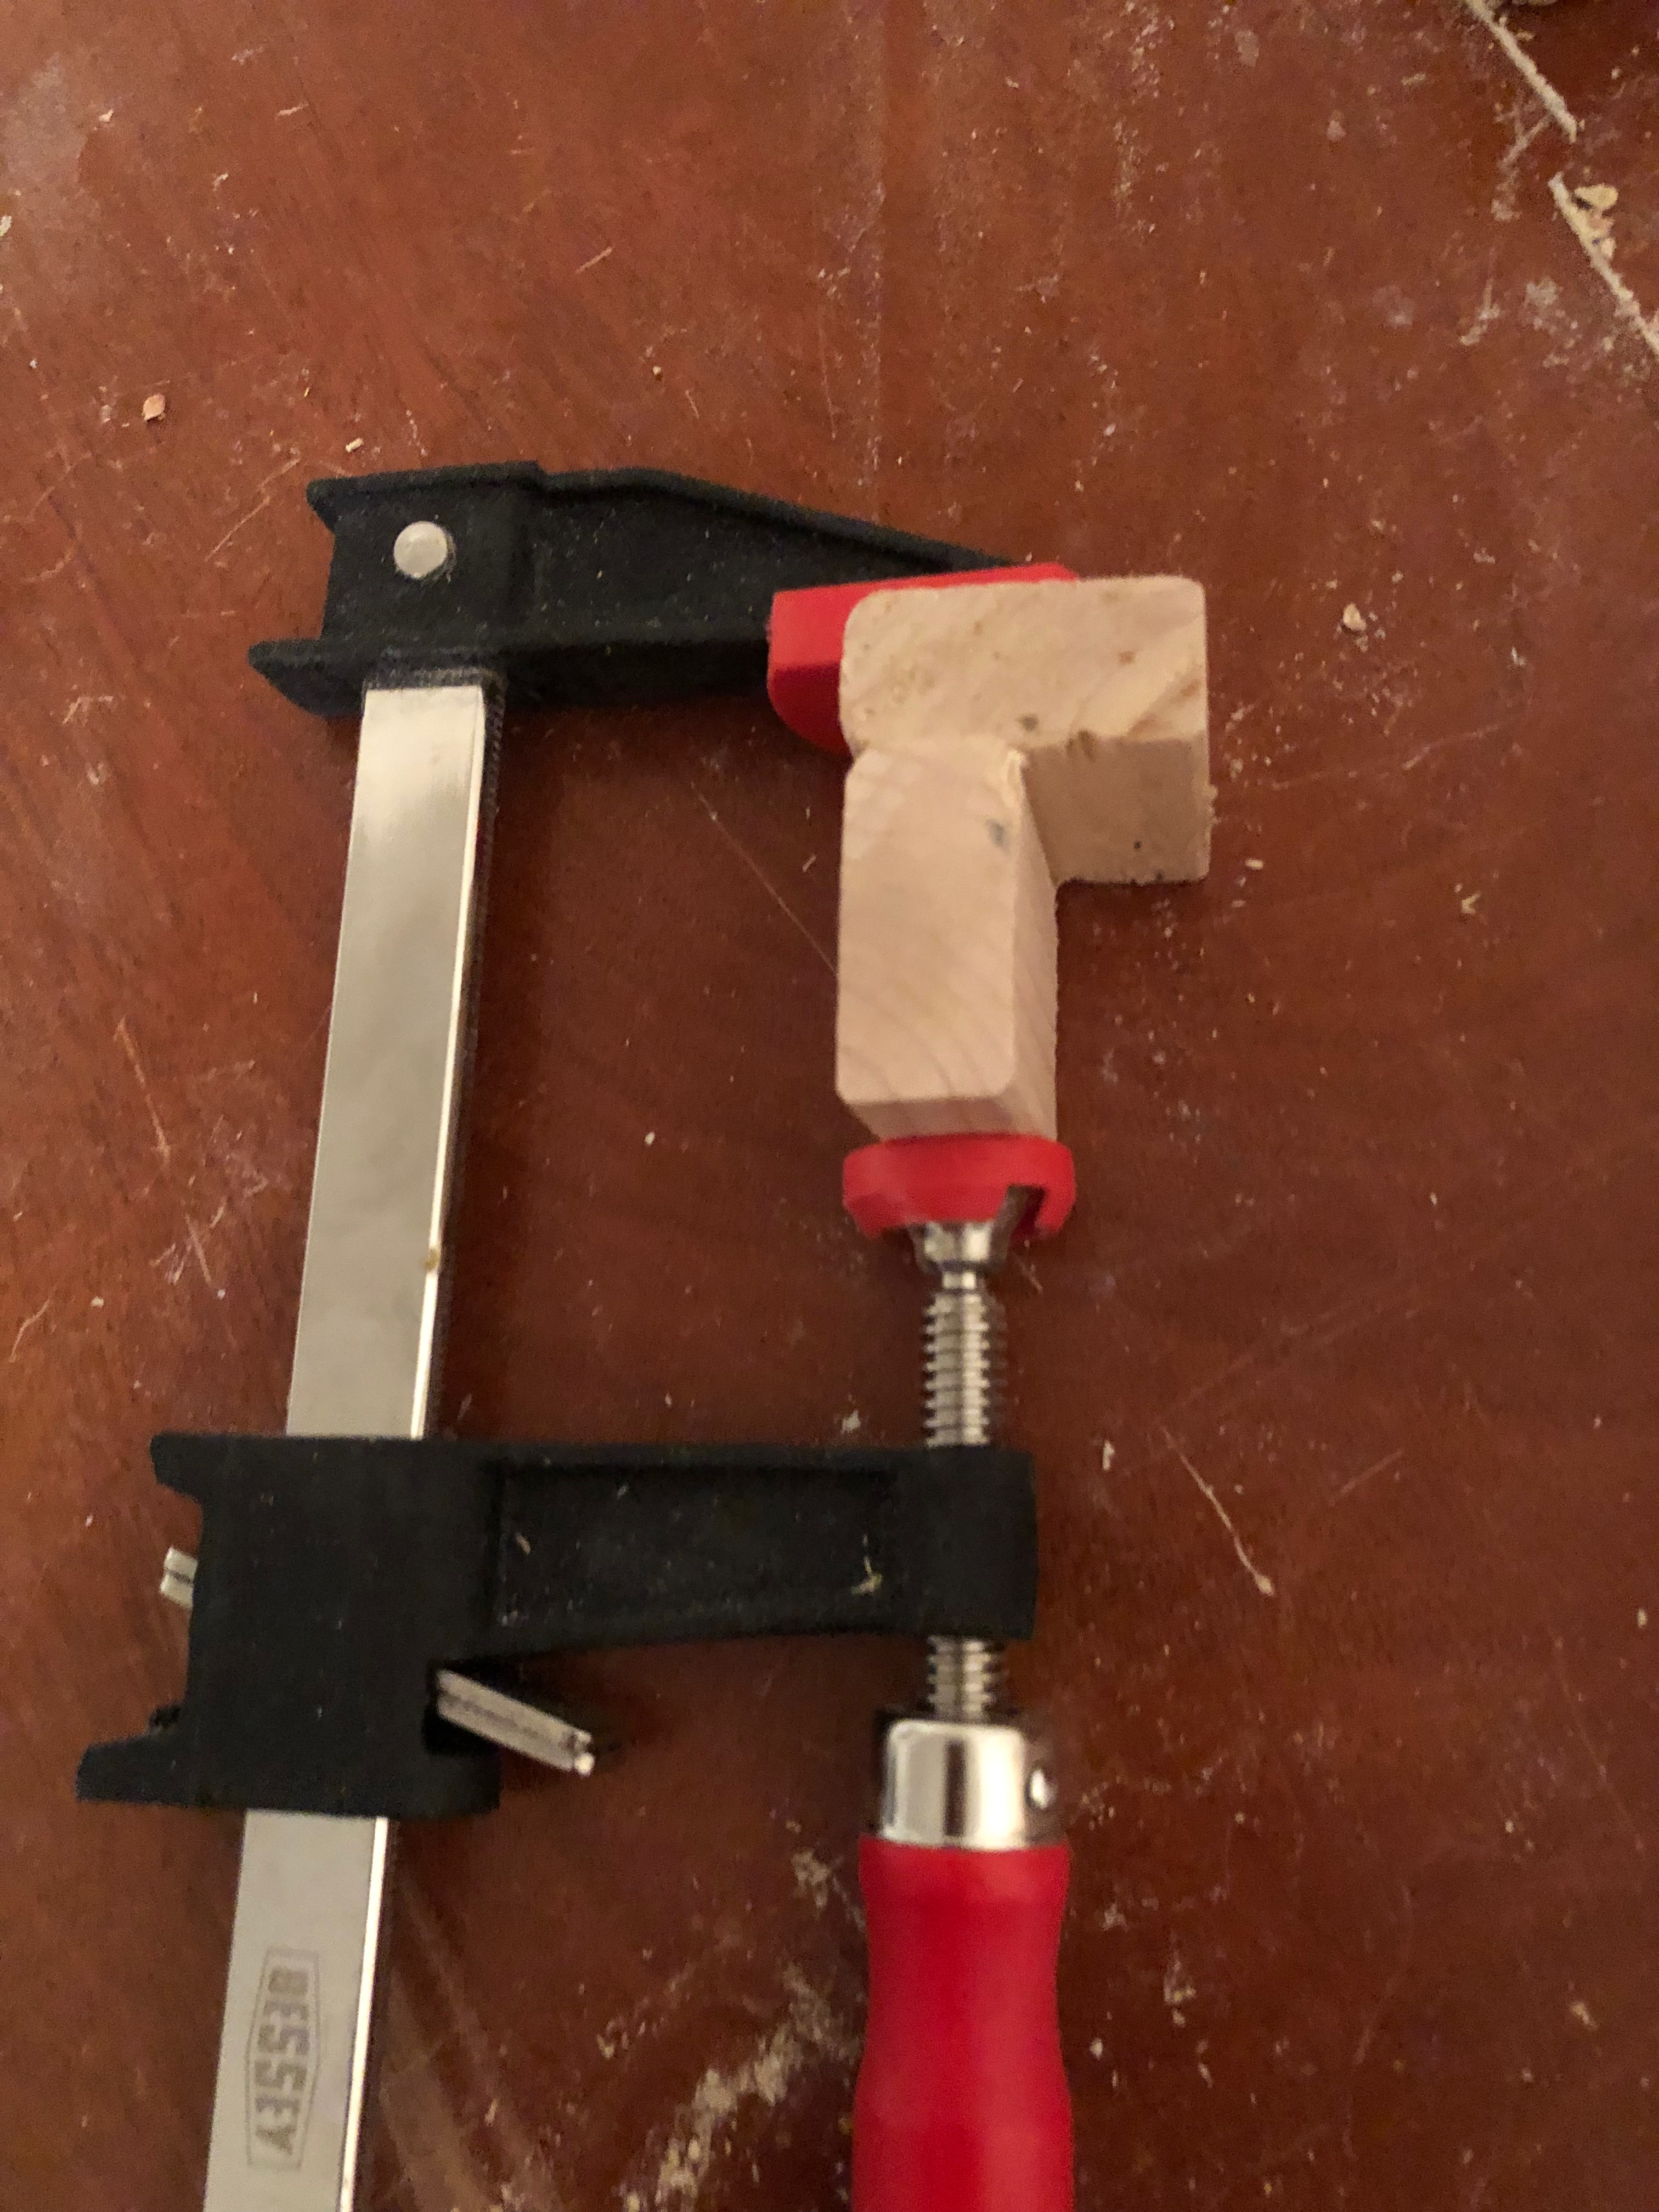
If you don’t have a drill press, you can put together a makeshift one with some scrap wood. Use a square (or whatever you have with an angle that you trust) and clamp two pieces into an L shape. This will guide your drill as you make the holes. Even if it’s a little off, they’ll be off in the same way. That’s better than all over the place.
Before drilling, make a starter with a nail or something similar so that your drill doesn’t wander. Remember that the peghead/fingerboard wood is hard. And measure your peg shanks so that you know what size drill bit to use. It should be just smaller than the part of the shank that will go through the peghead. You’ll widen it out with the reamer later. I’ve always used 1/4” holes.
Cutting the neck shape
How you cut the neck will depend on how curvy you made it. If it’s straight lines, you can get away with using a circular saw to plow a bunch of wood out on the rough cut. Just keep an eye out, it would be a shame to mess things up now.
A hand saw is far safer for cuts that are long and straight, but there’s a lot of wood and maple, for example, is really hard. It’s not a fun day. Cut off chunks of waste to make things easier to handle as you make your way through the cut(s).
For curves, you can go back to the coping saw, but it may be too weak to handle the thick stock. You may be better off using the kerfing technique from before. Sawing lines from the side and up to the cut line lets you get the chisel out and work pretty quickly.
Regarding chisels: be careful about the wood grain. If you cut the wrong way, it will break along the grain in a way that you don’t want.
You’ll end up with some messy lines, but your days of rasping, filing, and sanding will take care of those. These two necks are at different stages of filing.
Drawing and cutting the dowel stick
You can also see the dowel sticks in that picture above. The dowel stick tapers from the base of the heel through the end. The exact measurement isn’t particularly important since you’ll be cutting a hole to match whatever you have. Most are about 1” wide at the heel and a 3/4” wide where they exit the rim. Check out the banjo database for measurements on old instruments if you want to get picky.
To get this drawn and cut, you’ll first extend your center line all the way to the end of the wood. Mark 1/2” to each side of that line at the heel. Then mark the length of the diameter of the rim (11” or so). Go 3/8” to each side of the center line at that mark. Connect those dots and extend the lines to the end of the wood.
There isn’t much reason to cut the end shorter yet, but you’re welcome to do so. If you do, be sure to leave 3” or so for the tailpiece. You can shorten it later, once you see it all together. Then cut those lines! It’s important to keep these cuts as vertical as possible since they will line up with some holes on the rim later.
Shaping the back of the neck
In some ways, this can be the most satisfying part of the entire project. You basically chisel, file, and sand until you have a neck shape that feels good in your hand. There’s not a ton to say, except that you want to keep an eye on the lines along your fingerboard. Getting into corners is tough, but smaller chisels and files can do it pretty well.
It’s another good time to return back to an instrument that you like. Feel the thickness (that’s better than measuring, in my experience). Use the coarsest tool for a long time and don’t both switching it up until you get close to what you want. Wear a mask and goggles.
A drawknife is incredible for this job and I’ve heard that a spokeshave works really well, too. I never had one, but found an old Stanley for $25 or so from Hyperkitten and I look forward to trying it on my next build.
An angle grinder with a carving tool or a spindle sander work so well that they feel like cheating.
This is also the time to cut, fit, and glue a keep cap if you are using one. Just cut it out and glue it on. As always, make sure that your glue surfaces are flat and you clamp well. Don’t forget to shape and sand your scoop, too.
When you’re happy, start sanding with a coarse grit and work your way up to about 220. Keep the mask and goggles on and add an apron. This one’s messy.
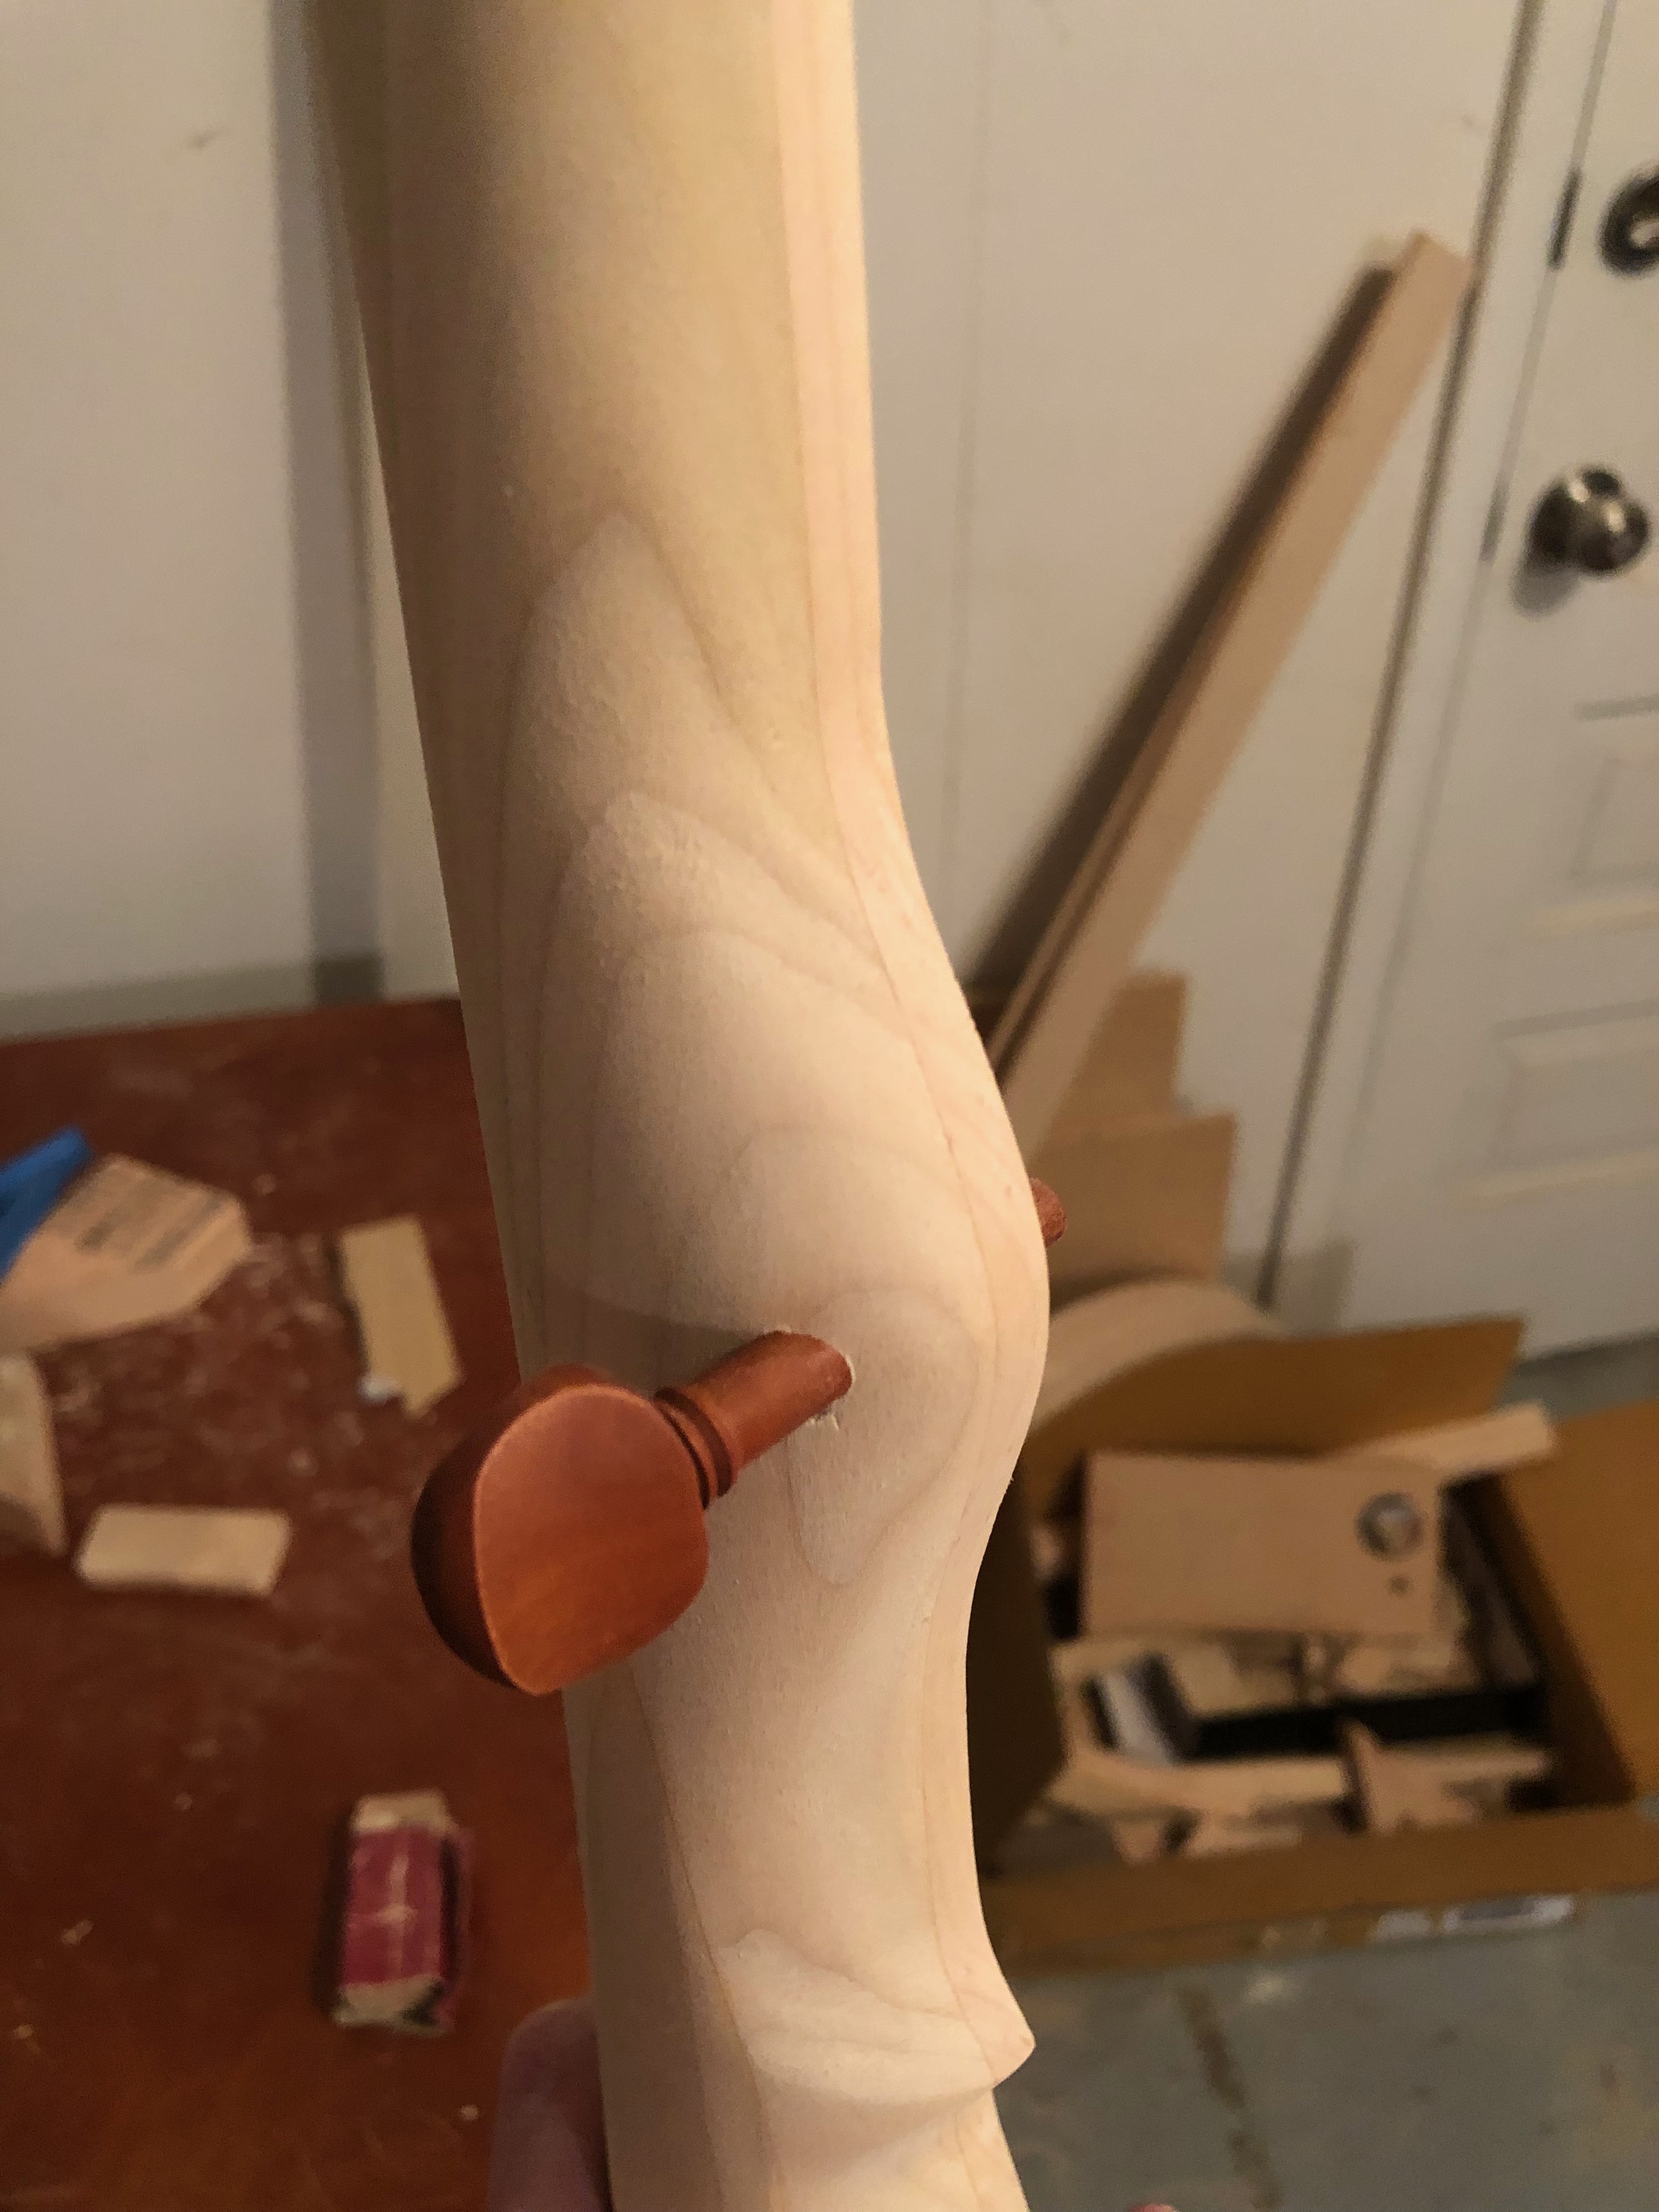
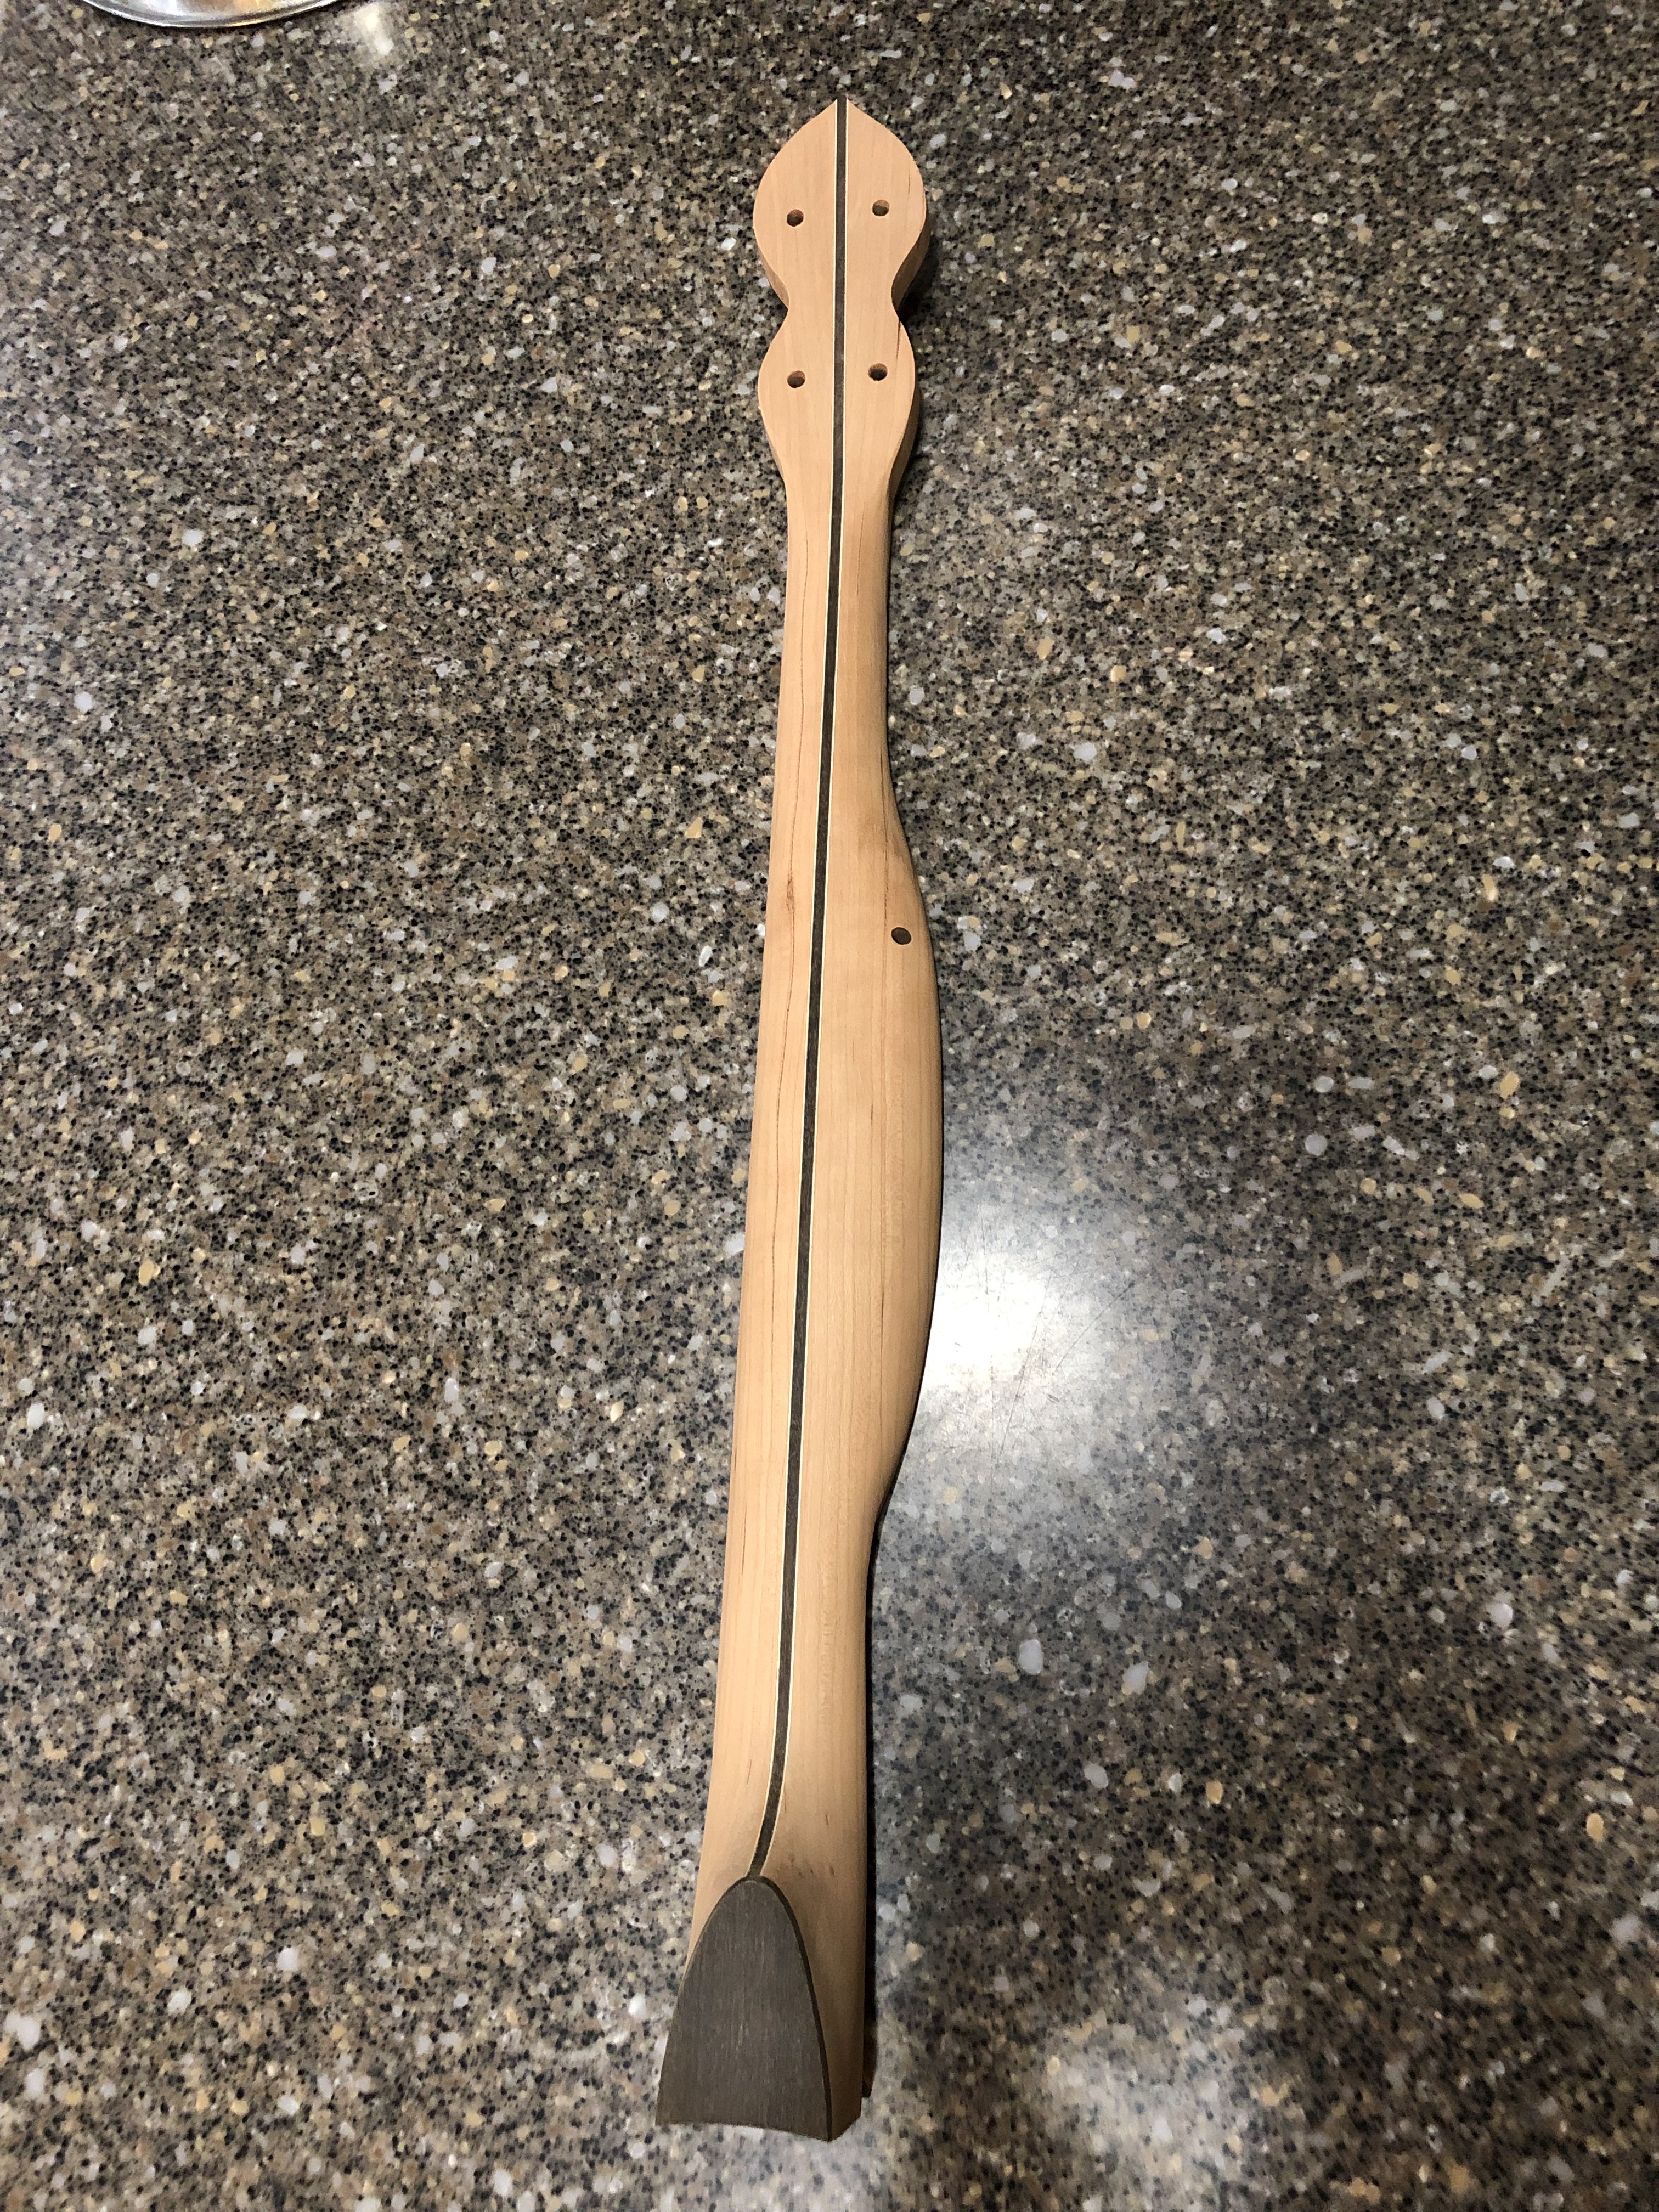
Here are some shaped necks. Note that the one made out of cherry with a stripe doesn’t have a dowel stick. I wanted to try making one after the fact. It’s not too bad, but this process here is a little simpler. Also, your pegs won’t fit yet. That’s coming soon. The last photo here is actually finished and not just shaped, but it gives a good idea of one way to shape the back of a neck with a double ogee on it.
Fitting the pegs
This is a pretty easy job and it’s nice that you can do it inside while watching TV. A peg reamer widens your drill holes with a taper until your pegs fit. It’s like a reverse pencil sharpener.
One major tip: you want to be intentional about the peg sizes. You can always widen holes, but you can shrink them. And you want them to be sticking out the same length on the back of the peghead. (You will trim down the shank that goes through the peghead and comes out on the face side.)
You can probably do this easily with calipers, but I made up a jig of sorts. Drill a hole in a piece of scrap from your neck using the same bit you used to make the peg holes in the first place.
Use the reamer to widen this out a bit. You’ll be comparing the pegs to each other, so it doesn’t matter how wide it is.
Take your eight pegs (remember that you had to buy two sets) and check them over. Sometimes one or two don’t look as good as the others, especially if they were cheap. Then put the first one into the reamed hole. Measure how much of the shank sticks out between the block and the peg’s head. Write that on a piece of tape and stick it to the peg. Do this for each peg.
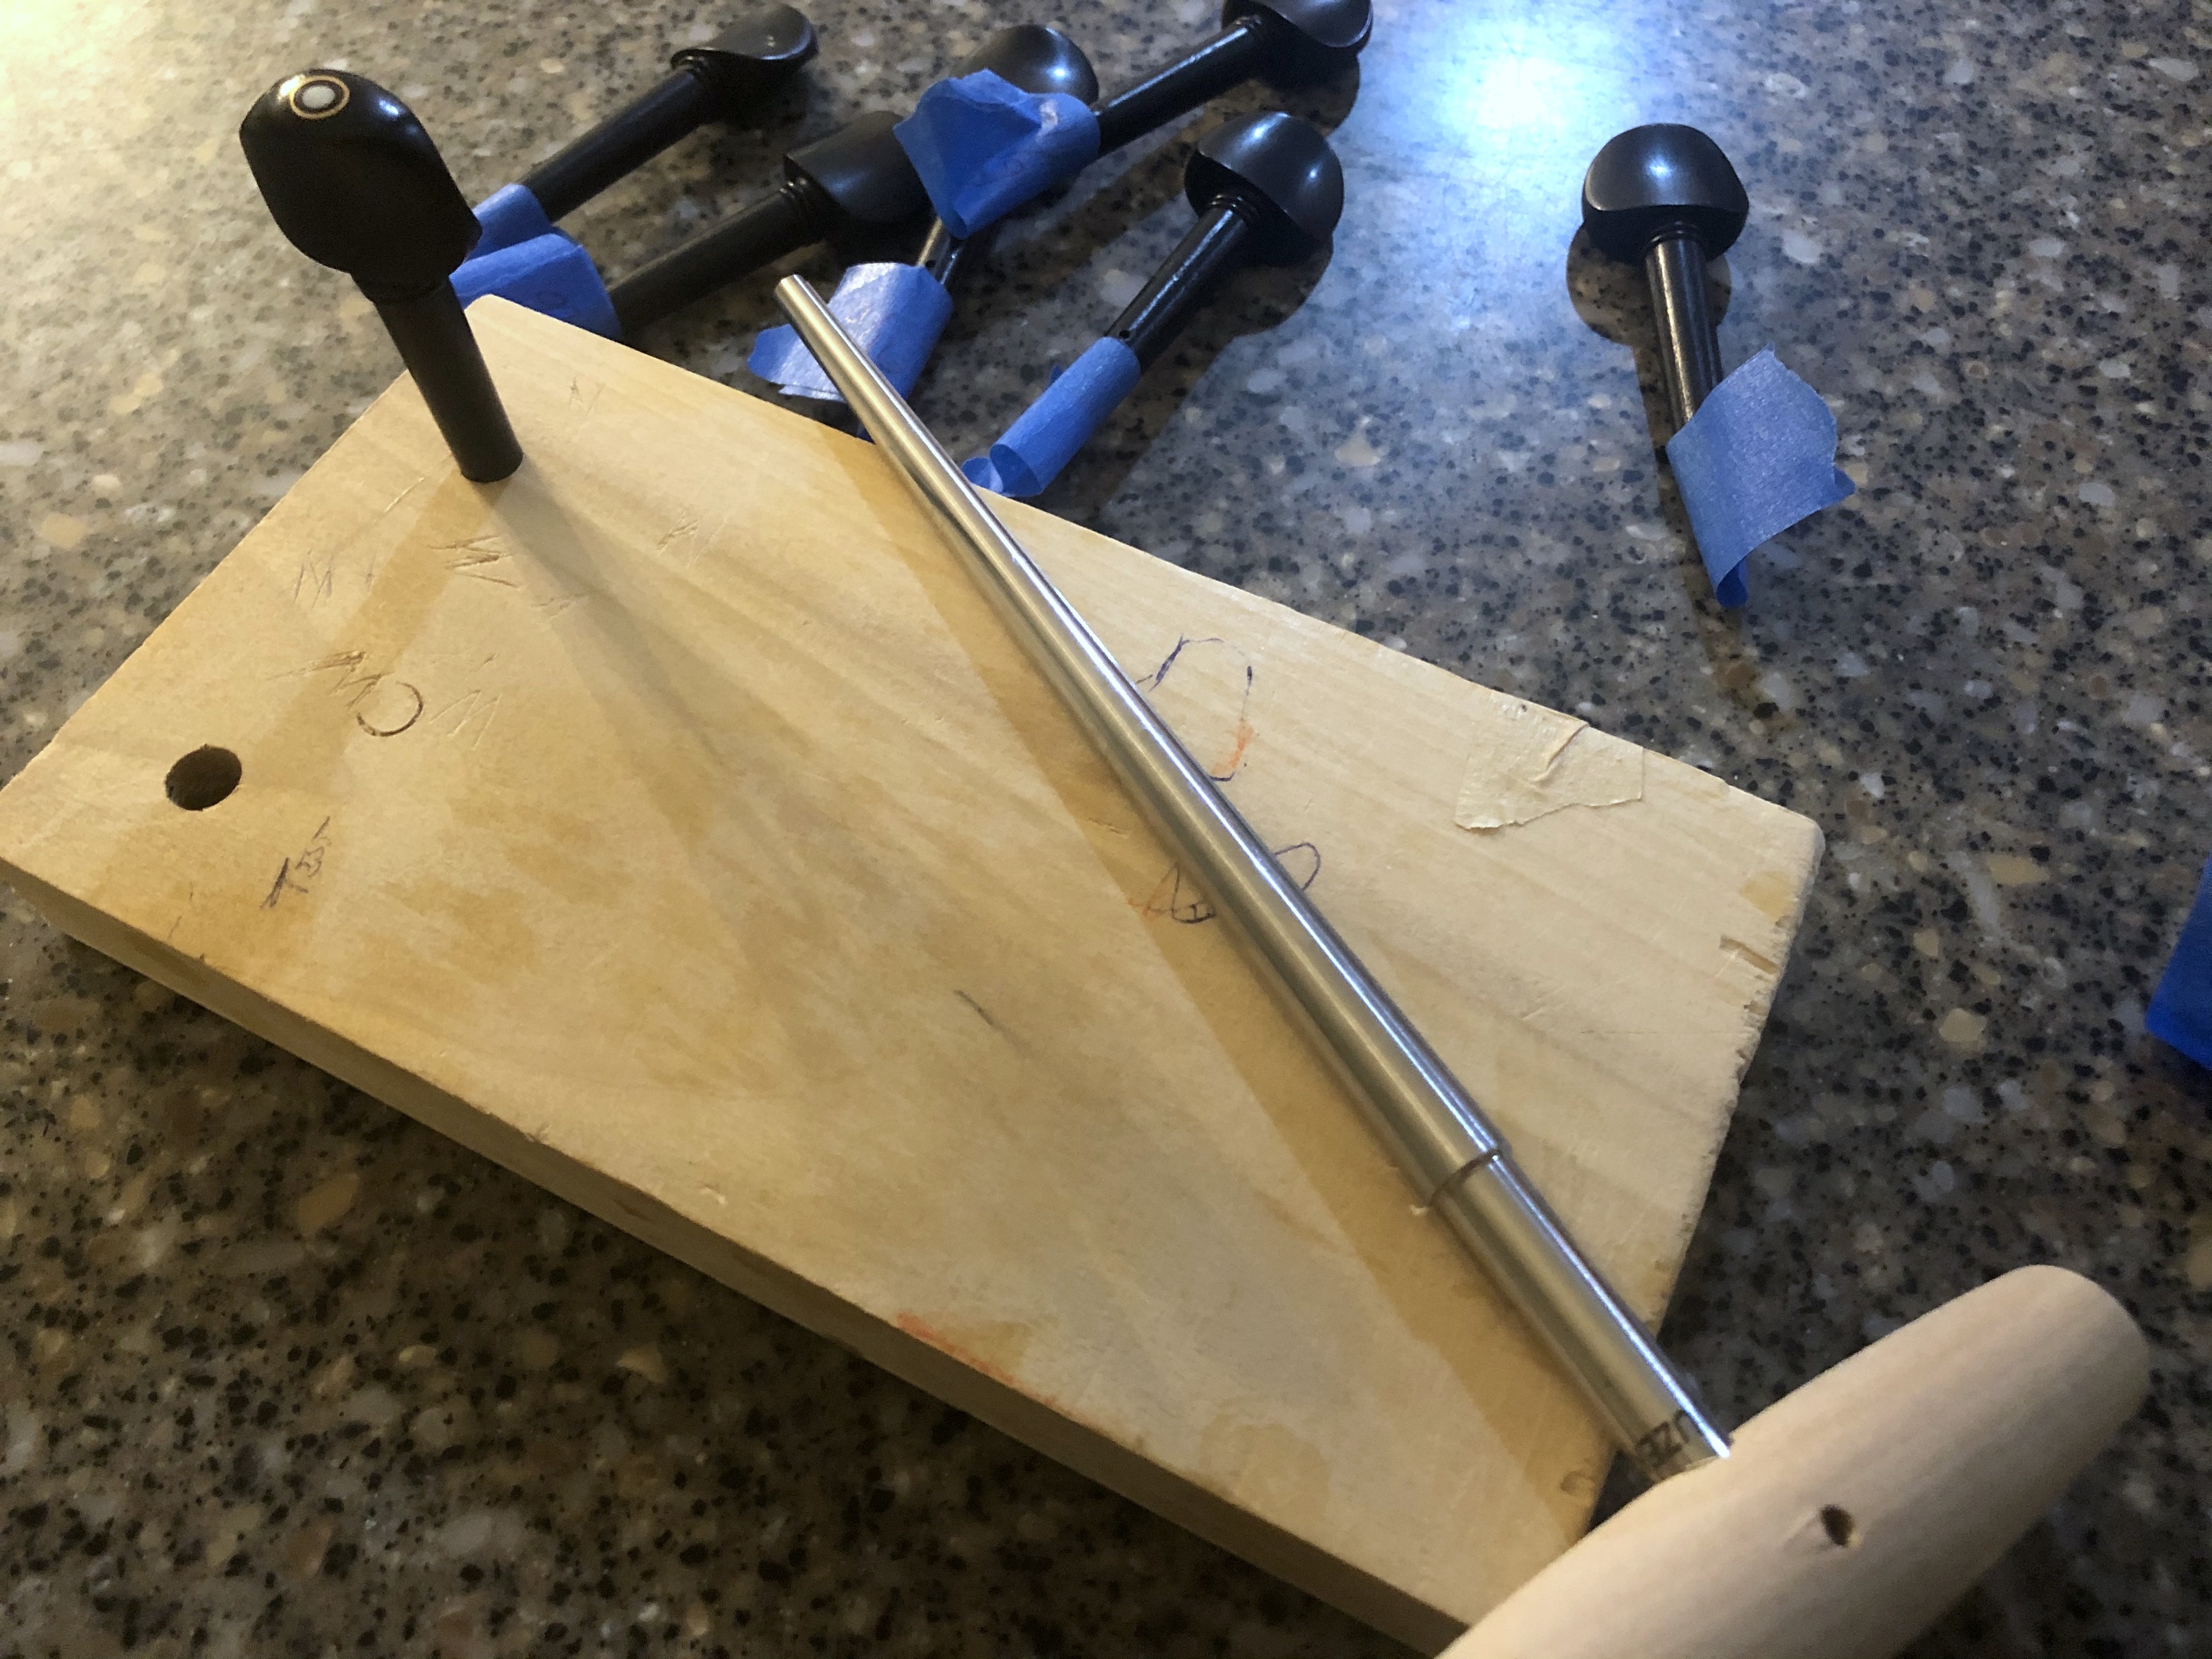
Then, you can line up your pegs by this measurement. Assuming that the tapers are all the same (they all fit well in the hole), you will know that the one with the most shank coming out was the one with the widest shank. This is important because you want to work in order.
Now you can go back to the neck. Start with the fifth string hole, since that one is the most precarious (it’s on the side of the neck) and you want to keep that hole the smallest. Ream it out until it tapers through the entire hole.
Warning! Remember which way the taper goes! You ream from the back to the front: the peg head goes behind the instrument. You want the strings to go on the front, right?
Take your thinnest peg (the one that had the shortest amount of shank when you measured earlier) and fit it into the hole. You want it to sit so that enough peg comes through the fingerboard that you can get some string on it later. If your pegs have holes drilled into them, ignore them. You’ll make your own later.
Then get your next thinnest peg (the next shortest measurement) and pick a hole on the peghead. Do the same thing, but work in order. And be absolutely sure to figure out a way to remember which peg goes to which hole. The main aesthetic thing here is working to get the peg heads to be an even distance from the back of the peghead. Working from thinnest to thickest lets you move to the next thickest one if you overshoot with the reamer.
Finally, mark a spot that’s a little bit above where the peg emerges from the fingerboard so that you can saw the ends off and sand them down. You want them to be even. This is also a good time to take a small drill bit and put a new hole in for your strings.