Building a banjo, part 2: buying wood
Buying wood
When I was starting with my first build, choosing wood was one of the most mysterious parts. Finish was (and continues to be) another. There are three big questions:
- What kind of wood do I choose?
- How much do I need?
- Where do I get it?
- How do I cut this wood?
A third one is relevant if you don’t have a table saw or band saw in your garage, like me:
Northwest Ohio has a great local place called Laborie Farms in Portage, just outside of Bowling Green. That’s the place to go. They also cut wood to size, though it can take a while if they’re working with someone to design a kitchen instead of sell $100 worth of scrap for a banjo. So, that’s easy. They have local types and a pile of “exotics” that can range from cheap to ridiculously expensive. It’s fun to poke around. So that’s questions 3 and 4.
Choosing wood
Best advice here: look at photos from makers. Pick something that you think is attractive and that you’ve heard of before, at least for the main wood. I loved working with cherry. The ambrosia maple was really interesting: it’s maple (super common), but with these stains from insects that lived (past tense) in the tree. Figured and curly maple are gorgeous, but more expensive. I’ve seen walnut, which is softer (and local to here in Wood County).
Fingerboards need to be hard and smooth. Some of the good choices here can be really expensive, but you’re also not looking for much, so it might be worth it. Common ones are ebony (obviously, but not really available and problematic), pau ferro, cocobolo, and figured maple. Others are cheaper, like hard maple, ipe, and rosewood. I’ve used hard maple (which is boring), ipe (super dark), and purpleheart (which eventually turns dark brown).
There are some cool native options, too. Persimmon and osage orange seem to be popping up more often, for example.
Since the main issue is hardness, it’s good to reference a Janka hardness chart. The higher the number, the harder the wood. It also gets more difficult to work with. You’ll see the fingerboard woods in the 2500-3000 range, but hard maple (1450) works just fine for nylon strings, too.
Trim woods can be anything. I like getting extra pieces of the fingerboard wood and using that for consistency, but you can do whatever. Potential spots for trim would be:
- A line down the neck
- The base of the rim
- A heel cap (back of the neck where it flattens and meets the rim)
- The peghead top
I’ve never done inlays, but I hear that they are not impossible. They just require some extra tools, patience, and creativity. Trim wood could serve as an inlay, or the more common shell (or plastic).
End of the day: choose something that you can find and like. It’s nice to look at the piece you’re buying, so I’ve never ordered and shipped anything.
Wood amounts (a cut list)
You can never have too much scrap, so take these as bare minimums from someone who is cheap and has lucked out by not making enough mistakes to get stuck.
There are two main parts of a banjo to build: the rim and the neck. There are tons of ways to do each, but I’ve done each two ways. I’ll quickly mention one and then go into detail on the other for each part.
For the block rim
I’ve steam bent a rim and done block rims. Steam bending was a pain, but worked. The blocks were more intricate to assemble, but less stressful in one single moment of bending. We’re doing a block rim here.
Steam bending involves building a steam box out of PVC, watching it melt, then doing it out of wood, watching it disintegrate, and hoping that you have enough heat to work. You also have to build a form and figure out a contraption to give you leverage. And you need a steamer. It’s hard to get a perfect circle, but since you’re gluing a head, that’s not really much of an issue. Either way, it works, but it’s a pain. (I also did it with a quarter inch thick piece of ash instead of the more common laminations, but that’s another story. It was old school.)
For the block rim, you get long pieces of wood, cut trapezoids, and assemble an octagon. After a bunch of prep work, you stack them and glue them together to get the proper depth.
To get the size, you need to draw out a circle and work out the geometry. Randy from Bluestemstrings.com sent me an email shortly after I first pushed this to the wide web and graciously offered to let me post his plans for block rim segments. His site doesn’t seem to be running anymore, but it’s mentioned often in the banjohangout.com forums as really useful. You can find it in the Wayback Machine, though, and it’s worth looking around at his plans. This thumbnail links to a PDF of his plans for rim segments.
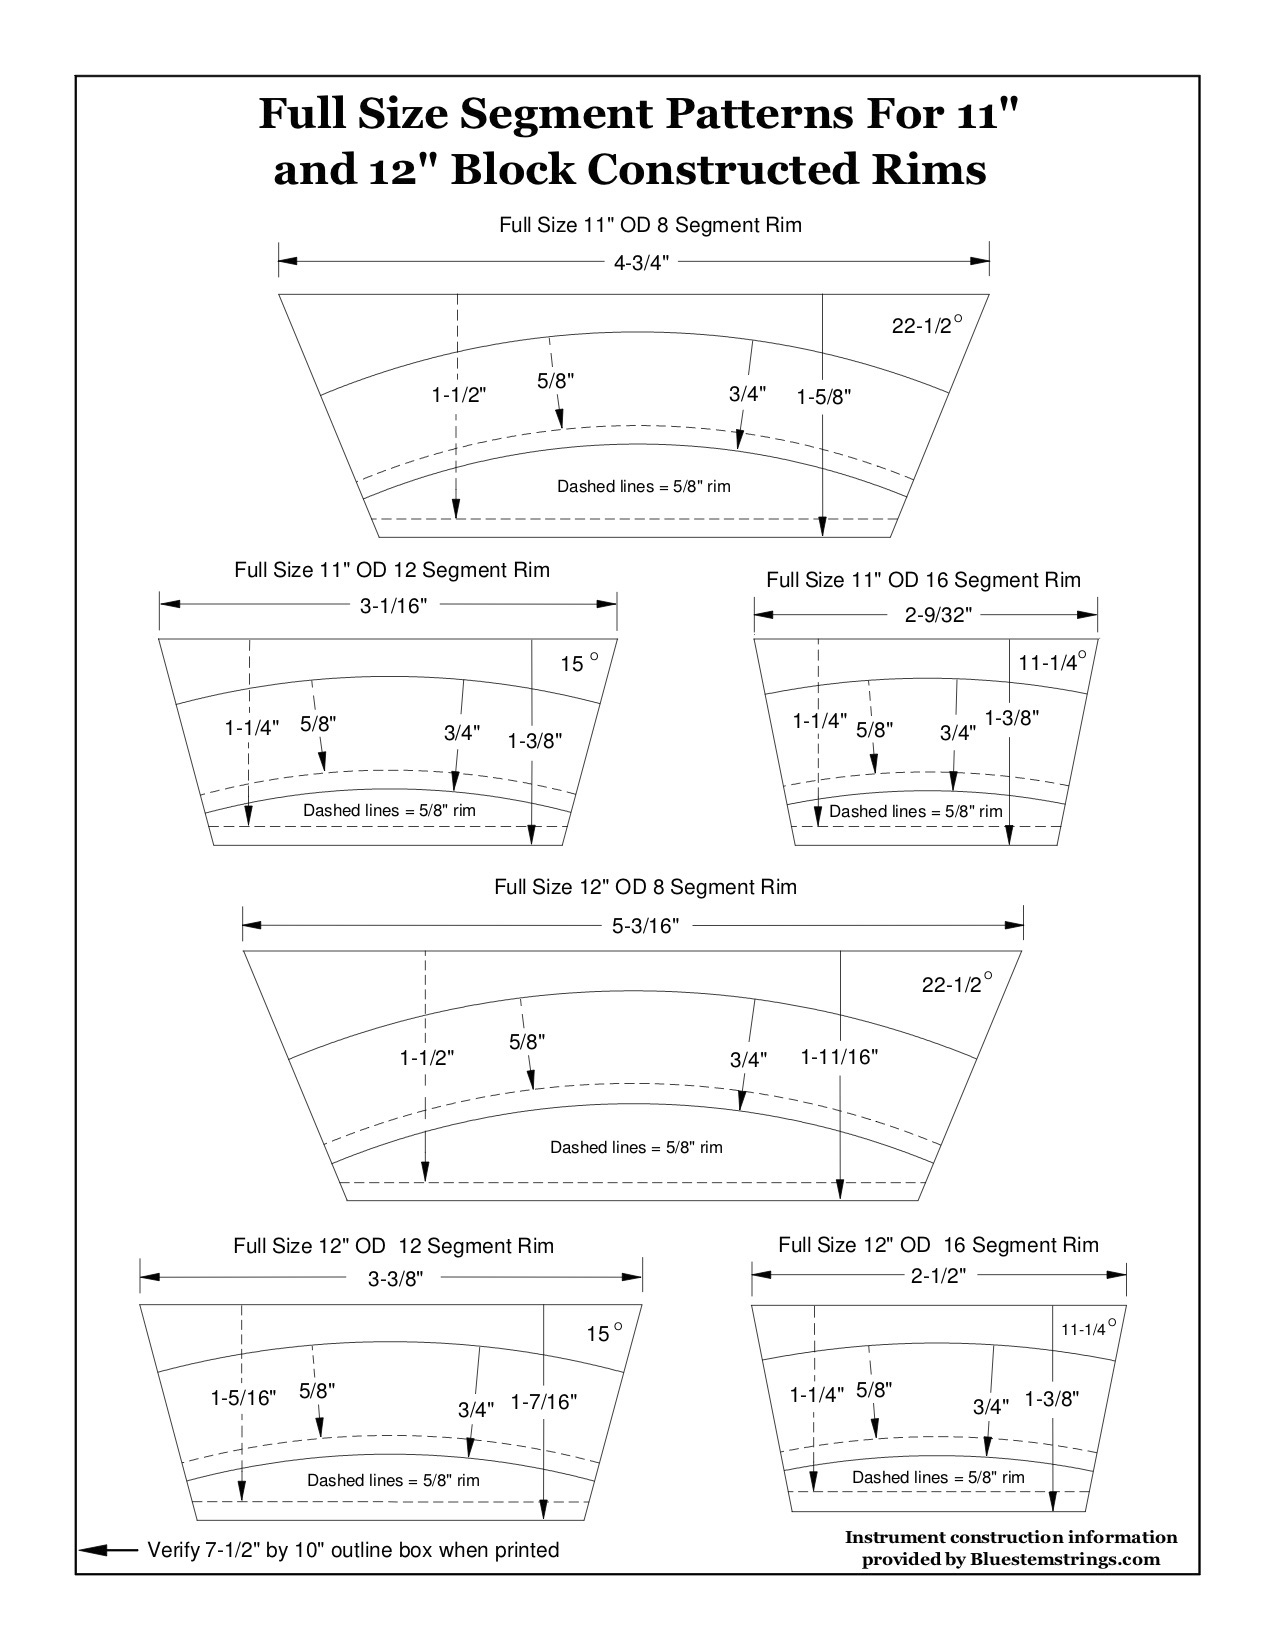
Taking the larger size rim for the sake of overestimating the amount of wood, you need 8 segments that are each 5 3/16 inches on the outside. Since you flip the wood, it’s really 4 times (5 3/16” + math and stuff). I’d guess high and call it 5 1/4” times 8 segments for 42” per lamination (per hoop that you’ll glue together). If your wood is 1” thick and you want a 3” deep rim, you need three laminations. By the time you cut and sand, it might be short, so guess high. That’s four laminations for 168” or 14 feet. The pattern gives a width of 1 11/16”. A 2x4 prepped is usually 1 3/4” thick, not 2”. So take the 1 11/16” and call it 2”.
Some people also use a harder wood for the top of the rim to serve as a wooden tone ring. If you pick something soft, you may want consider that.
That means: 14 feet of wood that’s 2 inches wide and 1 inch thick. If you want a cap, you can make that last lamination out of something different, so 3.5 feet of trim an 10.5 feet of the main wood. Always get more. We’ll call it 16’ since things come in 4s.
For the neck
I’ve used two techniques for building a neck. You can see each in the photos at the top of the page. The purpleheart/maple banjo stacks pieces of wood horizontally together. For the cherry/ipe one, I cut a 4x4 in half, folded it on itself (vertically) and put a piece of ipe in between. This second approach gives extra strength because the two long pieces of cherry reinforce each other. Plus, the ipe serves as a super hard bracing (like a truss rod).
I like the second way (the cherry/ipe one), but the first way is far easier. We’ll start there. I got the idea from another website (among many) that outlines a banjo building process and also describes all sorts of good woodworking methods, not to mention how to get into and out of problems. I recommend reading this completely!
This page in particular has the layout that we’ll use. It comes out to 68” of 1” by 4”. Let’s call that 6 feet. 7 to be safe. The 4” might really be 3 1/2” after all is said and done.
So, the neck and dowel stick are 7 feet of 1” x 4”. Let call it 8 feet.
For the fingerboard
The fingerboard material is a little different. It should be thinner (1/4” thick works) and it should be about 3 1/2 to 4” wide like the neck wood. It’s easiest to buy this at 1/4” thick unless you have the tools to cut it down. It’s basically going to lay over the top of the entire next and peghead. If you want a different material for the peghead, go for it. If you want to use figured maple for the neck and skip the fingerboard entirely, go for it.
In any case, you’ll want about 24” to allow for extra on the fingerboard, plus 7 or 8 inches to allow for extra on the peghead. You’ll also want some scrap for other odds and ends (like the tail piece). This is a gross overestimate: math-wise, if you include a scoop, you can probably get away with 24 inches total. Maybe less. Let’s call it 4 feet.
So, the fingerboard material is 2 to 3 feet of 1/4” x 4”. It’s hard to get 1/4 inch thick stock, so you might buy a 1” thick piece and split it in half on a bandsaw.
Totals and board feet
You buy wood in board feet (BF), which is calculated as one inch thick 12x12 pieces. These are rough, since you can’t always predict the widths or lengths that you’ll be able to get exactly. You can look up estimates of prices online, but it varies. I’d check my math if I were you. These are all going to be cut into shorter lengths.
- Rim: 16 linear feet, 2” wide, 1” thick for 3ish board feet
- Neck: 8 linear feet, 4” wide, 1” thick for 3ish board feet
- Fingerboard: 4 linear feet, 4” wide, 1/4” thick for 1.5ish (at 1” thick, but I look for 1/4” pieces)