Building a banjo, part 5: assembling and finishing
Assembling the neck and rim
This is a tricky part of the build, but it’s also one of the most satisfying to finish up. Once you’re done, you’ll have two pieces that fit together and look something like a banjo.
Neck angle
There is a lot of discussion online about banjo neck angles. If you look at old minstrel banjos, there are examples where the neck angle is 0°. Other boards talk about angles that are steeper, around 3°.
These are describing the angle of the neck in reference to the rim. If you lay a banjo (that has no strings or bridge) face down on a table, the neck will usually be tilted back a tiny bit. This adds some downward pressure on the bridge: the neck “pulls” the string backward and into the banjo head.
I have had luck splitting the difference, which accounts for the idea that the angle can help, but you don’t need much since we have nylon strings. I aim for 1 to 2° and allow for some wiggle room. You can use the same process, but decide on a different angle if you so desire.
The neck angle is relevant because we need to cut some holes in the rim so that the neck and rim can attach. If we lay both flat and put both holes at the same height on the rim, we’ll have a 0° neck angle. If we want the neck to angle away a little bit, the we are going to have to adjust our holes and they won’t line up at exactly the same height.
Measuring holes in the rim
You need five measurements to cut these rectangular holes:
- The bottom of the rim to the bottom of the front hole he(by the heel)
- The bottom of the rim to the bottom of the back hole (by the end of the dowel stick)
- The hight of the dowel stick, and therefore, the height of the holes
- The width of the hole at the heel
- The width of the hole at the end
The distances from the bottom of the rim to the bottom of the two holes are the most difficult to get. There’s not a piece of wood to measure. And this also has to account for the neck angle.
This (poorly drawn) diagram shows what you are looking for. Prop the neck up at the angle you want. You have to account for a straight line through the gap that you created when carving out a scoop.

Thinking of a right triangle will help you create that neck angle. If you want 1°, you will have a long side (along the table and under the neck) and a hypotenuse (the neck from the end of the rim to the nut). If the far angle is 1°, you can use an online right triangle calculator to get the height of the neck at the nut.
For our 26” scale neck with an 11” rim, we have 20” of neck. That’s the hypotenuse. Our height comes out to about a third of an inch. Let’s call it almost 3/8ths (0.375). Use some blocks and a straight edge to set this up. Then you can do some measurements.
You know the height of your rim (if not, just measure it). The difference between the rim height and the height of the dowel stick at the heel. Then measure the diameter of the rim down the length of the dowel on the flat surface of the table (not along the dowel, which is angled).
The height of the dowel stick at each of these points is the distance from the top of the rim. Everything is upside down. Subtract that from the height of the rim to get the distance up from the bottom of the rim for the bottom of the two holes.
Be sure to measure straight up from the corner of the imaginary plane extending from the fingerboard and go straight up. You are going to cut (carve) this angle out later so that the rim comes in flush with the heel of the neck.
Cutting holes in the rim
Once you have the measurement from the bottom of the rim to the bottom of the hole, you can make your square. The height of the square is the thickness of the dowel stick. The width is the width of the dowel stick. The last part of this drawing is about carving the angle into the neck to fit the rim. That step comes next. Remember that you can always click an image for a larger version.
To locate the squares, decide on a front and back of the rim and mark the two points. You may want to hide a nasty patch in the heel of the neck. Always an option.
Cutting the holes is straightforward, but a slow process. Use drill holes to get a bunch of the waste out, then go in with a file to flatten the sides. Start small, check for fit, then get a little bigger. Do it again and again. Remember that the heel sides of each cut will have to be a tiny bit wider than the tail sides since the dowel stick is constantly tapering. Take your time.
These photos show a (somewhat gappy) final product. This is from my first banjo build, which had a steam bent rim.
Carving the heel
As you start to get closer to the heel, it’ll be time to think about carving that angle and curve so that the rim can fit snugly.
This is another job that can be done with any number of tools, but there is no really clean way to go about it. (If you have a separate dowel stick, you can use a spindle sander and do the job quickly.)
File and chisel slowly so that you inch your way toward a snug fit. If you have good control, you may be able to draw in the final cut lines and use the saw kerfing method from the neck, but sharp carving tools are safer.
This is another spot where something pretty is great, but something that fits snugly does the job. This image shows how the curve in the heel matches to the rim, but this particular build didn’t have a dowel stick (I added it later). You can also tell that I wasn’t quite done with the sanding. Sometimes you need to change up your jobs for the sake of sanity.
Attaching the rim
The easiest way to attach the rim is with screws. They’re a little ugly, but they pull the rim tightly against the neck. An alternative is carving a slot and making a wedge-like “key.” These look good, but I haven’t tried it myself, yet. You can also drill a hole and use a pin, but that won’t pull the pieces closer together. The string tension, should, though, so I imagine a pin would work.
The dangerous part of screws is aiming so that you don’t break through the outside of the neck. Depending on how you carved your heel, this may not be possible or may be a tight fit.
Check your screw to get a bit that is the width of the shank and narrower than the thread. This will get you a good pilot hole diameter. Drill your holes so that they angle in toward the center of the neck.
You don’t want the screws to grab the rim. The screw head should pull the rim into the neck. Find a larger drill bit, one that is wider than the thread but narrower than the head. Use that to widen the holes in the rim.
Then you can put the screw in and tighten it up. You may need to use a screwdriver instead of a drill here, but in any case, you should be able to get the rim nice and tight against the neck. If not, find the bumps and get the carving tools back out.
Then, you can hold it up and see how it looks and feels like a banjo. That’s a good moment. It’s also a good time to trim down your dowel stick if you want. Leave a few inches for the loop that attaches your tailpiece.


Attaching the skin
Every time I have to attach a skin, I go back and read this page from a minstrel banjo discussion forum. I actually copied it into a note on my computer and pull it up. Thanks, Bell Banjos, whoever you are.
Just in case that page disappears into the ether at some point, here’s the basic gist.
Preparing the rim
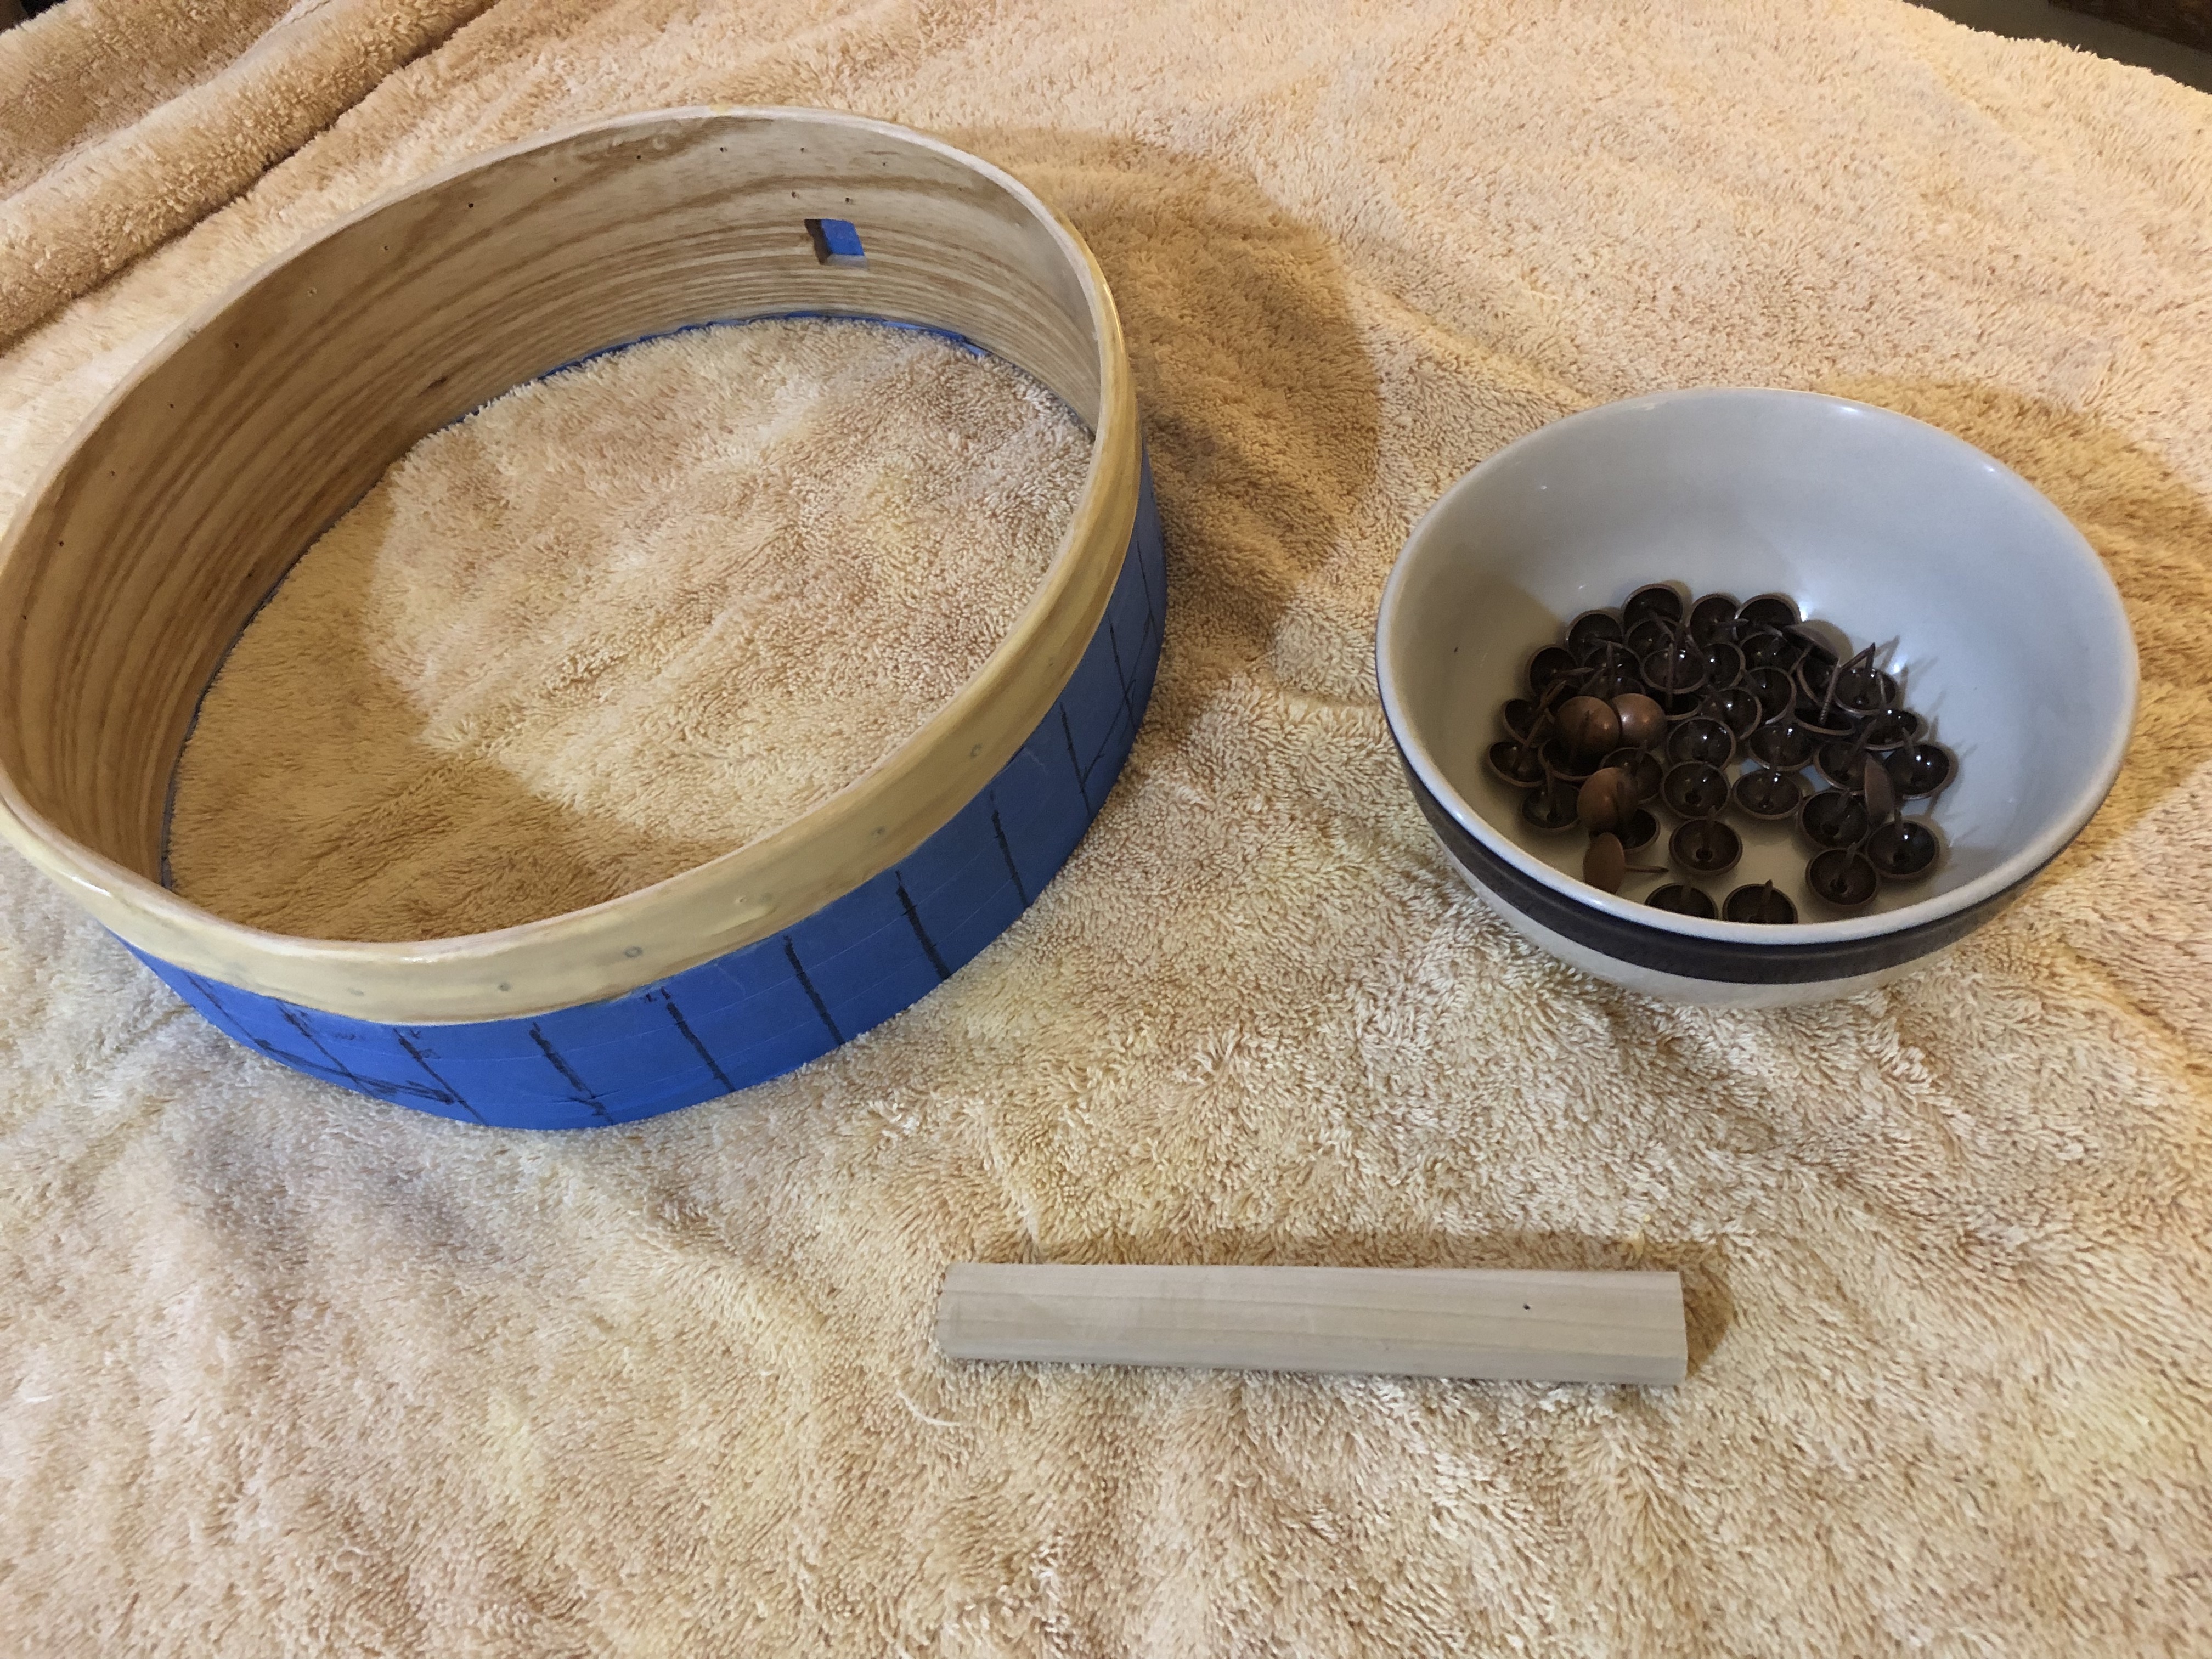
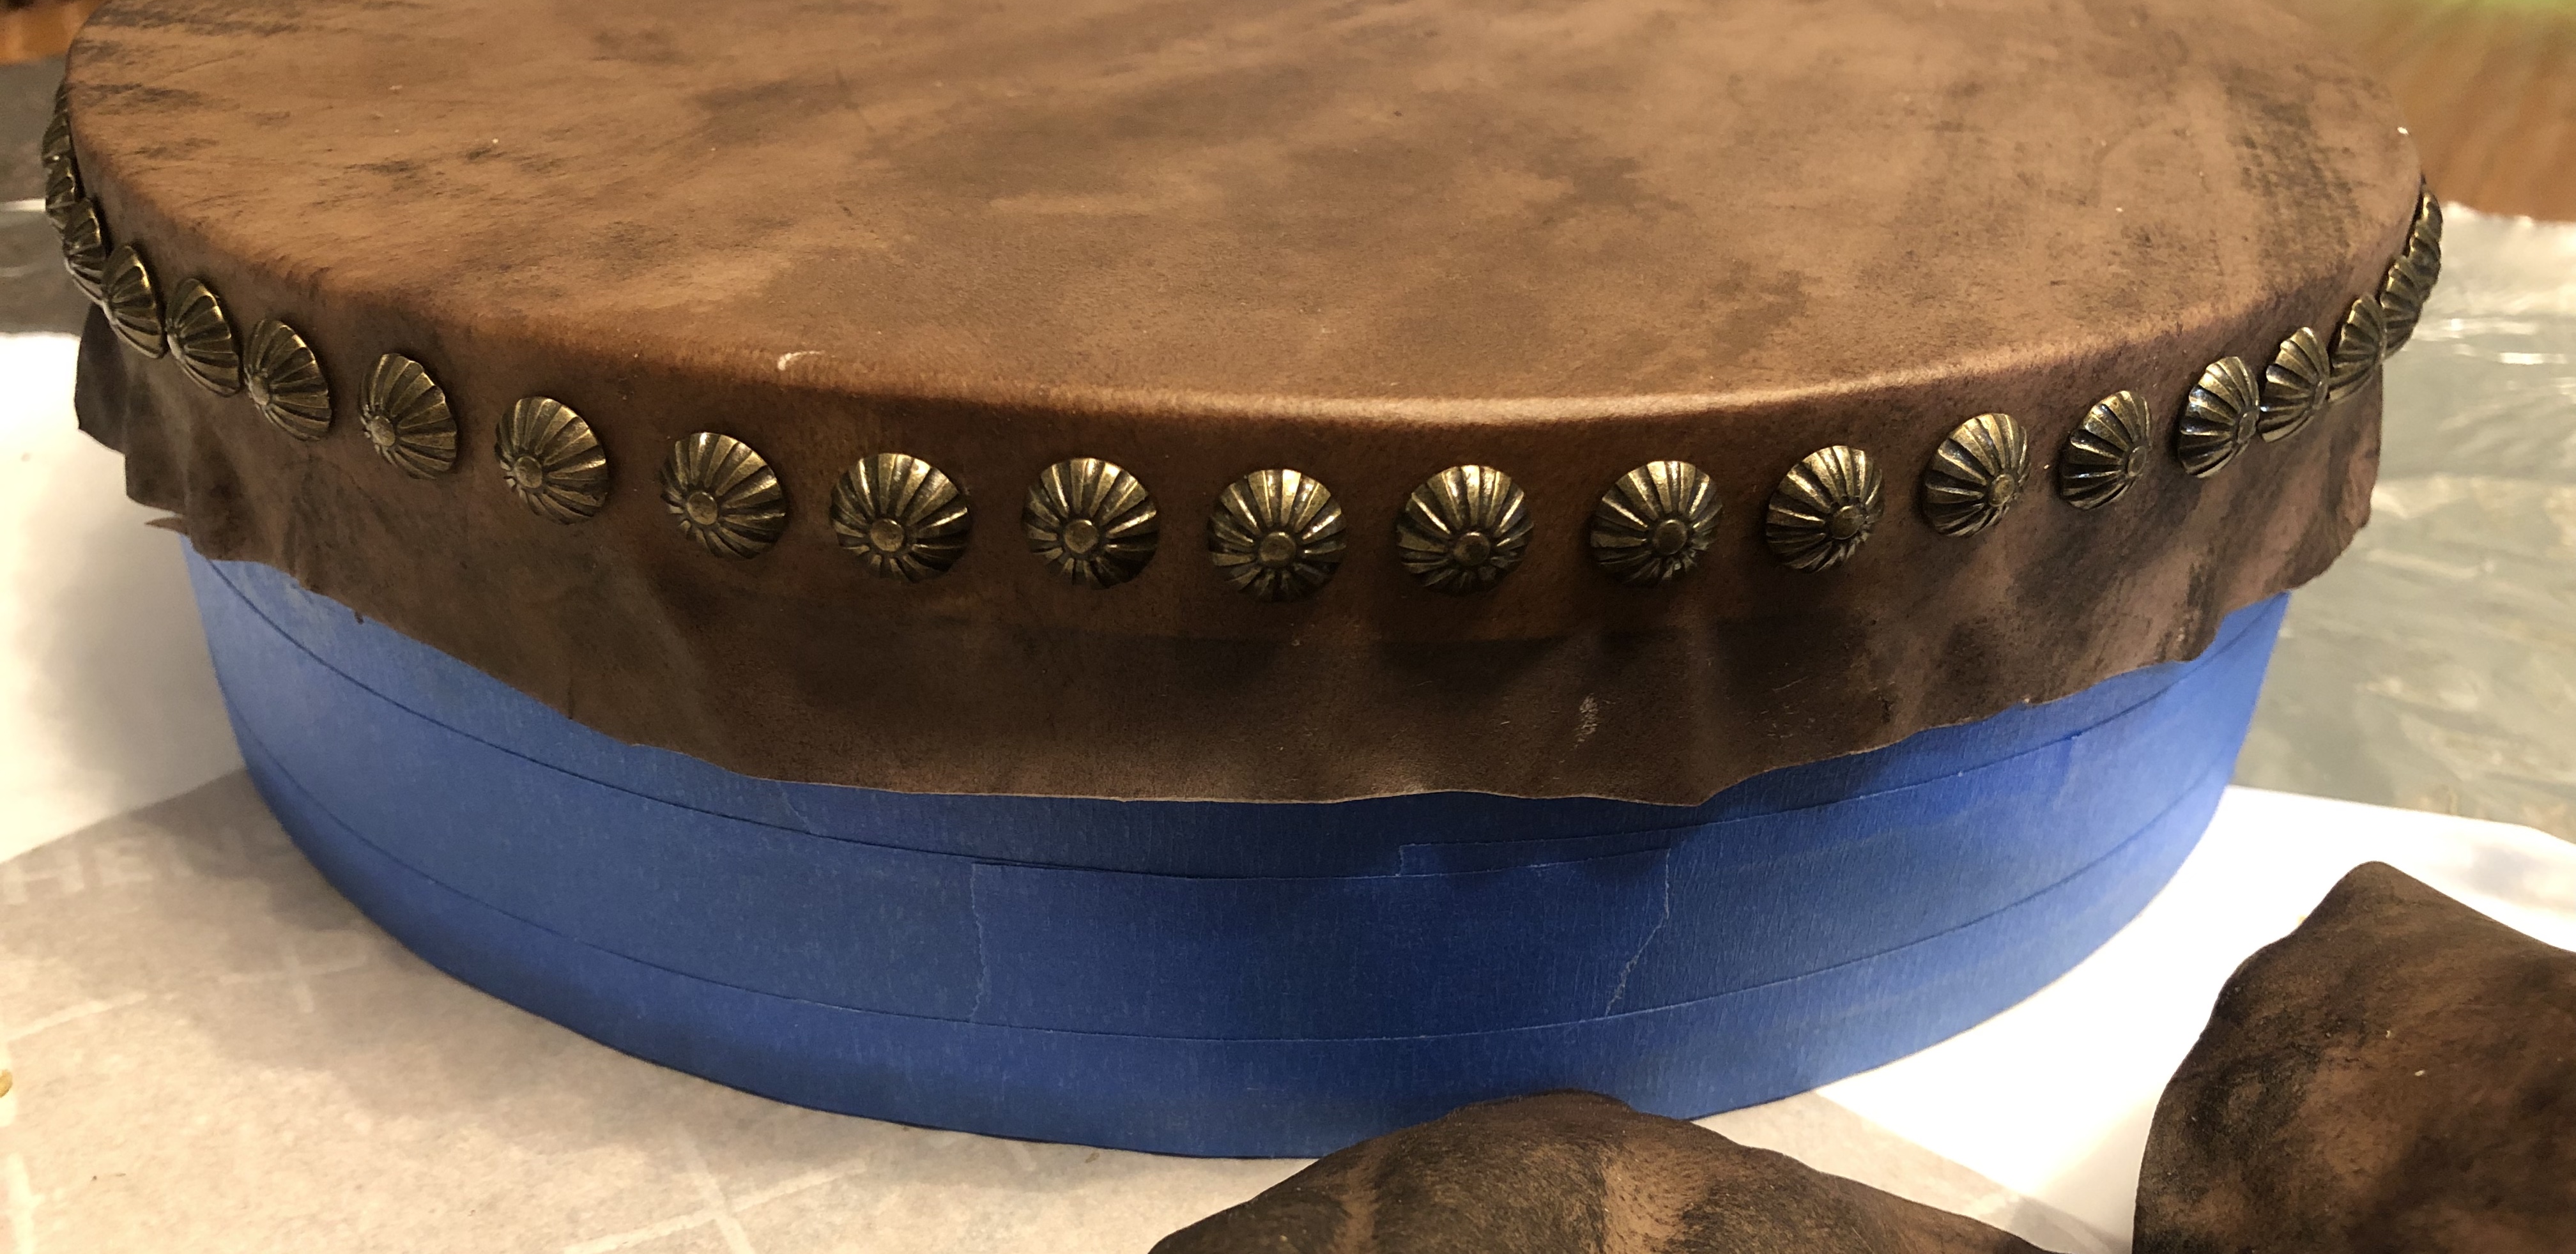
Figure out where to put the tacks. You’ll want a little space between the top edge and the end of the tack, but you don’t need much. Then, you want a roughly equal amount of space between the bottom of the tack head and the end of the skin, where you’ll cut the skin off and where the finish begins. Take a look at this photo from my first build to get an idea of what I’m talking about.
The best way to figure this out is to simply measure the heads of your tacks and add a bit. This line (head + change) is also going to be the glue line. If you have a marking gauge, you can use that to draw a line around the top of the head, but it’s not necessary. Just mark the distance in a few spots around the rim and run a piece of blue painters tape from spot to spot. You’ll want to tape off the rest of the rim, too (from that line all the way down to the bottom).
Figure out where you want your tacks (how widely you want to space them) and mark the spots with dark, vertical lines on the tape. A Sharpie works well. These will help you to quickly find the hole, which is important.
Decide on a vertical placement (the halfway point makes sense) and mark the spot for each tack on the wood in pencil. Drill pilot holes with a drill bit that is just barely thinner than the shank of your tacks. Then mark each hole with a dot from the Sharpie. This dot will make it far easier to see the holes when fighting the tacks and it will be covered by the heads of the tacks themselves.
Grab a piece of scrap wood to use to push the tacks in and a friend to help hold everything down.
Gluing, tacking, and drying
You have to move fast for this part, so read first, then go back to it.
Fill a tub with some water and put the skin in it. You may need to weigh it down with a few things. Meanwhile, put glue on the bare wood of the rim. Try not to get any over the edge. Wait for 30 minutes. The glue will get close to drying and the skin will loosen up in the tub.
Dry the skin off by rolling it in a towel and move quickly to center it over the rim. Don’t put it down on the rim until you have it centered. Four hands make this easy. You don’t want to move it around and get glue where it shouldn’t be.
Get a few tacks ready and have a block to help pushing in tacks handy. You’ll put in three next to each other (just one will probably rip the skin when you pull against it). Then, pull the other side as hard as you can and put another three in over there. Three more on each side, again as tight as possible, and you’ll be on your way. Move quickly.
Throughout this, be sure not to touch the skin that’s stretched over the rim. Keep pulling hard and adding tacks to work your way around the rim. Focus on spots where there are wrinkles so that you can flatten things out as much as possible.
Once everything is in, use a razor blade or scissors to cut off most of the excess. I find it easiest to do this in two stages. First, cut pretty close to the glue line with scissors, then, after working to dry and flatten the skin on the side. Then I go back with a razor blade to clean it up.
For that in-between phase, sit and watch some TV while turning the rim around in your hands and pushing the spaces between the tacks as flat as possible. Keep going around until the skin dries tight. This will be easier if you cut the excess pretty close to the glue line. Then, clean it up with a razor blade.
Wait a day or so before touching the skin. It’s great to hear the high pitched ring, but don’t touch it until a day or two pass. The link that I shared above mentions rubbing some mink oil in after a few days pass. I haven’t had any, so I can’t speak to this, but there’s no reason to believe that it wouldn’t help!
Other pieces
The last step for the banjo itself is the finish, but the tail piece needs finish, too. So this section has a few comments about building the other odds and ends that you’ll need. After that, you can apply finish to everything at once.
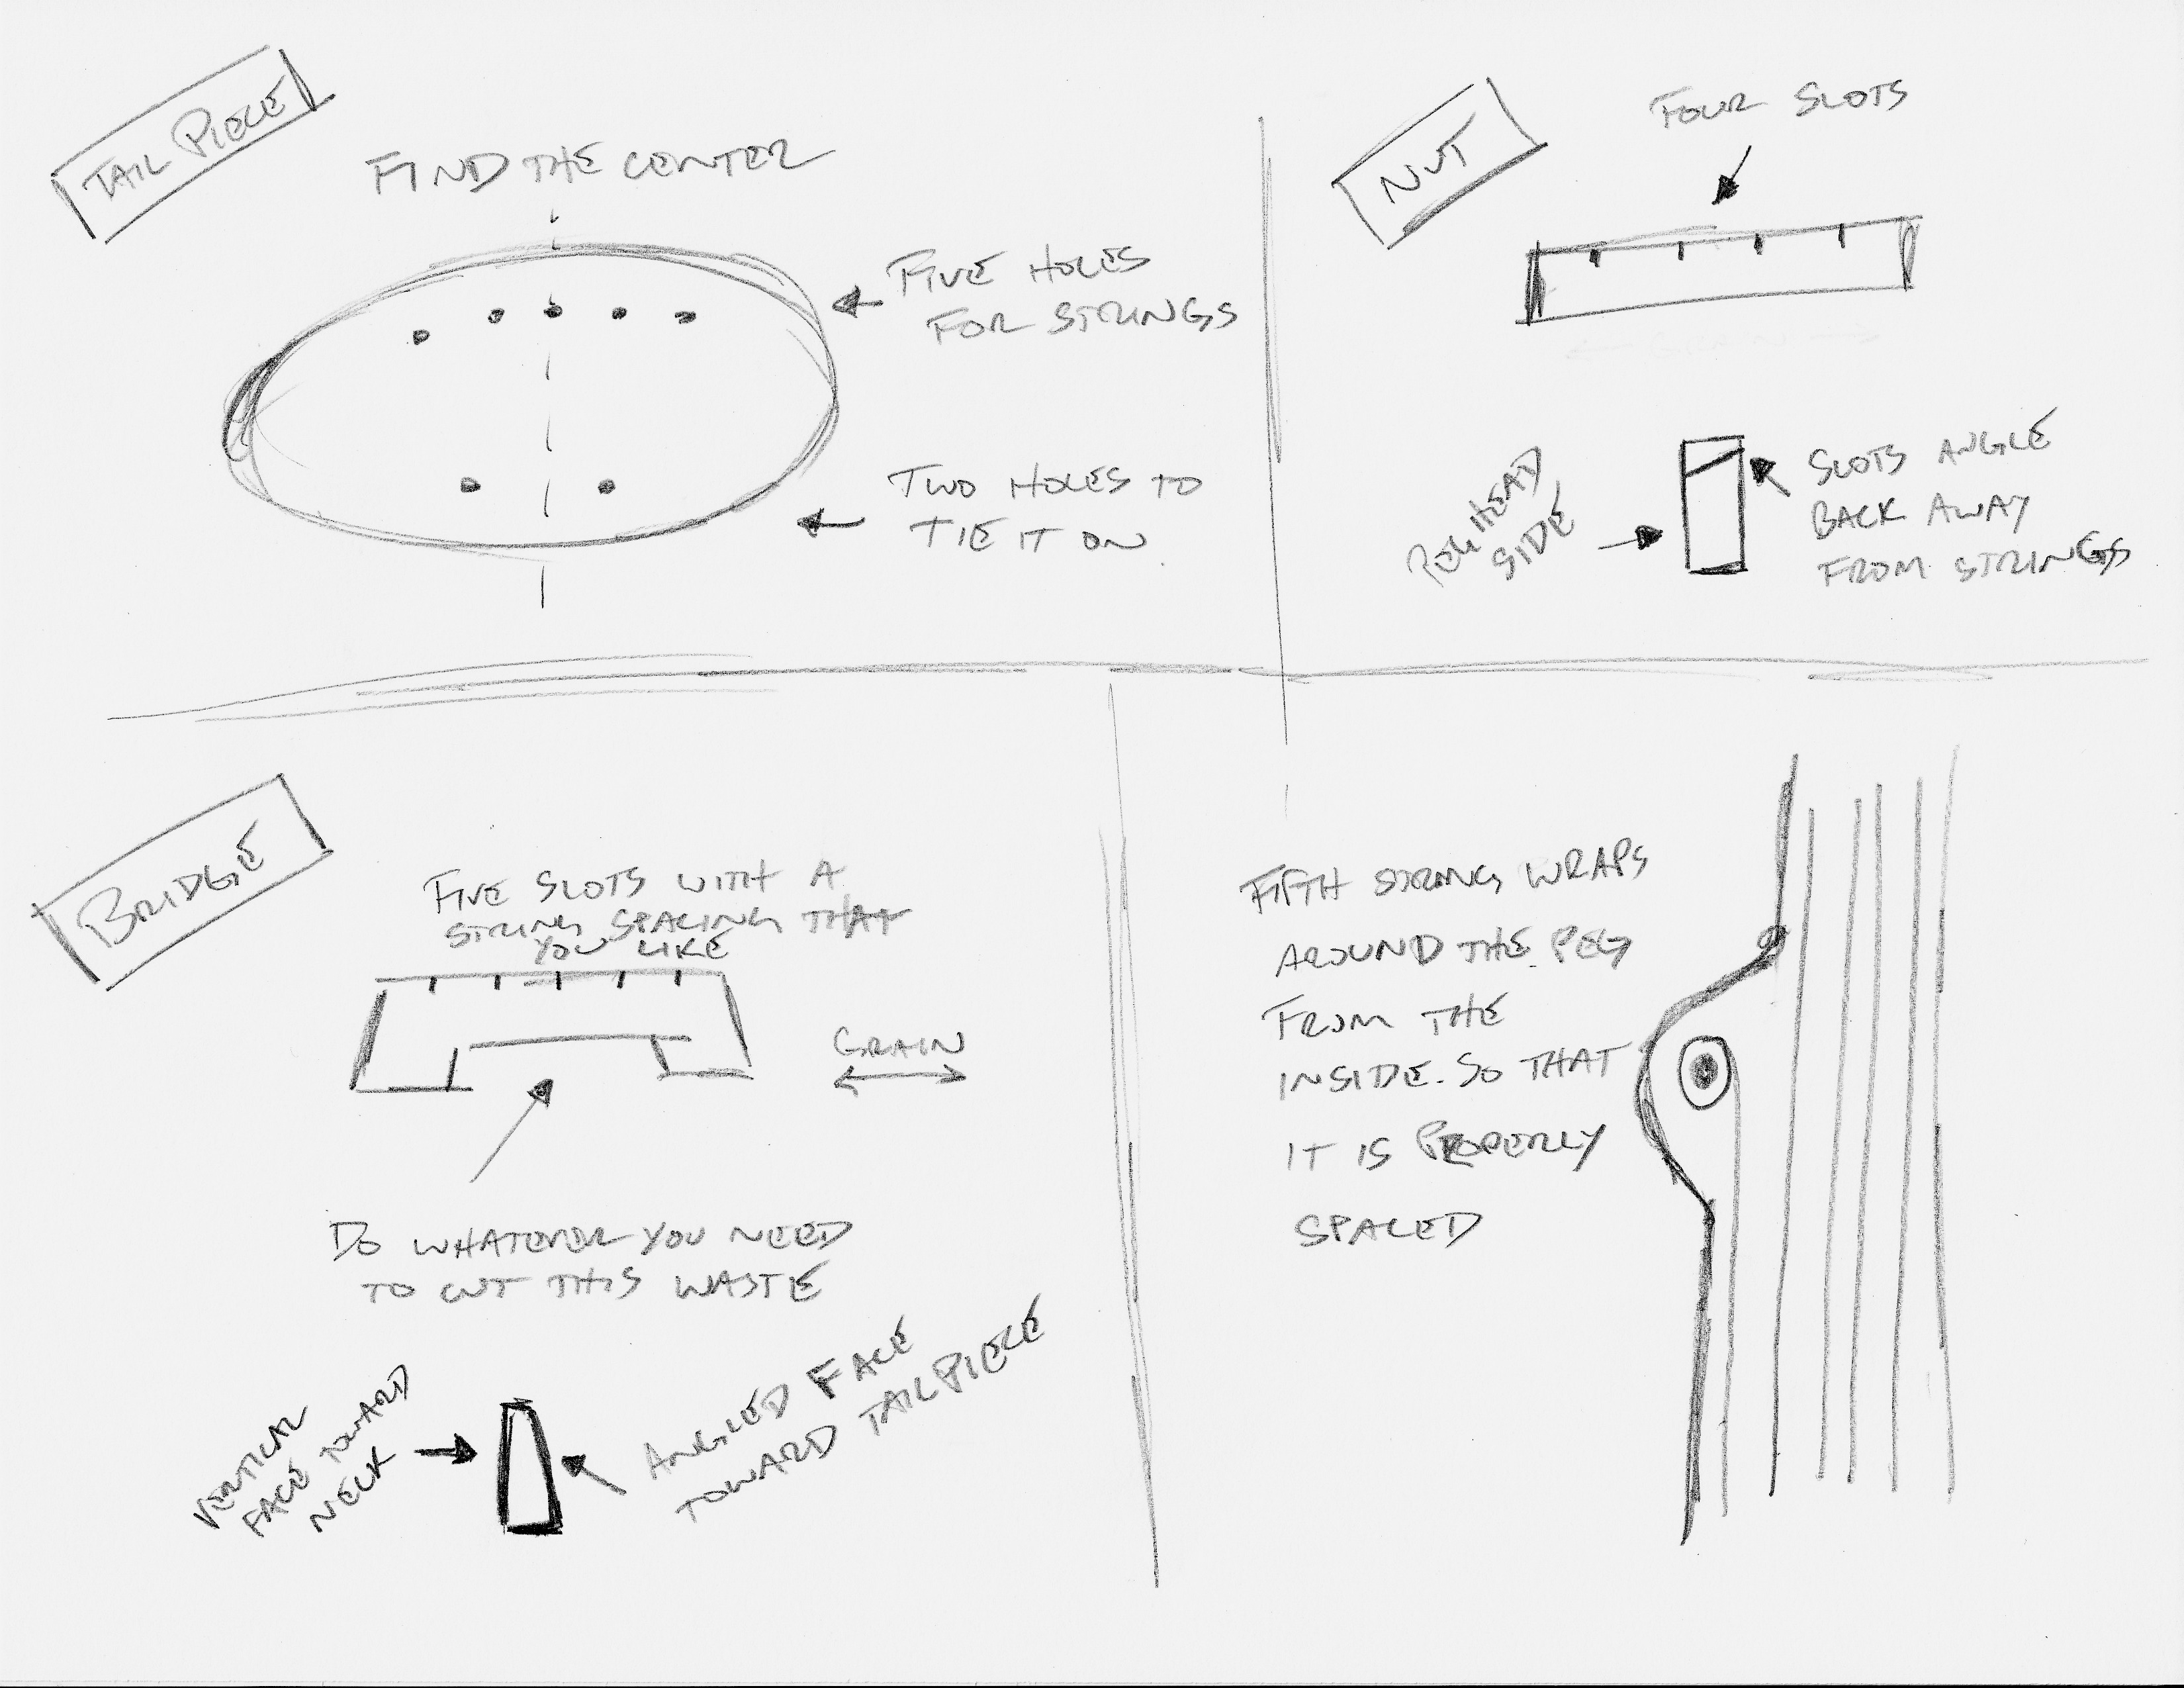
Making the nut
The nut is pretty straightforward. You want a small rectangle that fits into the space between the peghead face and the fingerboard. A mounted belt sander is the easiest way to get the fit just right. You want it snug, but don’t glue it in yet. You’ll adjust things when you string up the instrument.
You can make your slots for the strings at this point, though. The main thing here is that you want the strings to start bending backward toward the pegs as soon as they hit the front of the nut (the side facing the fingerboard). Instead of cutting the slots flat at their base, you can angle them back slightly toward the pegs. This makes sure that the strings stop where the nut starts and not at some bump in the middle of the cut. The depth of the slots will determine your action, the height of the strings off of the fingerboard. I like mine really low, only 1/16th or 1/8th of an inch away from the fingerboard. We’ll come back to this at the end, when stringing up and setting up the instrument.
Making the bridge
This step of the bridge is similar, you’ll come back to it later to adjust string action. In the meantime, the key here is measuring the spacing (which might be a touch wider than at the nut).
One other thing: you’ll want the side of the bridge that faces the fingerboard to be vertical. The opposite face can angle out slightly. This gives a bit more width at the base than at the top without getting in the way of the strings ringing. It probably doesn’t matter, but it’s what you do with a violin bridge, too.
Cut this however you need to. Scroll saws work well, but I’ve used the rounded nose of a belt sander to sand out the gap in the bottom.
Making the tailpiece
The tailpiece can have any number of shapes. Check out some photos before diving in.
This particular design is a simple one. There are all sorts of other options out there. The idea here is to make a piece of wood with five holes for the banjo strings on one side and two holes for a loop to go around the end of the dowel stick. The drawing above gives an idea, but you do not need to make it an oval.
Sand it well and consider tools you may have for rounding off the edges of the string holes. You don’t want the strings to cut on a sharp edge.
If you mess up, perhaps the holes are too close to the edge and they eventually break the wood, you can just make a new one.
Applying the finish
I spent many more late nights reading about finishing instruments. This is the easy way. It comes from this banjohangout thread.
More sanding
Sand everything up to a 220 grit. Make sure you don’t have any scratches left. If you run a damp cloth over the wood, it will raise some of the grain and you can sand it smoother.
Finishing (but not finishing)
Use tack cloth (from a hardware store) or a t-shirt cut into squares to apply the finish. Tru-Oil from Birchwood Casey is a gunstock finish that holds up well and is very easy to put on. Use latex gloves that you can toss after each coat or two. This stuff is really awful to get off of your hands.
The first coat will be thicker (but not too thick) since it soaks in a bit. Let it dry for a day.
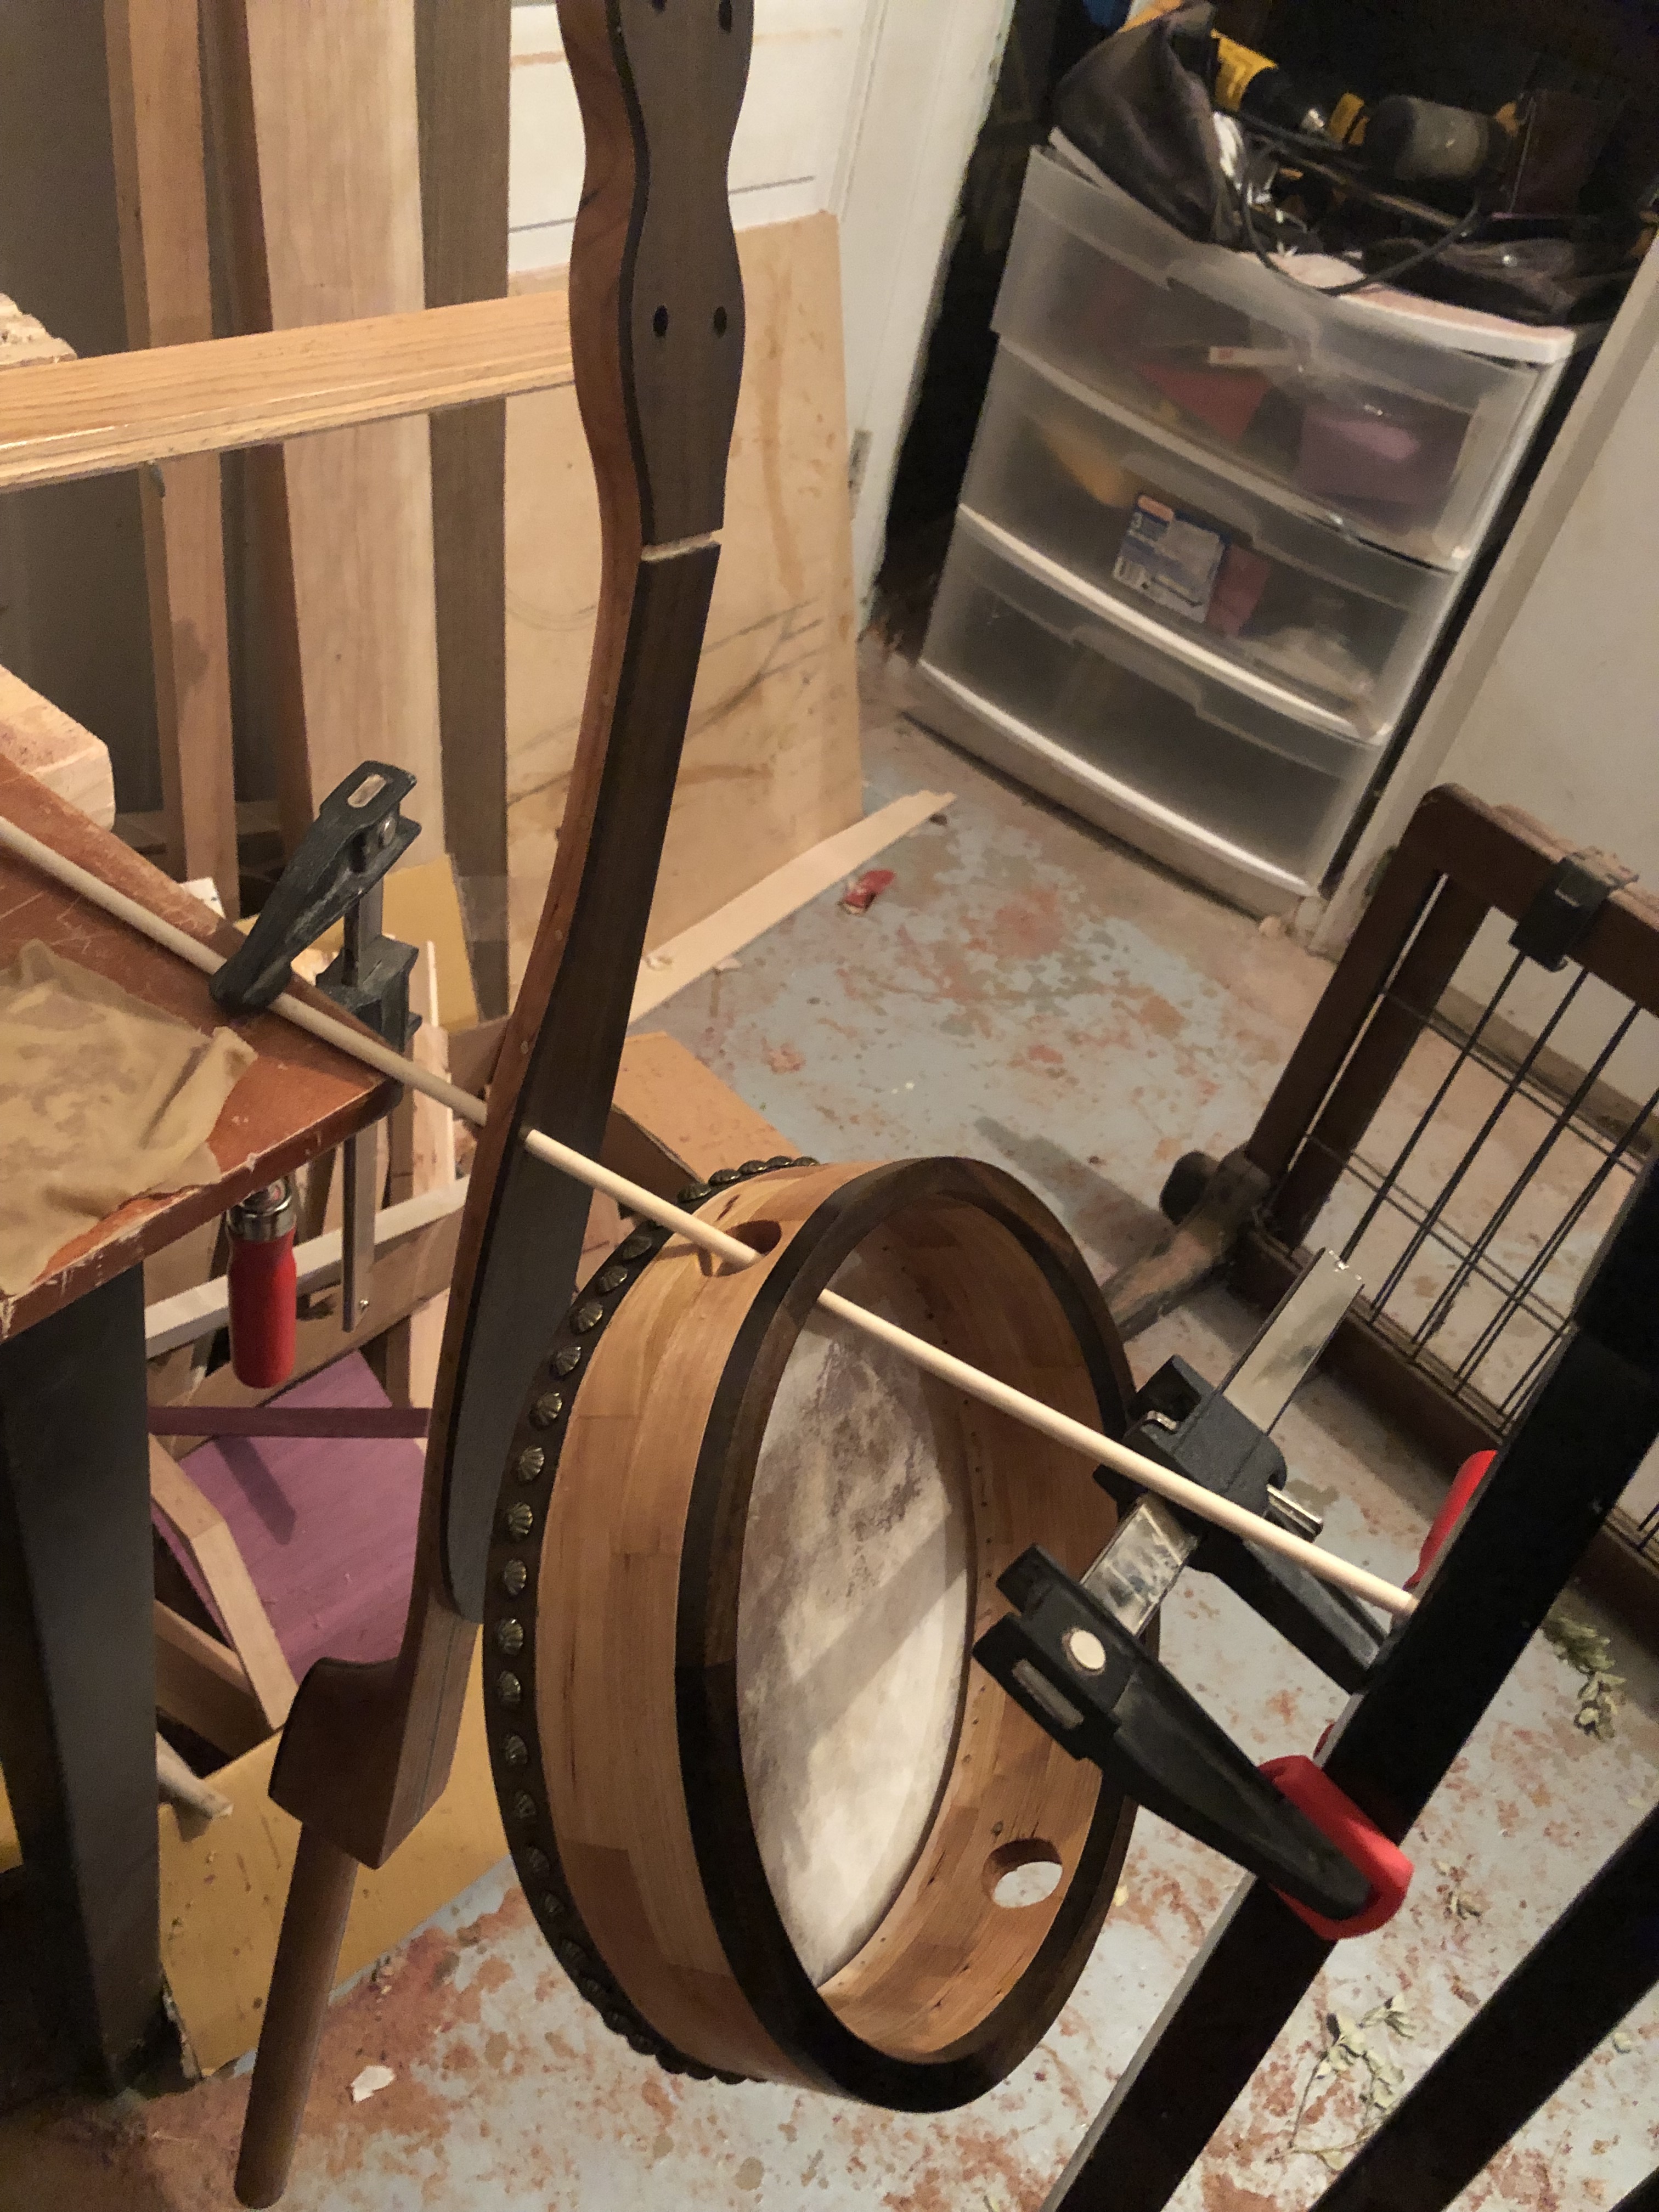
Try and rig a way to dry things that doesn’t involve touching them. I run a dowel through the fifth string hole and the holes in the rim.
Then you can come back to it with a few coats each day. After every three or four, sand it down with 400 grit sand paper. It will build up a little each time. Once it gets to a point that feels good, use 0000 steel wool and apply a final coat. Then use more of the steel wool to put on a coat of Johnson’s floor wax. It smells terrible, so keep it outside. Buff the wax off with a cloth.
Setup
Last few steps! Here’s a drawing for some of the descriptions below.
Installing the tailpiece
Tying on the tailpiece is a matter of trial and error. You’ll cut a loop of fishing line that goes through the two holes on the tailpiece itself and run it around the end of the dowel stick. Tying this knot is a pain, but it works well. Look up fishing knots that tie two lines together for some ideas. This link to a blood knot should do the trick. You’ll have to try a few times before you can get the size of the loop just right. You want the tailpiece to get around the edge of the rim, but if it’s too big, it’ll push your bridge out too far.
One hint: if you run the loop from the back of the tailpiece to the front, the fishing line will hold the tailpiece further from the head. This will help prevent buzzing.
The other side of the tailpiece gets the strings. I find it easiest to tie all of the strings on to the tailpiece first so that you don’t have to fight the tension after you start running the strings through the pegs. I’ve used this bimini twist knot for strings. Again, be patient and be sure to run the string through the tailpiece the same way for each knot.
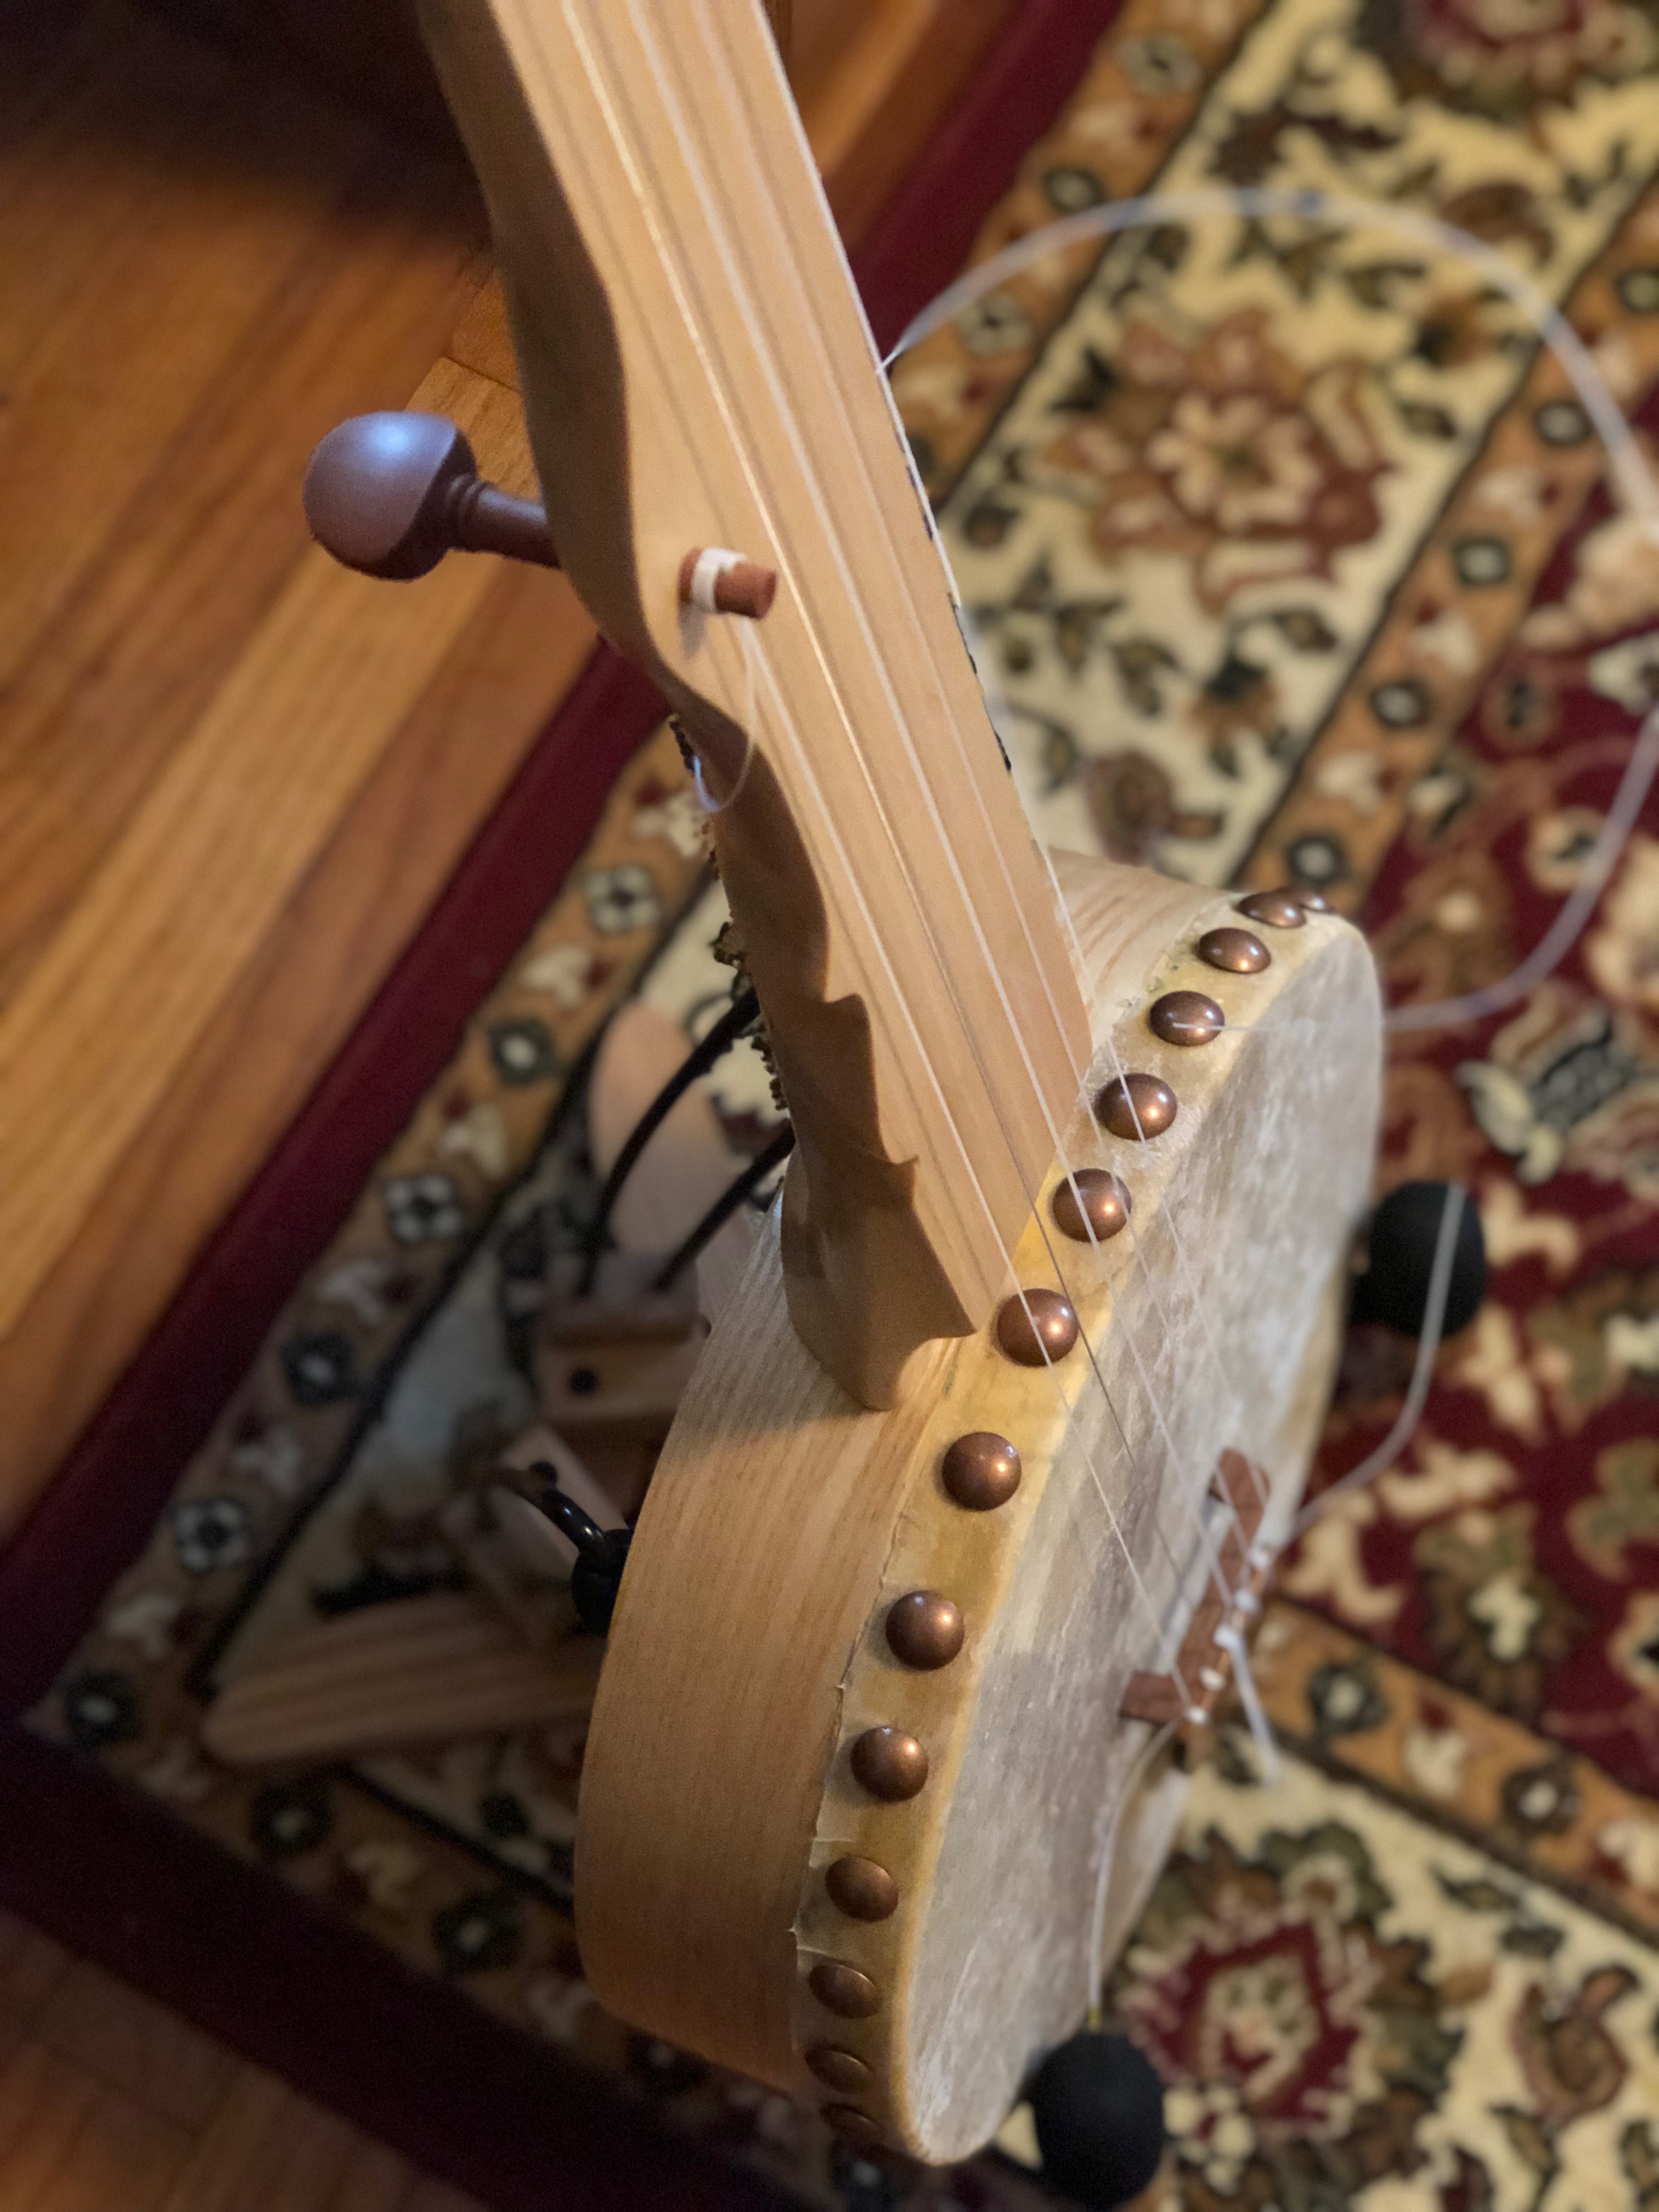
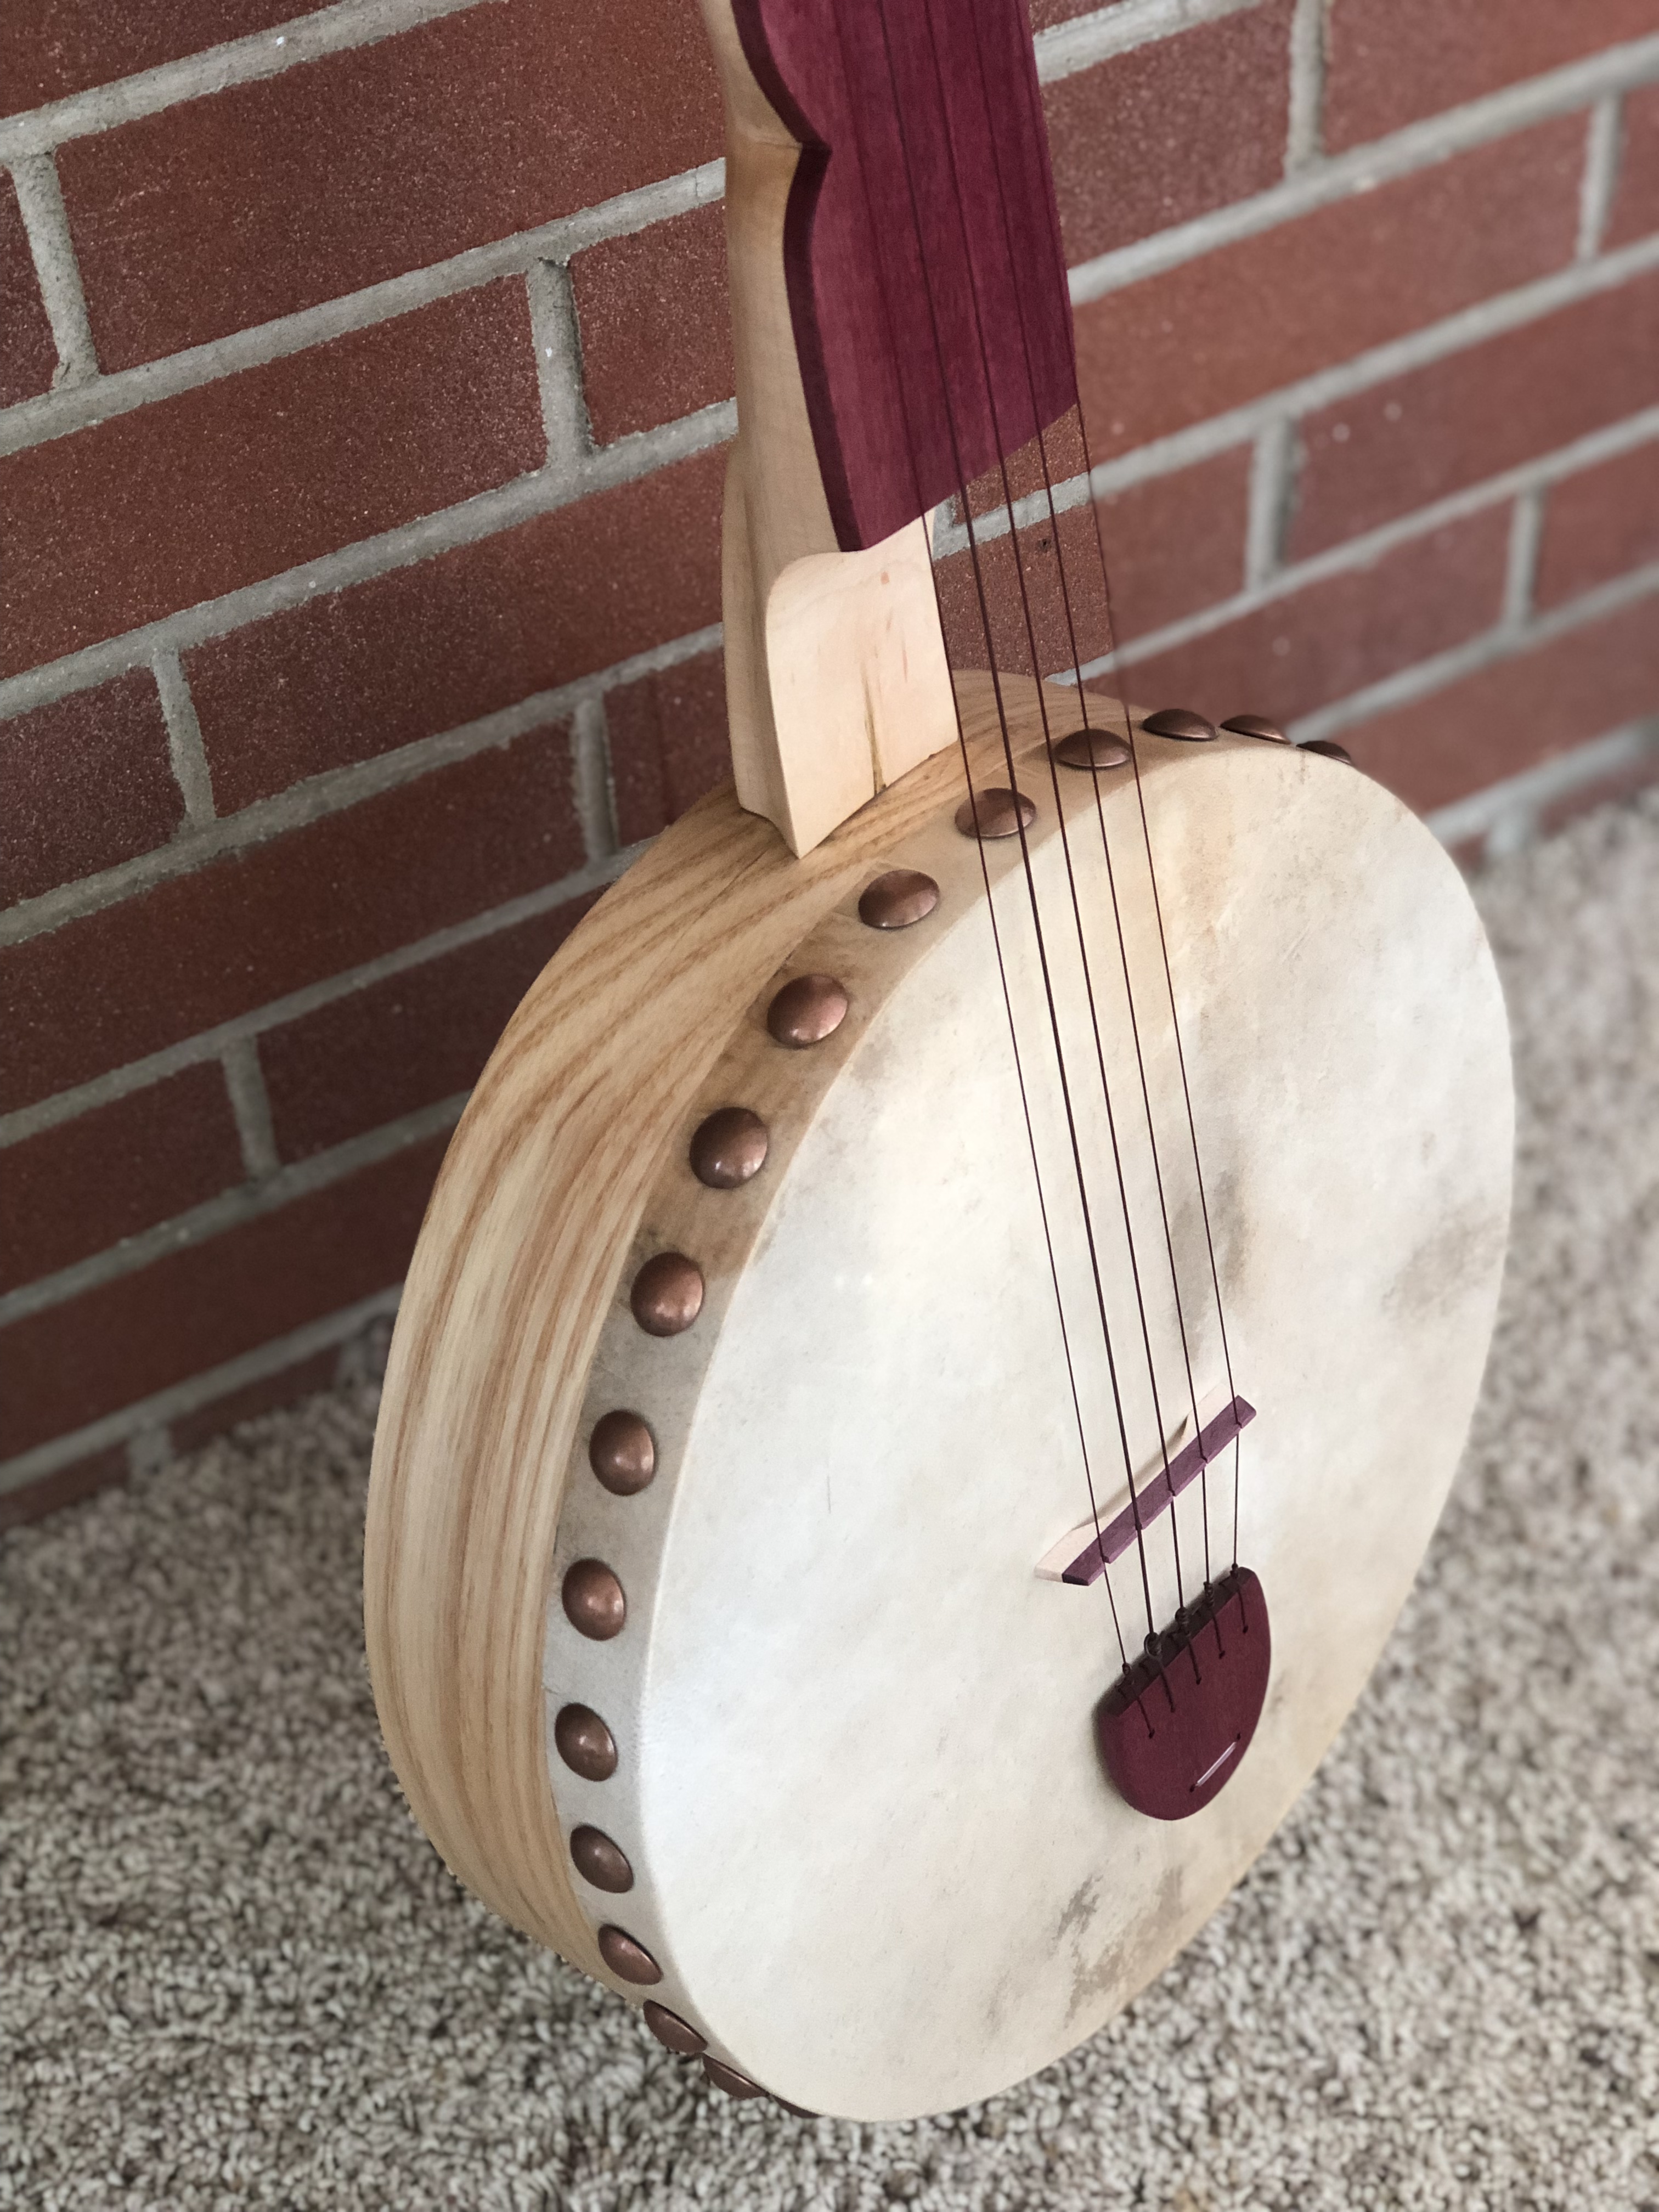
Here’s a photo from way up at the top of the page that shows the tailpiece.
Setting up the strings
If you haven’t drilled new holes in your pegs, now is the time to do it.
Once you string up your banjo, you’ll take a lot of time futzing with the nut and bridge height. This just involves sliding the nut and bridge out, sawing a wider or deeper slot, and sliding it back in to see how it feels. It takes time, but it’s nice to be able to set the string action yourself.
Once you get both where you want them, you can go back to the sander or sand paper to knock off any excess. The slots don’t have to be deep. If they are too shallow or narrow, though, the strings can pop out when you get going.
Retuning over and over
Nylgut strings take forever to stretch, so you’ll spend a week or so retuning over and over. But as you do, you’ll be playing a banjo that you built yourself. Congrats!
If this was helpful, I would love to see what you came up with. Please, don’t hesitate to share photos, stories, comments, or suggestions with me via email or any of the world’s standard social media formats. I have links to my other writing and projects at my home page: cwitulski.com. Thanks for reading!